...it's my favorite time of year, and I'm sick. I had really hoped to do some inspiration looks for you guys, but it was impossible when the eyeliner kept running down my face, and my nose was redder than Rudolph's. I am so sorry. Just for fun, I may do them anyway, after Halloween, in the event anyone wants them for next year, or needs to dress up between now and then. For now, I'm going to go back to blowing my nose.
See you on the flipside (good Lord, I must be sick),
Erin
Wednesday, October 30, 2013
Friday, October 25, 2013
In Case Of (Costume) Emergency: No-Muss, No-Fuss Halloween Ideas
Dear God, we are about to head into the very last weekend before Halloween! How did that happen? I haven't finished my Christmas shopping, yet!
Seriously, though, it may seem like it's too late to put together a fantastic costume for any last-minute parties you may be planning to attend. I assure you...
...yeah, it is. But there's still plenty of time to throw together a half-way decent ensemble. Below, I've come up with four low-to-no cost, practically zero-effort, toss together in no time costume ideas. They're not great, but hey, desperate times and all that. So, without further ado, here are my 2013 suggestions.
1. Melissa McCarthy Elle Cover
This cover has caused a bit of an uproar recently, concerning body issues in Hollywood and in the fashion industry. McCarthy, herself, has defended the photo, and even admitted that she's the one who picked the coat, so I'm all for letting the offense over this photo drop. That said, one thing about this photo is undeniable: she looks freaking hawt. I mean, wowzers! Honestly, between the gorgeous subject, stunning photography, and public drama, this shot could very well become iconic. Plus, it's the easiest Halloween costume since the t-shirt that says, "This IS My Halloween Costume". All you need is smokin' hot makeup, drop earrings, a black dress, heels, your winter coat (or one from the local thrift shop), and a metric ton of hairspray. This costume also gets bonus points for being wearable away from the party, as well.
2. Daryl Dixon from The Walking Dead
I happened to run across this little gem at the Halloween store, and had a minor conniption fit at the $29.99 price tag. I'm sorry, but if you want to dress as Daryl Dixon, you don't need to buy a pre-made costume. Heck, I could put together a feminine version with stuff out of my closet. All you need (male or female) is a brown, green, or white tank top, some old jeans, boots (if you've got them. Dark sneakers would work in a pinch), and, well, a lot of dirt. If you want, you can always mix up a tiny batch of fake blood to smear on your face and body. Now, if you want an ear necklace, you're on your own. (Spirit Halloween does sell one...ew...)
3. Rejected Angel Vessel from Supernatural
This is, by far, the easiest costume. I can't find a decent photo online, but if you're a fan, you know what I'm talking about (and if you're not a fan...A) why not? and B) why would you want a costume from it?). Wear whatever clothing you want. Be comfy. Be cute. Be sexy. Be whatever. It's the makeup that makes this costume. Do your normal makeup, but skip the eyes. Then, use black greasepaint to black-out your eyes, like you would if you were going to put on a superhero mask. Lastly, using either fake blood or, as a last resort, lipstick, add blood dripping from the eyes. Done.
*BONUS: You could add the greasepaint and blood to nostril and mouth areas to go as a fresh walker from this season of The Walking Dead.
4. Ridiculously Photogenic Running Back
This is more for the guys, but ladies can feel free to give it a go. I don't know if you've heard about this viral photo, but it's adorable. A football player for Notre Dame lost his helmet during a recent game, and finished the play before stopping to put it back on. In the short time he was sans chapeau, a photographer snapped this pic that looks like an ad in a catalog. I think it's the little half smile that sends it over the top. Anyway, if you're in a bind and happen to have a football jersey lying around, dab a little greasepaint under the eyes, toussle your hair, and go be your ridiculously photogenic self.
Have a great weekend, guys!
Monday, October 21, 2013
'Ip, 'Ip, 'Ooray!: October Ipsy Unboxing
Dear Lord, this month is flying by. It's ten days until Halloween. That's insane, y'all.
Over the weekend, my October ipsy bag made it in, and I thought I'd share what was sent. For those just joining us, ipsy (formerly myglam) is a monthly beauty sample subscription service. For ten bucks a month (less, if you sign up for multiple months at a time), you'll receive a makeup bag filled with four or five deluxe- to full-sized beauty products to play with, as well as a list of discounts to the participating brands. There's always a theme, and this month's was "The Art of Beauty". I was hoping for a Halloween-y, or at least, Fall-ish theme, but I'm actually surprisingly pleased with this choice.
 |
| No, the stuff isn't floating. I have a glass-top table, and didn't realize how weird that looked until just now. Oops. |

The color is what I would call a classic Christmas green. Emerald is the color of the year, and supposedly a hot hue for Fall, but you could definitely wear this one well into the holiday season. The formula is a little messier than I usually find with Zoya. It's very opaque, but I did notice some streaking, and sort of felt like I had to glob it on. It does look fantastic on, though, and seems resistant to chipping. I'll have to let you know for sure after a few days. Here, I'm wearing it with Deborah Lippman's Happy Birthday glitter on the accent nail. Above is an indoor shot, and below is in natural light.

Terrible manicure; gorgeous color.

Since we're talking about hands, let's move on the hand cream. I'd never heard of this brand, but I simply adore the scent. I got Coconut & Cream, and it smells exactly like coconut custard pie. I mean, exactly. That was one of my grandmother's favorite desserts, and she and I were the only ones in the family who liked it. This lotion stirs up a ton of memories, so for that, I give it two thumbs up. On it's own merits, though, as a hand cream...it's okay. It's about on par with Bath and Body Works, but not anywhere near as hydrating as the Eucerin my husband uses. Then again, this smells a heckuvalot better, so I guess it's a trade-off.
 |
| My camera hates shiny. |
The color is stunning, but the formula can be a deal-breaker for a lot of folks. It's a slightly sticky (stickier than E.L.F. mineral gloss, but nowhere near as sticky as MAC lipglass), super shiny, plumping gloss. There is a definite sting to this gloss when you apply it. It feels kind of like Icy/Hot, where it's ice cold, but still sort of burns. It can be uncomfortable to some people. I don't mind it, but I would recommend trying a sample size before plunking down the cash for a full version. It does earn points with me for smelling like vanilla mint.

Big Sexy Hair has been almost omni-present in ipsy bags, here lately. I've gotten three or four items since I joined in April, and I think that's the most repetition I've had of a brand. I certainly don't mind, because everything I've tried has been wonderful, but I feel like I need to put that out there for those trying to decide on subscribing.
This is hair gel. It looks like hair gel. It smells like hair salon (you know what I'm talking about). You run it through damp hair and blow dry. On paper, this is nothing special. In practice, it's freaking awesome. I've blown my hair dry with all sorts of gels, but this one gave me more volume alone than my other gels and mousses combined. I actually had to figure out how to de-pouf it before I could leave the house. I'm not 100% sold on it, but I'm definitely keeping my eye on this.

And then we have the La Fresh wipes. I just...I just really don't like these. I do like that they're oil-free. I do like that they're mostly natural and good for the environment. I don't like that they burned and didn't remove my makeup. I'm sure there are people out there who love them, and I'd be happy to try something else from this brand. I'm just not digging these wipes in particular. Maybe I can use them for removing swatches, or something like that.

Finally, here's the monthly makeup bag. It's a plain white bag made from an almost-rubberized fabric that I could not identify if my life depended on it. The bag is trimmed with a dark pink zipper, and bears an uncredited quote by Ralph Waldo Emerson. According to ipsy, the bag is mostly bare so that subscribers can add their own designs. It's a cute idea. I'm not going to do it, but I like the reasoning.

In conclusion, I thought this month's offerings hit a home run. Flat-out. For giggles, I'll leave you with a laughably horrible, low-res selfie I snapped a couple of hours after what I'm dubbing "The Volumizing Incident of 2013". By this point, I'd brushed and pinned it into submission, but the bangs were still standing out from my forehead, and the crown was a good inch higher than my scalp. I felt just like one of those poor kids on Toddlers & Tiaras, and I didn't even have to use my teasing comb. Where is my teasing comb, anyway? Huh...I probably need to find that...
Friday, October 18, 2013
Should It "Stick" Around?: Maybelline Fit Me Shine-Free Foundation Review
The other day, I ran across the new(ish) Maybelline Fit Me Shine-Free foundation stick that everyone's been talking about. I had a coupon that made the price around $6, so I decided to give it a try. After all, it is Fall, and I'm not sure how well bold lipstick goes with BB Cream. It seemed time to amp up the foundation.
Short version: I freaking love this stuff. It's awesome. It's not perfect, but I'm digging it.
Long version: (buckle up, buttercup)
I have tested this product out thoroughly. I've worn it with a silicone primer, with a serum-like primer, with no primer and a setting spray, and all by its little lonesome, and there is no difference in performance. It is what it is, just FYI.
The product comes in a stick form that twists up. It's larger than a concealer stick, but still very compact and travel-friendly. The product, itself, is a cylinder of foundation with a powder core, which is supposed to help keep your makeup looking matte. It's not matte. I'd classify it more as a natural finish, bordering on slightly dewy. It looks like skin, which I happen to love, but I could see where someone purchasing this for a completely matte look would be less than thrilled.
Now it's time for the brave no-makeup "before" shot:
And here's the after, with (thank God) finished makeup:

I am really impressed with this. It's medium coverage, so it evens out my skin to the point that I don't have to use a ton of concealer, but doesn't look cakey or overdone. Basically, it's sort of like a step up from the BB Cream I normally use, and perfect for everyday. I just swiped it across my cheeks, nose, chin, and forehead, and blended in with a Real Techniques Expert Face Brush. Fingers would probably work well, too. I'm just partial to brushes.
As I stated earlier, this really isn't a matte finish. I find that, on its own, it has almost a glowy finish, and does need to be set with a powder to keep from sliding all over the place. Once it has set, the foundation has more of a natural finish. The staying power is pretty good. I do need to top off my powder a couple of times throughout the day, but I haven't noticed any bare spots or patchiness. There also doesn't appear to be any oxidation over the course of wear, and the shade matches my skin tone perfectly. I could only guess at the store, and 120 is dead on the money for my NW15 complexion. Honestly, I don't remember the last time a foundation matched me this well. My Urban Decay Naked Skin in 2.0 is super-duper close, but...I mean, this is spot-on, can't tell there's anything there, exact.

Folks, I'm going to level with you: this is my favorite foundation right now. I haven't even considered reaching my BB Cream, MAC, or UD since I started using this last week. In fact, I almost moved my other foundations from the countertop organizer to my train case, the other day. The case is in my closet, and filled with out-of-season and rarely used items--a dungeon for makeup. I'd give you a pro/con list on this, but I really can't complain about anything. It covers the perfect amount for everyday, wears well, doesn't smell bad (or at all), doesn't break me out, travels easily, matches my skin, applies nicely, and is ridiculously cheap. I guess, if I had to find something wrong, it could stand to have some SPF, but the absence just means that it won't flash back in photos. I would also have to deduct points for not holding up to the claim of staying shine-free, even though I personally adore the finish.
This is a definite winner, and has earned a place of honor in my organizer. If you're in the market for a new foundation and have six bucks to play with, I highly recommend giving this a shot.
Final Verdict: 9.5 out of 10. If you want matte-matte, keep looking. Aside from that, this is fabulous.
Short version: I freaking love this stuff. It's awesome. It's not perfect, but I'm digging it.
Long version: (buckle up, buttercup)
I have tested this product out thoroughly. I've worn it with a silicone primer, with a serum-like primer, with no primer and a setting spray, and all by its little lonesome, and there is no difference in performance. It is what it is, just FYI.
The product comes in a stick form that twists up. It's larger than a concealer stick, but still very compact and travel-friendly. The product, itself, is a cylinder of foundation with a powder core, which is supposed to help keep your makeup looking matte. It's not matte. I'd classify it more as a natural finish, bordering on slightly dewy. It looks like skin, which I happen to love, but I could see where someone purchasing this for a completely matte look would be less than thrilled.
Now it's time for the brave no-makeup "before" shot:
 |
| Oh, lovely. I don't remember if I even had on moisturizer here. Hide the kiddies so this doesn't give them nightmares. |

I am really impressed with this. It's medium coverage, so it evens out my skin to the point that I don't have to use a ton of concealer, but doesn't look cakey or overdone. Basically, it's sort of like a step up from the BB Cream I normally use, and perfect for everyday. I just swiped it across my cheeks, nose, chin, and forehead, and blended in with a Real Techniques Expert Face Brush. Fingers would probably work well, too. I'm just partial to brushes.
As I stated earlier, this really isn't a matte finish. I find that, on its own, it has almost a glowy finish, and does need to be set with a powder to keep from sliding all over the place. Once it has set, the foundation has more of a natural finish. The staying power is pretty good. I do need to top off my powder a couple of times throughout the day, but I haven't noticed any bare spots or patchiness. There also doesn't appear to be any oxidation over the course of wear, and the shade matches my skin tone perfectly. I could only guess at the store, and 120 is dead on the money for my NW15 complexion. Honestly, I don't remember the last time a foundation matched me this well. My Urban Decay Naked Skin in 2.0 is super-duper close, but...I mean, this is spot-on, can't tell there's anything there, exact.

Folks, I'm going to level with you: this is my favorite foundation right now. I haven't even considered reaching my BB Cream, MAC, or UD since I started using this last week. In fact, I almost moved my other foundations from the countertop organizer to my train case, the other day. The case is in my closet, and filled with out-of-season and rarely used items--a dungeon for makeup. I'd give you a pro/con list on this, but I really can't complain about anything. It covers the perfect amount for everyday, wears well, doesn't smell bad (or at all), doesn't break me out, travels easily, matches my skin, applies nicely, and is ridiculously cheap. I guess, if I had to find something wrong, it could stand to have some SPF, but the absence just means that it won't flash back in photos. I would also have to deduct points for not holding up to the claim of staying shine-free, even though I personally adore the finish.
This is a definite winner, and has earned a place of honor in my organizer. If you're in the market for a new foundation and have six bucks to play with, I highly recommend giving this a shot.
Final Verdict: 9.5 out of 10. If you want matte-matte, keep looking. Aside from that, this is fabulous.
Thursday, October 17, 2013
A Brief Interlude: Rant and Random Observations
I'm actually working on a "real" post right now, but thought I'd stop in for a sec for a mini-rant and some random observations.
*Begin rant...now
Why, in the name of all that is holy, is Halloween already being clearanced out?!?! Today is the 17th. That's...one, two, three...14 days before the actual holiday, and it was already on clearance over the weekend, so really...19 days before the actual holiday. The pop-up Spirit store didn't open until September, and nothing made it to Target or Walmart's shelves until the very, very, very end of the month (and even then it was only a few items). Christmas trees, on the other hand, have been on the floors for two weeks.
In addition to Halloween items barely being in stores, the selection has been godawful. I had to go to three stores before I found glow-in-the-dark nail polish, and then it was overpriced. In the past, I've found throw pillows, baking supplies, nice table linens, welcome mats--you know, decent decorating items--but this year, the best I could find was a clearanced out centerpiece at Michael's, left over from last year. I know that I've already ranted and raved over the lack of costumes in stores, so I won't go into that again, except to say this: my little brother needed a Batman mask for Homecoming Week at his school, and I told my Mom I'd pick it up for her. I eventually ended up in the toy department at Target, because I couldn't find one anywhere else. Let me say that again: I ended up in the toy department. Not the Halloween aisle. The toy department. That's just sad, folks.
Normally, I try to do a Halloween post per day in October. It's something that I really look forward to, but this year, I really don't have anything to write about. According to the merchants, Halloween is over, and it wasn't really worth dealing with, anyway. There aren't any awesome new costumes out this year, unless you count Sexy Captain America. I'm going to be a Despicable Me minion, but that doesn't require special makeup or hair. There was a great Toy Story Halloween special on last night, but aside from that, there's been very little holiday-specific programming. I'm just...I'm just disappointed.
I'm still going to try to post some Halloween-related things around here, but it's not going to be everyday. The post I'm working on now is a product review. I am going to attempt a makeup tutorial, but really have no idea what it'll be. Maybe a sugar skull? Thomas wanted me to do that last year, but I chickened out. Anyway, I should probably wrap this up. After all, there are only 68 days till Christmas, and I haven't even started shopping.
*End of rant.
Recently, I've learned and/or noticed some things that I thought I'd share with you.
If you cross my puppy, he will b**ch-slap you. Pardon the language, but I really don't know how else to describe it.
College kids look like babies. When did that happen?
Phone chargers work really well when you remember to plug them into both the wall and your phone.
I don't care how uncool or inauthentic it may be, I really like Olive Garden, and I could go for some fettuccine alfredo right now.
Equate Weight Loss Shakes may taste like Slim-Fast, but they are nowhere near as effective at controlling hunger.
I think I figured out why I'm craving Olive Garden.
All day long, I've had both Time Warp and Seasons Of Love stuck in my head. They keep alternating, so now, apparently, there are 525,600 ways to jump to the left and take a step to the right.
That's it for the randomness. Have a great day, and I'll be back with an honest-to-God post soon. Thanks!
Tuesday, October 15, 2013
Wigging Out: How To Make Your Halloween Costume Wig Look Less Terrible
With Halloween rapidly approaching (and Christmas rapidly attacking, but don't get me started on that. We'll save that for another rant.), I'm sure at least a few of you are planning costumes, and that some of those costumes are going to need wigs...
...and that Halloween wigs suck.
I'm sorry, but they do. I'd imagine it has a lot to do with the fact that they're shoved in flat plastic bags (and that they tend to be poorly made to begin with...), but they never look anywhere remotely close to what's pictured on the model. Of course, when the price is low, I'm not going to expect too much, and I'm certainly not going to complain. The higher-priced ones irk me, but, again, that's another rant for another time.
Anyhoo, the point of this post is to give you some tips on styling your own cruddy party-store wig into something you'd actually be okay instagramming at a party. These are not "pro tips", but are some things you can do without having to buy (too much) special equipment. Heck, I'm not an expert. I wouldn't even know where to begin styling a high-quality wig. I have, on the other hand, had plenty of experience dealing with cheap synthetics.
So, a few weeks back, Thomas and I filmed a short about goofy supervillains. One of our actresses was supposed to be very glamorous in a retro-sixties way, and while she's gorgeous, I had no idea what I was going to do with her hair. It's absolutely lovely--don't get me wrong, this girl is stunning--but Thomas wanted a very specific look that would require extensions and pieces and about an hour longer than I had. I lost sleep over this, guys. Then, the heavens opened and the angels sang, and this appeared in the Halloween aisle at Target:

Yeah...it sucks. But it was eight bucks, and I could take as long as I needed to style it. You know, as long as "as long as I needed" was less than about 14 hours. I didn't find it until the day before the shoot.
To start, I pulled the wig out of the bag and surveyed the damage. It was...rough. I tried it on, and the bangs were completely uneven and reached my chin, with longer strands dangling lower. The waves and curls were practically non-existent, and what was there was scraggly. That said, the construction of the wig wasn't terrible. The layers were ugly, but they were even, and the color was beautiful. This was definitely a workable situation. I grabbed a hairbrush and started trying to unsnarl the knots.
Now, they do make wig combs for styling, but on a cheapie wig like this, I don't see the point in spending the extra money. I used a regular brush on my hair pieces for theatre, and those were worn and re-styled a lot. I never had any trouble with them, other than some shedding. As it was, this wig came out of the bag shedding. I worked in sections from the bottom up, brushed gently, and did not try to brush directly from root to end. Sure, I did end up with a tribble's worth of fake red hair in my brush in the end, but the hair didn't come out in clumps, or anything like that. In other words, use your own judgement. If you'd feel better using the pro brush, go for it. I just, personally, didn't see a need.
Once the knots were untangled, I set to work styling. First, I grabbed a wig head (mine was from Hobby Lobby, and I think around $10) and pinned the wig in place using big straight pins with colorful ball tips. I wanted to be able to find them easily when time came to put the wig on the actress. Then, I just started styling the hair as if on a real person.
The thing to remember is that this is not real hair. Synthetic hair is plastic and rather thick. It'll hold its shape pretty well without gel or mousse, or anything like that. Also curling irons and hot rollers (and heat implements, in general) will melt the strands. You can tease the hair to a certain extent, and you can roll it by misting sections with water, rolling on foam curlers, and allowing to dry. You can pin it, you can braid it, you can manipulate it into whatever style you choose, just don't use heat or products. Here's a picture of mine on the stand, rollers still in place:
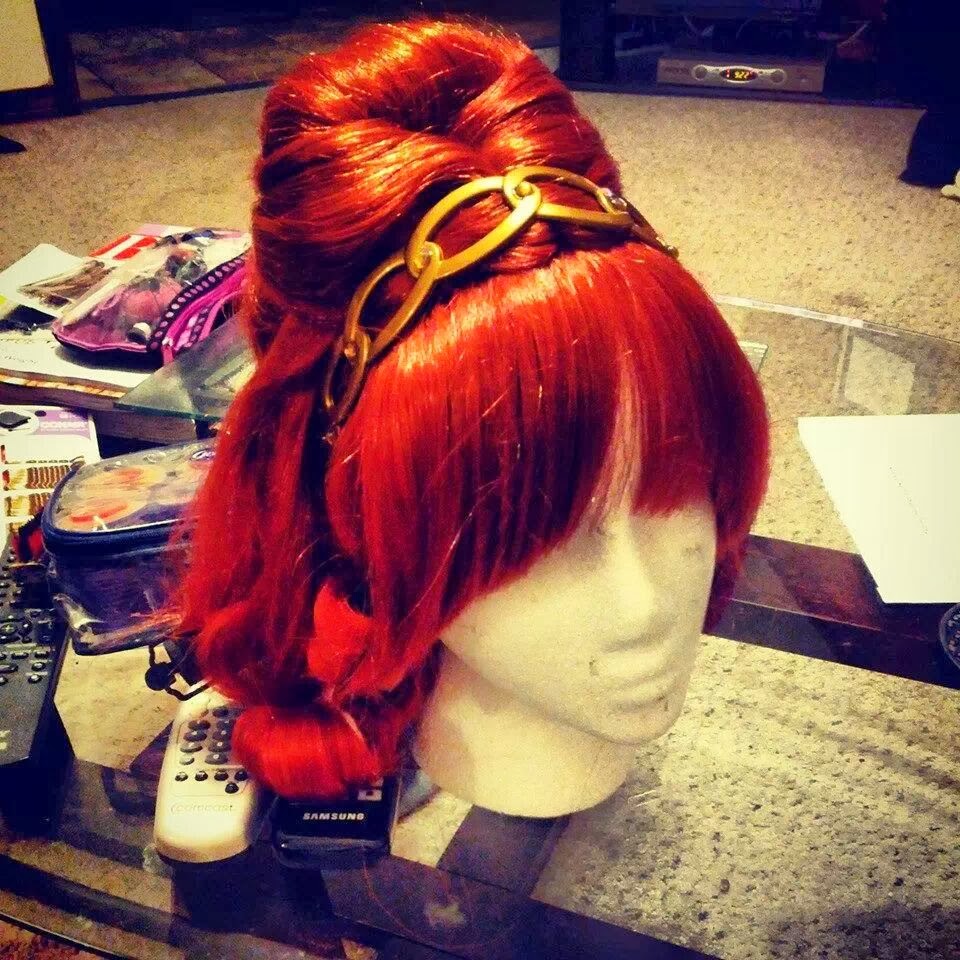
For this look, I kept the existing middle part and divided three sections off of it. These were clipped out of the way while I teased the crown into a bouffant. I wrapped the middle divided section over the teased portion and pinned the ends under to create the pouf. Then, I pinned the front sections around that, hiding all pins as I went. The ends were misted with water, then twisted and rolled on satin-covered foam rollers (from Sally Beauty Supply) to create waves, and then the bangs were trimmed to a more reasonable length, with the intention of finishing the trim once the wig was on the actress (and we all know about good intentions...). I added the headband the actress would wear to make sure the placement was about what I wanted.
As luck would have it, I wasn't even in the same building as the actress when the wig went on, and wasn't able to even see it in place until shooting had already started and it was too late to trim the bangs any further. Here is a really lousy, heavily cropped, way too dark shot of the actress wearing the wig:

Why yes, that is a clown on her left and a gorilla on her right. Why do you ask?
And here's the promo photo from the short. They're channeling The Breakfast Club. I think the wig looks particularly nice here:

Should anyone else need to wear this, I can wash it. I would have to be very careful with the pouf, since I really don't want to have to do that again, and it would definitely have to be re-curled, but washing these kinds of wigs is not a problem. Just use cool water and a very mild soap, like baby shampoo. Again, there are special wig shampoos out there, and you can use those if you want, of course, but the baby shampoo will work just as well, and it's a little more readily available.
So, in conclusion, here are the basic tips again:
- If you use a regular hairbrush, start at the ends and work your way up. Avoid putting any stress on the roots. You can also use a professional wig comb, available at Sally Beauty and any number of online retailers for fairly cheap.
- Do not use hair products. A little finishing hairspray is okay, but nothing else is necessary. It'll hold on its own.
- DO NOT USE HEAT! EVER! THE HAIR WILL MELT!
- Curl the wig by misting with water and rolling on foam curlers. Allow to air dry.
- You can cut the wig, if necessary.
- You can wash the wig with cool water and baby shampoo. Allow to air-dry, then re-style.
I hope this helped! Have a great Halloween, and be sure to share any cool wig pics in the comments.
Monday, October 14, 2013
Behind the Screams: Universal Orlando Halloween Horror Nights Part II
***This is part two of my overview and review of Universal Studios Orlando's Halloween Horror Nights. It's stated throughout the post, but there are spoilers for the houses, as well as for the movies The Cabin In the Woods and An American Werewolf In London.
Because I'm a wuss and can't go through the haunted houses without crying, but am also extremely interested in set and prop design, Thomas and I opted to go on the Behind the Screams tour. This is a lights-on, actor-free, in-depth guided tour of three of the haunted houses. It takes slightly over two hours, and I highly recommend it if you have any interest in theatrical set design--for movie or stage. The production values are astonishing, and they encourage picture taking.
It's also still really creepy, at times.
***WARNING! The pictures you are about to see are some of the least graphic in nature that I was able to take. They still contain some images that may too violent or off-putting for some. If you have a problem with gore or monsters, or if you are planning to go to HHN and don't want to be spoiled on three out of eight houses, STOP READING NOW***
Before the tour, we checked in at the VIP office (fancy) and got our lanyards that denoted we were on the tour. They were the same limited edition lanyards being hawked outside the gates, and a nice touch. We then waited in a gorgeous conference area with the cleanest, most opulent ladies' room I've ever seen. For some of you, that might not mean much, but when you've been stuck using theme park, fast-food joint, and gas station restrooms for several days, it's a god-send.
Once everyone was present and accounted for, we were split into our groups (there were three going at the same time, with each starting at a different house) and headed for the first house. Ours was the La Llorona tent (yes, tent, but you'd never know once inside), patterned partially after the house of the same name at last year's Hollywood Halloween Horror Nights.
Now, if I'm going to be totally honest, I have to point out that I really didn't want to go in this house. I also hated pretty much every second of being in there. See, I hate the urban legend. HATE the legend. If you don't know it, it's a Spanish tale about a beautiful young widow who falls in love with a handsome young nobleman. Unfortunately, while he's taken with her, he's not a fan of kids, and she has two from her previous marriage. So, she drowns them in the river. Seriously. As our tour guide (who felt the same way I did, I guess) sarcastically put it, "Nothing says fun like dead babies." Obviously, this doesn't go over well with the nobleman, and the woman poetically drowns herself in the same river. Depending on which variation of the story is being told, she also could have been murdered by a lynch mob. It was horrific, and involved a horse, and that's all I'm saying. Anyhoo, once she's died, she ascends to Heaven where she is promptly turned away, with the caveat that she can come in once she's found her children. Now, La Llorona (the weeping woman) wanders the Earth searching for her children, and because she doesn't remember what they looked like, she'll take anyone.
I'm a softie. I love kids, and can't bear to even think of anything like this happening, even in a fictional sense, so I spent most of this house staring at the architecture, which was gorgeous. Stunning. Unbelievable, especially considering this was a tent. They built a Spanish villa, complete with river running through it. There are water effects galore. It's a beauty of a house, and I could only bring myself to take one picture.

This is the outside. It's lovely. Inside, the highlights would be the river, the pepper's ghost effects, and some super cool "Weeping Angel"-ish statues that come to life. You'll walk past several alcoves with real statues, and then past alcoves with actors dressed identically, stonework and all. It's a really neat effect, and brilliant in its simplicity.
Next up, The Cabin In the Woods. If you haven't seen this movie, drop everything and watch it now! There be spoilers ahead!! Seriously. I'll wait.
(Elevator music...shuffling of feet...awkward looking around the room...)
All done? Good. Hope you enjoyed it.
This one begins by queueing through the facility, and then trekking through a (small) forest to the cabin. Supposedly, you're maintenance for the facility and they need you to fix some equipment. When you get to the cabin, Jules has already been decapitated and is slumped against a tree. Inside, the level of detail is remarkable. The interior matches the movie to a tee, right down to the keg, Solo cups, and chip wrappers in the kitchen. Fun fact: stupid people at the event have been trying to steal things from the houses (and have succeeded), so everything is bolted down, and quite a few objects have been coated in Vaseline. Yum...

And yes, the "moose" is on the wall. No, I did not make out with it. (That would be frowned upon.)
You then make your way through the bedroom with the horrifying painting and two-way mirror, and down into the basement, where you see all of the totems that the kids could choose from. Again, I can't express the level of detail involved here.


Everything you remember from the movie, plus about a hundred other things that you would never see going through the event, but would certainly miss if they weren't there.
The basement leads to the black room, where you find torture devices, and also where the Buckner boys can reach at you from above. This leads back in to the facility, and into a ton of gore. I mean, a ton. The blood-filled elevator room, the dismembered Buckners, the Merman munching on Hadley; it's all exceptionally well-done, and again, the little things like coffee cups in the breakroom cabinets and fun signage throughout the hallways really sell that this is happening. One fun Easter egg to look for is the wipeboard. It's a spot-on replica.

Yeah, that is a Merman's tail. Yes, it is gross, and yes, it is hilarious.
The final house we toured was An American Werewolf In London. Again, if you haven't seen the movie (first of all, you should. It's amazing), go watch it and then come back. Spoilers, dead ahead!!
Back? Got Van Morrison's Moondance stuck in your head? I know I do. Alright! Moving on!
You enter this house through the Slaughtered Lamb pub, and it's just like being there. The pentagram is on the wall, the tables and coats are all as they should be, and there's even an errant dart in the wall, from where the guy who never misses missed. From there, you move into a cemetery (which isn't in the movie, but why not?) where hidden among the headstones you'll see markers for the Jaws and King Kong rides. Cute.
Now is when the house gets really impressive. Past the cemetery, you see Jack and David in the process of being mauled by a very large, very realistic, fully animated, mechanical werewolf. And it. is. gorgeous. The wolves (and there are several) were constructed by the same puppeteer who handles the work for Cirque du Soleil, and also worked on The Lion King stage show. And I can not remember his name to save my life. I'm sorry.
You'll travel through David's fever dreams, set in the hospital and his own home. The hospital set doesn't seem uber-detailed, but there are little touches that show how much thought went into this set. A copy of A Connecticutt Yankee In King Arthur's Court lies on a nightstand; an apple on a tray is missing a bite. Again, it's the little things. The house set holds far more items, and many sent me right back into my 80s childhood. We had the same videotape organizer that appears on a shelf. The carpet is exactly the same as what was in my house--that sort of thing. There was far too much to take it all in.
Down the hallway is Nurse Price's apartment, and David's transformation scene.

Just look at all of that detail! The half-read Twain novel, the Mickey Mouse that zombie-Jack plays with, and who else had that TV? I used to hook my Atari up to one just like that at my grandparents' house.
Now, you may be looking at this, thinking, "um...that werewolf-in-process doesn't have a head?" Well, yes and no. That werewolf doesn't have a head, but the actor who plays the werewolf does. He sits underneath the floor, with his head and arms sticking out. Then he can flail around and scream and all that jazz, without having to be pretty much naked and body-painted.
From here, you enter the Underground where David makes his first kill. This place looks amazing. I've been in the London Underground, and this is just like it, only more cramped. A lot more cramped. I couldn't take any pictures because I was jammed in between people like a sardine cramped. There's a wolf in here, and it'll scare the bejeezus out of you. Even with the lights on, it's frightening.
Next comes the movie theatre where David meets all of his victims and discusses his situation with Jack. With the lights on, it's just a big screen with a lot of theatre seats and mannequins. During the event, however, the actual adult film (enlarged to the point of obscurity, thankfully) plays, and live actors are mixed in among the dummies. There's also another werewolf at the exit, gnawing on the bones of an usher--the same usher who served as the icon for HHN a few years back.
When you leave the theatre, you enter Picadilly Square, complete with double decker bus, theatre marquee, and a great big blue box that may or may not be a replica of one used by a property that Universal does not own.


We were our guide's first tour that recognized the TARDIS. True story.
Once you leave the Square, you find yourself in the alley for David's final showdown with the police. It's also the best place to get a shot of the wolf.

Holy Mother of Pearl, that is fantastic! Story goes, the studios have wanted to do this house for several years, but never could get the go ahead from John Landis, the creator of AAWIL. He didn't understand how his movie could translate to a haunted house attraction. Eventually, they got him out to HHN, and he saw the craftsmanship and care that goes into building these houses and gave his blessing. I think they did it justice.
I wish I had better photos for you guys, but the houses were still quite dark with tiny spaces to walk through (for the most part). These were the photos that turned out the best, had the least amount of blood and guts (this is a family-friendly blog, after all), and--most importantly--didn't show anyone outside of the tour guide. Those folks didn't give me permission to post their photos on the interwebs, and I respect their privacy. I'd be less than thrilled if anyone posted video of me freaking out during the walker swarm.
Final little Easter egg: each house has a raven in it somewhere. This house technically has two. If you know where they are, leave a note in the comments. Thanks!
Friday, October 11, 2013
Walking With the Dead: Universal Orlando Halloween Horror Nights!
*Editor's Note: This is part one of a two-part post. Here is the overview and review. The next post will have all of the pretty pictures.
I know, I know. It's a third of the way through October, and I haven't started my Halloween posts (for reals, anyway). I have a good excuse! I've been out of town at Universal Studios Orlando's Halloween Horror Nights. Then, when I got back to town, I realized how loved and needed I am at work, and have been swamped trying to play catch-up. Anyhoo, I thought I'd give you lovelies a rundown of the event, and maybe even share some pics of the behind-the-scenes tour Thomas and I took.
***WARNING! If you are planning to go to HHN and don't want to be spoiled, STOP READING NOW!***
Alrighty, now that's out of the way, let's have some fun!
So...I'm a wimp. I didn't sleep for three nights after watching The Woman In Black, and the bride on The Haunted Mansion ride gives me the heebie jeebies. I am a grade-A, number-one, yellow-bellied, scaredy-cat wuss. Our trip to Halloween Horror Nights actually came about, oddly enough, because I'm too chicken to go to Halloween Horror Nights. Really.
See, for the past few years, Thomas and I have trekked down to Orlando for Mickey's Not So Scary Halloween Party. It's sweet. There's trick-or-treating. Small children come dressed as dwarves, Muppets, and KISS (seriously. I love those parents). The scariest thing in the park is the Headless Horseman, and last year he fell off his horse. This is my kind of Halloween, and it also happens to be more Thomas's speed. He's not really into the hard scares, either.
Again, I know, I know. Cue the record scratch. This is probably disappointing to a lot of folks, considering we make movies like Night of the Krampus. We can dish out the scares, but we can't take 'em. I'm sorry.
Anyway, every year, we go to the Disney party at night, and hit the Universal parks during the day. And every year, we find ourselves spending those days wandering amidst the un-hideable decorations, awestruck at the design and production values. And every year, we contemplate sucking it up and getting passes for the event. And every year, we chicken out.
It's the haunted houses, man. I just can't do haunted houses. Being confined in a dark space, smack in the middle of a crowd, with scary-looking people (or even normal-looking people, if we're being totally honest) jumping out and screaming at me tends to send me crying toward the nearest exit. Panic attacks ensue. It's less than fun, and the thought of spending a lot of money to not have fun doesn't appeal to me. I just want to see the pretty (creepy) decorations!
So, wonderful man that he is, Thomas did some research and found out that the park hosts Behind the Screams tours. These are lights-on, actor-free, guided tours of the haunted houses. You get to see all of the artistry that goes into the houses without getting the you-know-what frightened out of you. We signed up for an afternoon tour of An American Werewolf in London, The Cabin In the Woods, and La Llorona (morning tours visited three differing houses) the day they became available.
And then insanity set in.
After all, if we were going to see the houses, then it seemed a shame to miss out on the rest of the decorations. Plus, there was a Bill & Ted show and a tribute to Rocky Horror (which I detest, but it was a live musical performance, so I had to go). We could suck it up. We could just stay out of the houses and ride some rides and see some shows, right? It'll be fun!
Oy, vey...
I have no pictures of the actual event. I was too busy trying to avoid The Walking Dead walkers that had taken over the park, and really, it was just too dark. We did walk through most of the "Scare Zones" while it was still light out, just to see what was there, and kind of test out how well we thought we'd handle them at night.
We avoided those suckers like the plague.
I still got swarmed by about a dozen zombies.
Thomas still regrets not having the video camera rolling.
If you're planning to go this year, here's a lily-livered rundown of what's what:
Scare Zones
Atlanta: This takes place on New York Street. It's supposed to smell of death, but I only smelled concessions, so I guess that'll depend on how you feel about the park's food offerings. There are a number of walkers to contend with, but there's also a tank (!!) and some pretty cool theatrics, with ordinary people being turned into zombies.
The Farm: Herschel's barn is ablaze! Supposedly, if you walk through the barn you'll see a bunch of walkers, including the infamous "well walker". I wouldn't know... I did get into a stare-down with the cutest little "scareactor" walker, though. It was still daylight, so I didn't scream or throw-up on her, and her makeup looked amazing.
The Woodlands: This is another that we took in during the day. Michonne's zombie buddies hang out in there and look pretty cool. There's also supposed to be a deer walker, but he was off, so I only saw the deer. The "bicycle girl" zombie is also on display...just not while we were there.
Camp: The RV and some tents are set up in a very small area that feels like walker central. At night, projections on the tents make it look like zombies are eating the campers inside. You really can't avoid this zone, either. It's the only unavoidable zone, though, and it is very small.
The Highway: Yeah...we just flat-out skipped this one. From what I could see, abandoned cars and a school bus are around the Disaster attraction. We had no reason to go down that way, and no desire to get attacked.
The Van: This is a roving scare zone. It's a van full of walkers that, more or less, randomly appears, lets loose its cargo, and then gathers them all back and moves on. It's terrifying.
Clear: Technically, this one has the fewest walkers, and those are impaled on scaffolding and easy to spot. The entire street (over by Terminator) has grafitti projections to match the ones in the episode that the zone was based on. The only time that it really becomes frightening is when the *&$#@ van comes through and dumps a ton of walkers and they decide you look nice and weak and swarm you, causing you to scream and your husband to laugh and try to lure more over. *ahem* The walkers are effective.
*Word of warning: As the night wears on, and guests become tired and/or drunk, it becomes more and more difficult to tell guest from walker. Just sayin'...
Shows
Bill & Ted: In a word: Excellent!!! This is a rip-roaring, high-energy, ridiculously funny, musical treat. Nothing in pop culture is sacred. This is PG-13, however, and definitely raunchy. Someone brought a small child who was seated next to me, and I felt more than a little awkward at moments, so bear that in mind if you have kiddos.
Rocky Horror Picture Show Tribute: Meh. The performances are fantastic, but if you're not a die-hard fan, you can probably skip this. Several people walked out of the performance I caught. Also: You will get wet. If you are a fan, you're going to love it. Gorgeous costumes, wonderful singers, and lots of audience interaction.
Concessions
Drinks: We ate at the Simpson's food court, so I can't rate the event fare, but I did order a drink in a souvenier glass from one of the bar carts. The glass is heavy plastic with a light-up element in the bottom, and worth the ten bucks I paid for it, including the drink. I ordered a mixed drink (from a very limited bar) of cherry vodka and cola. It tasted incredible, but it was very weak. For me, that was perfect, but if you're looking for a buzz, this isn't it.
Shots: I didn't get one, but I had to ask. There are "nurses" roaming the park with "blood bags" of jell-o shots. They're vodka, peach schnappes, and cherry jell-o. I kind of regret not trying one.
Overall
I loved it, and really hope to go back next year. Maybe I'll be a little braver by then.
Next Post: The House Tour!
Subscribe to:
Posts (Atom)