Showing posts with label trick or treat. Show all posts

Thursday, October 25, 2012

Fighting for Truth, Justice, and the Occasional Treat

My puppy thinks he's Superman.


I'm perfectly fine with that. When Thomas puts this little costume on Ronnie, the dog's entire demeanor changes. He stands up a little straighter. His ears perk up a little higher. He is SuperRonnie, the Magnificent.

I love my dog.

Happy Halloween to all of our furry little friends! If you're thinking of taking your pet trick-or-treating, here's a really helpful, informative article you might want to read first. Ronnie's going with us--no question!--but he's probably going to spend the evening watching over the city from the safety of Thomas'--I mean, Batman's loving arms. Oh, yes, there will be pictures.

Friday, October 19, 2012

Costume Creations/Frugal Friday: Frankie Stein from Monster High

My little niece, Tempest, is big into Monster High. It's my fault, too. I got her a Frankie Stein rag doll for Christmas one year, and that was it. To her mother, I apologize.

Last year, Temp went as Frankie Stein for Halloween, and was so darn cute it hurt. In her honor, I thought I'd do a costume look for Frankie Stein, and I wanted to try to do it with all drugstore products. This is not intended to "transform" you into Frankie, nor is it meant to be a "going out" look. This is just to show that you don't need to buy the overpriced makeup kit that is sold alongside the costume to get a Frankie Stein look for trick-or-treating. If you want to see me do a Frankie Stein-inspired "going out" look for adults (since those costumes apparently exist. Who knew?), let me know in the comments, and that can totally be arranged. This one is more "stage makeup" inspired, and intended for ten to twelve year-olds.

For the uninitiated, this is Frankie:

Frankie Stein (Credit)
And here's what I came up with:
I know, the stitches go on the other cheek. Whoops. You'll also want to do your neck and ears, but this was for demonstration purposes only. I love you guys, but Supernatural was coming on. I have priorities. Jensen Ackles is cute.
I'm not a tween, nor am I a model, so this looks silly as heck. Plus, I blinked every darn time Thomas took a picture. As a stage actor, I can tell you that this--every bit as much as the whole "the actors could get distracted, fall, and die" aspect--is the reason they tell you not to take flash photos at theatrical productions. It's because we're unaccustomed to the flashes and make stupid faces. THIS is the picture I look the least stoned in, so here you go. 

Alrighty, I (not being a twelve year-old with perfect skin) started out by applying a moisturizer, then used Maybelline Age Rewind concealer to cover any blemishes and dark circles. Then, I used a NYX jumbo pencil in Milk to prime my eyelids, all the way up to the brow. The white base will help keep the L.A. Colors mineral shadow in a purple color nice and vibrant. Next, I mapped out the shape I wanted for the eyeshadow, then filled in the entire area with purple,including under the lower lashline. After that, I took the pink shadow from the L'Oreal HiP duo "Reckless" and defined the crease area. Then, I grabbed my NYX liquid liner (though a black pencil would work if you're not comfortable with liquid) and created a winged cat eye on the top lashes, then lined the lower lashline, as well. We'll come back to the eyes a little bit later.

For the skin, I used a small, dense powder brush to apply the green side of the L'Oreal HiP duo "Perky" all over my face. This will take you a thousand forevers, but it's a sheerer effect than greasepaint, and easier to find in a close-to-accurate shade. If you have trouble keeping the brush out of the dark navy shadow that makes up the other half of the duo, try carefully covering that half with a little masking tape until you finish with the green. Once you have your face (and neck and ears) covered, take an even smaller brush (like a lipliner) and the same green (the smaller brush will help concentrate the color) to map out the places you want contoured, like the cheekbones and around the nose. Use the bigger brush to blend out the lines. Then, uncover the navy blue side and lightly go over those contoured areas with the bigger brush and the blue. You'll also want to go into your hairline and around your jaw. Next, take a blush brush and a hot pink blush, like E.L.F.'s Pink Passion from the Studio line, and shade the apples of your cheeks. Use the same brush to pop a bit of the purple eyeshadow over the pink, to tie the colors together. Dust a sparkly white shadow, like L.A. Colors mineral shadow, onto the cheekbones to highlight.

Back to the eyes! You're going to have to do a little clean-up, now that the green is in place. I found it easiest to do this with the NYX jumbo pencil in Milk, because it's super creamy, opaque, and you can just draw it wherever you want it. I didn't want to lose the eyeshadow shape, so I used the white pencil as a highlight for the brow, inner corner, and brought it down below the lower lashline. I also used it on the waterline. Then, I applied two coats of black mascara to upper and lower lashes. You could use false lashes, but I know a lot of kids won't sit still long enough for that, so I just went with the mascara.

To finish things up, I used a black pencil to darken my brows and to draw on her stitches. Lastly, I applied Revlon's Just Bitten Kissable Balm Stain in Romantic to my lips for her signature glossy red pout.

I hope you enjoyed this. Again, if you want to see a more grown-up version, let me know in the comments.


Wednesday, October 3, 2012

DIY: Halloween Candy "Spell Book"

Last year, Thomas and I found this "spell book" at Hallmark. If the link doesn't work (and that's a very real possibility), it's a hollow box, decorated to look like a Witch's spell book. You fill it with candy, and can use it instead of a trick-or-treat bucket. They talk, too, which is really cute. I considered getting one, but they were around twenty bucks, and were just a little too cartoony for my taste. I gave it some thought, and realized it could probably make a more realistic one for a lot less money. I mean, it wouldn't talk, but it would still look really cool, and that's what mattered. This year, I got to work, and can now proudly show you my creepy book of candy spells! But first, let's see how you can make one, too:

First, I started with a store-bought hollow book. This one cost about $5.99 at Ross. It's probably around 8 or 9 by 12 or 13 inches. I didn't measure it, but it's not much larger than a sheet of printer paper. It's probably about 1.5 to 2 inches deep. That's enough to hold plenty of candy.


Nice enough, but not really the look I was going for.


Inside the "book"
 The first thing I did was tape off the "pages" of the book. They were already detailed with a nice gold finish that I wanted to keep. I used a little painter's tape I had lying around from when we painted the bedroom to protect the edges. Then I sprayed the entire book down with a coat of the stickiest, yuckiest, ungodliest black paint known to man. Seriously, this paint has been the bane of my existence. I also forgot to take a picture of it. Oops.


Once I had the base coat on and it had dried, I taped off the areas I wanted to keep black (the spine), and sprayed the rest of the book silver. Thankfully, it was a lot easier to work with.
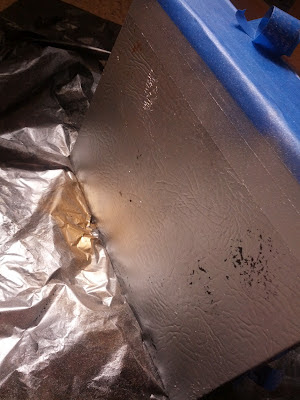

The darn thing still sticks to everything, and you can see where some black is already showing through.
I kind of like that, though. Gives it a little age.
 Next came the hard part. I wanted a harlequin pattern, but wasn't sure how to do it. This turned out to be the easiest method. It's time consuming, but it works. (I just wish I'd remembered to take more pictures...ugh...sorry...) First, tape off your first set of diamonds. I found it easiest to make my tape go corner to corner. Spray these, and once they dry, tape off your next set. If you mess up, you can just spray over the whole thing and start over. It's not an exact science, and it is frustrating, but it's worth it.


See?! Again, that black was awful, so I had a little bleed through and smudging, but overall, I'm really pleased with how it turned out. I did the same pattern on the back of the book, as well. Okay, to be perfectly honest, I did the pattern on the front of the book, as well. I accidentally did the back, thinking it was the front. I was going to leave the back silver. Oops.


Then, to add a little interest, I brushed some gold leaf I had leftover from another project onto every other gold diamond. 


Here's the leaf. I don't remember how much it was, but it wasn't very expensive. It came from Michael's.


And here's the book with the gold leaf.

After everything dried, I used a glue gun to add some jewels to the spine, and a label on the front. The label came from Hobby Lobby, in a pack of four. This is the original placement. I didn't like it, so I moved it over later, as you'll see in the final pictures.


As a finishing touch, I used a little more of the liquid leaf to freehand a title onto the spine of the book. I tried to mimic the lettering in the label. Thomas and Ronnie decided to photobomb, I guess.


And here is the mostly-finished product, on the mantle with the rest of the Halloween decorations. I say "mostly-finished" because I still need to clear-coat it. that black paint is ridiculously sticky and stains my hands when I touch it.


Thanks for making it all the way through this! I hope you enjoyed it, and please let me know if you try this yourself. I'd love to see pictures!

Tuesday, October 4, 2011

Don't Fear the Reaper

When it comes to Trick or Treating, it's really all about the yard. Ask any kid, and they'll tell you that you skip the houses with no lights, hope someone's home at the places with a couple of jack-o-lanterns, and bee-line it to the "haunted" houses. Ghosts, cobwebs, blacklights, and interactive goodies attract trick or treaters like Jason to a Summer camp. Want the most jumpin' house in the 'hood (I am so sorry...I should never attempt to be "hip")? Try these surprisingly affordable options to instantly up your cool quotient.
Photo Credit: Halloween Forum


I adore this Scream telephone. ($24.99, Spirit Halloween) This "vintage" handset is motion-activated, so it rings whenever someone passes by. Pick up the receiver, and hear Ghostface say, "What's your favorite scary movie?" and much more! Keep it by the candy bucket to freak out some kiddies. Even better? Have a friend dress up as Ghostface and pop out with a cellphone!


Photo Credit: Target
This little Reaper packs a huge punch, and you won't believe the price! ($20.00, Target) At around two feet tall, this reaper is the perfect height to frighten all of your tiny terrors. Lay him behind some dollar store headstones, or fashion a coffin out of cardboard. Either way, when he pops up and screams, your house will instantly become the center of attention! (And, as I have one of these guys in my dining room now, I can personally attest to his scream. It will be heard. No doubt. Also, he's super lightweight, so easy to carry. Just don't put him outside until time for trick or treating.)


Related Posts Plugin for WordPress, Blogger...