*sniff*
Thomas took this picture of me after we got back, so so I'm super proud of my hair for not falling completely flat. It was close to midnight, and I was a little bleary (I'm a 10:00 pm bedtime kind of girl), but I actually squeezed into this dress and needed visual proof.

Again, this is end of the night makeup, but it proves that Urban Decay All-Nighter Spray is a freaking miracle product. I'll list products used at the end of the post, in case you're interested in recreating.

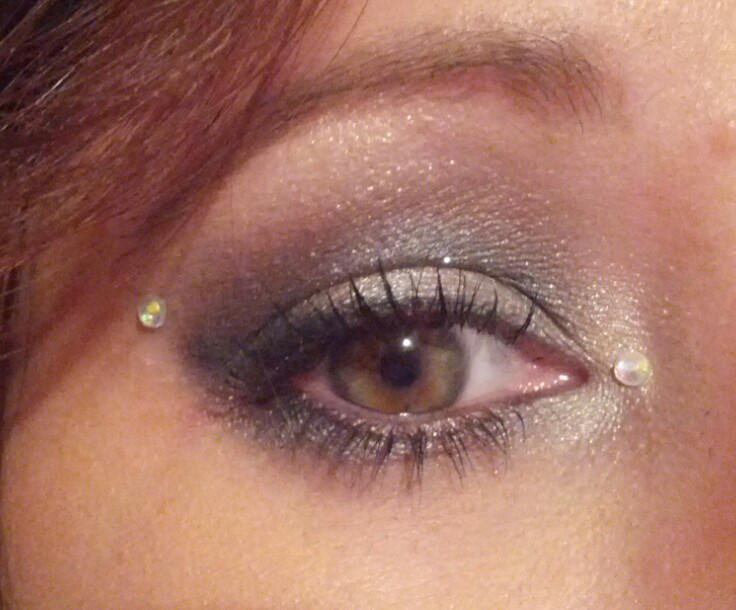
Here's a close-up of the eye makeup. It was created using a white base, then silver and navy cream shadows layered on top. Over that, I blended silver, blue, black, and muted purple shadows, and finished with a warm white highlighter at the tear duct and browbone. The coolest part, to me, anyway, is the crystal accent. These came as part of a set called Eye Rock, and I found it at Ulta for about $6.99. Technically, you're supposed to apply these as you would a temporary tattoo, and they come in pretty designs. I didn't want that much going on around my eye, so I just used a pair of tweezers to pick a couple off of the sticky backing (they come pre-glued), and applied them only where I wanted a little extra sparkle. They're not the easiest little suckers to work with, and I did lose a few along the way, but once they were on, they were on. They're also re-usable, if you want to save them and re-stick with a little spirit gum at a later date. (The original sticky back is a one-time-use kind of deal, just to be clear.) If you would like to see a real tutorial on this look, let me know in the comments.
I started by hot rolling my hair, using Bumble & Bumble Prep. This helps extend the life of the curl, but in a soft, touchable way. I wanted waves, not curls, and this helps achieve that look much better than hairspray can. Once the curls set, I took down the rollers and finger combed the curls to break them up. Then, I twisted two sections on the side where my hair is parted, pinning them to the back of my head. After that, I took the remaining length and divided it so that all of the hair on the non-twisted side would remain down, and the bit that was left on the twisted side was loosely twisted upward to meet the other twisted sections (good Lord, I hope that makes sense). I made a loose bun with the now twisted length, and used it to cover the pins I'd used on the first two twisted sections. I added a sparkly comb for interest. So, the left side of my head was all twisty, and the right side was completely down and curled. It's like a really fancy-schmancy side pony, without the ponytail holder. I used Aquage hairspray to finish.

So that's my glammed-up "Goin' to the Boom Boom" (as it's referred to around here. Because the parades are loud and have marching band drums throughout. I'm totally serious.) formal look. If you're getting ready for prom (or any other formal event) and want to DIY your hair and makeup, I hope this helped. The only thing I had to buy was a blue eyeshadow base and the crystals, so I only spent about $12 or $13 total. Here's that promised product list:
Touch in Sol Feels Like Honey Moon Skin Base (from a past Glossybox--any non-mattifying primer will work)
Urban Decay Naked Skin Foundation (Check out the Revlon Nearly Naked for a decent dupe)
Maybelline Age Rewind Concealer
Urban Decay Primer Potion in Eden
NYX Jumbo Pencil in Milk
Maybelline Color Tattoo in Electric Blue
Benefit Creaseless Cream Eyeshadow in Silver Spoon (Maybellline Color Tattoo in Silver Strike is almost identical)
Urban Decay Naked Palette (Gunmetal, Creep)
Urban Decay Naked 2 Palette (Verve, Blackout)
MAC Apres Chic Eyeshadow in Fireside (any muted plum will work. You're only blending out the edges with it.)
MAC Apres Chic Eyeshadow in Ice (I really don't have a dupe for this one. Mixing a little peach and gold glitter into a shimmery white eyeshadow might be a good place to start, though.)
Buxom Insider Eyeliner in Onyx (liner--any black cream/gel pencil will work)
Urban Decay 24/7 Glide-On Pencil in Zero (waterline)
Buxom Lash Mascara (or any black mascara that you like. Add false lashes, too, if you want!)
Anastasia Brow Wiz in Brunette (E.L.F. Brow Kit works well, too)
Rimmel Stay Matte Powder
Tarte Bronzer in Park Avenue Princess (on cheeks)
Tarte Amazonian Clay Blush in Dollface (on cheeks--you can get this and the bronzer in a travel set and save A LOT)
Benefit Hoola Bronzer (contour--look for a deluxe sample of this in the mini-kits Benefit is so fond of putting out. The sets run about $10-$15 and offer several products. A mini of this will last for-freaking-ever)
Eye Rock crystal tattoo (or rhinestones and spirit gum)
Buxom Big & Healthy Lipstick in London (or any matte baby pink)
Rimmel 1000 Kisses Lip Liner in Rose Quartz
Victoria's Secret Color Drama Lipstick in Enamored
LORAC Perfectly Lit Pressed Powder in Spotlight (for highlighting contour. Try Hard Candy Baked Blush in Pin Up)
No comments:
Post a Comment
Add your own ramblings, musings, or existential ponderings here--just keep it clean and keep it kind.