Hey guys! Have a wonderful Labor Day Weekend! I'll see you on Tuesday!!
Love,
Erin
Friday, August 31, 2012
Thursday, August 30, 2012
How Glossy is Your Box?: August Glossybox Opening

Hot dog! I somehow managed to get my August Glossybox in August!!! How cool is that?! This is going to be really long and amazingly picture-heavy, so let's just get right to it. I can, in all honesty, say that this is the best Glossybox we've had yet!
Immediately upon opening, we have the increasingly unnecessary GlossyMag. I said it last month, and I'll say it again: this is useless. *Spoiler Alert* There's nothing neon in the box.

The pretty pink box that I've yet to figure out how to repurpose this month. Any ideas? Leave 'em in the comments!

This month's insert with the theme. August was "Pure Luxury", and they weren't kidding!

The items, along with brief descriptions and prices for the full-sized versions.


Here's a new one: a coupon for a free gift with purchase. That's nice. Probably won't use it, but I appreciate the gesture.

Here's the item I was most excited for: Ole Henriksen Truth Serum Collagen Booster! It's a vitamin C serum, and supposely works wonders on dullness. I've been wanting a vitamin C serum forever, it seems, and I've really enjoyed using it over the past couple of days. I actually have seen a difference in the "glow" of my skin.

Sorry this is fuzzy. I did this unboxing during Hurricane Isaac, and was having to go pretty quick, since we could have lost power at any moment. Plus, let's face it, I'm a horrible photographer. This is the bottle of serum, and it's a very generous sample. The size is .5 oz, or half the full-size. It's about the size of a nail polish, and since you only use a drop or two at a time, should last a good, long while.

Next up, we have the Biolage Exquisite Oil.

This is a small sample, but as with the serum, it only takes a drop. I used this on the ends of my hair before pulling it into a side pony, and my frizzy, wavy, crazy hair obeyed. That's unusual.

This product just plain intrigues me. It's a face primer, but has decent-sized flecks of gold floating in it.

Do you see them? It's like Goldschlager! How on Earth does that work?!

Truth be told, it works really well. The consistency of the primer is very smooth and light, non-greasy, and doesn't feel silicone-based. The gold flecks don't show up too horribly on skin, either. You just end up with a pretty glow. I used it underneath my Rimmel Clean Slate, which has a tendency to feel really heavy and look a little ashy. Not only did I not feel the urge to run and tear the make up off of my face after a few hours, my makeup did look brighter, and it stayed put nicely, even in crazy Hurricane humidity. The full-size is only $20, with is not bad at all, and this is nearly full-sized. I have a long time to play with it, and I'm really looking forward to seeing how it does in the long run.

Here's another highly anticipated product! See, each month, Glossybox varies a couple of items. Sometimes it's by style (like half of subscribers get an eyeshadow and half get a lipgloss--that sort of thing), and sometimes it's by color. That's how this month's went, and I was dying to know which color of this gorgeous Illamasqua nail polish I was going to get! This Purity, and it's just lovely. It reminds me of when I played an Angel in a super-fun production of Anything Goes. Our names were Purity, Charity, Chastity, and Virtue (me), and we had a couple of costumes that were very close to this color, only slightly pinker. No one else may care, but it made me smile.

The color is much brighter in person. It's a rich, vibrant peach, and I think it'll be the perfect nude for my skin tone. I have not tried this yet, but plan to tonight. I've been waiting for the storm to completely pass, since clean-up can be a bi--I mean, it can chip your polish. Yeah, that's it...

The other variable in the box was this ridiculously, incredibly, even-if-I-could-I-don't-think-I-could expensive, thirty-five dollar lip glaze from Ellis Faas.
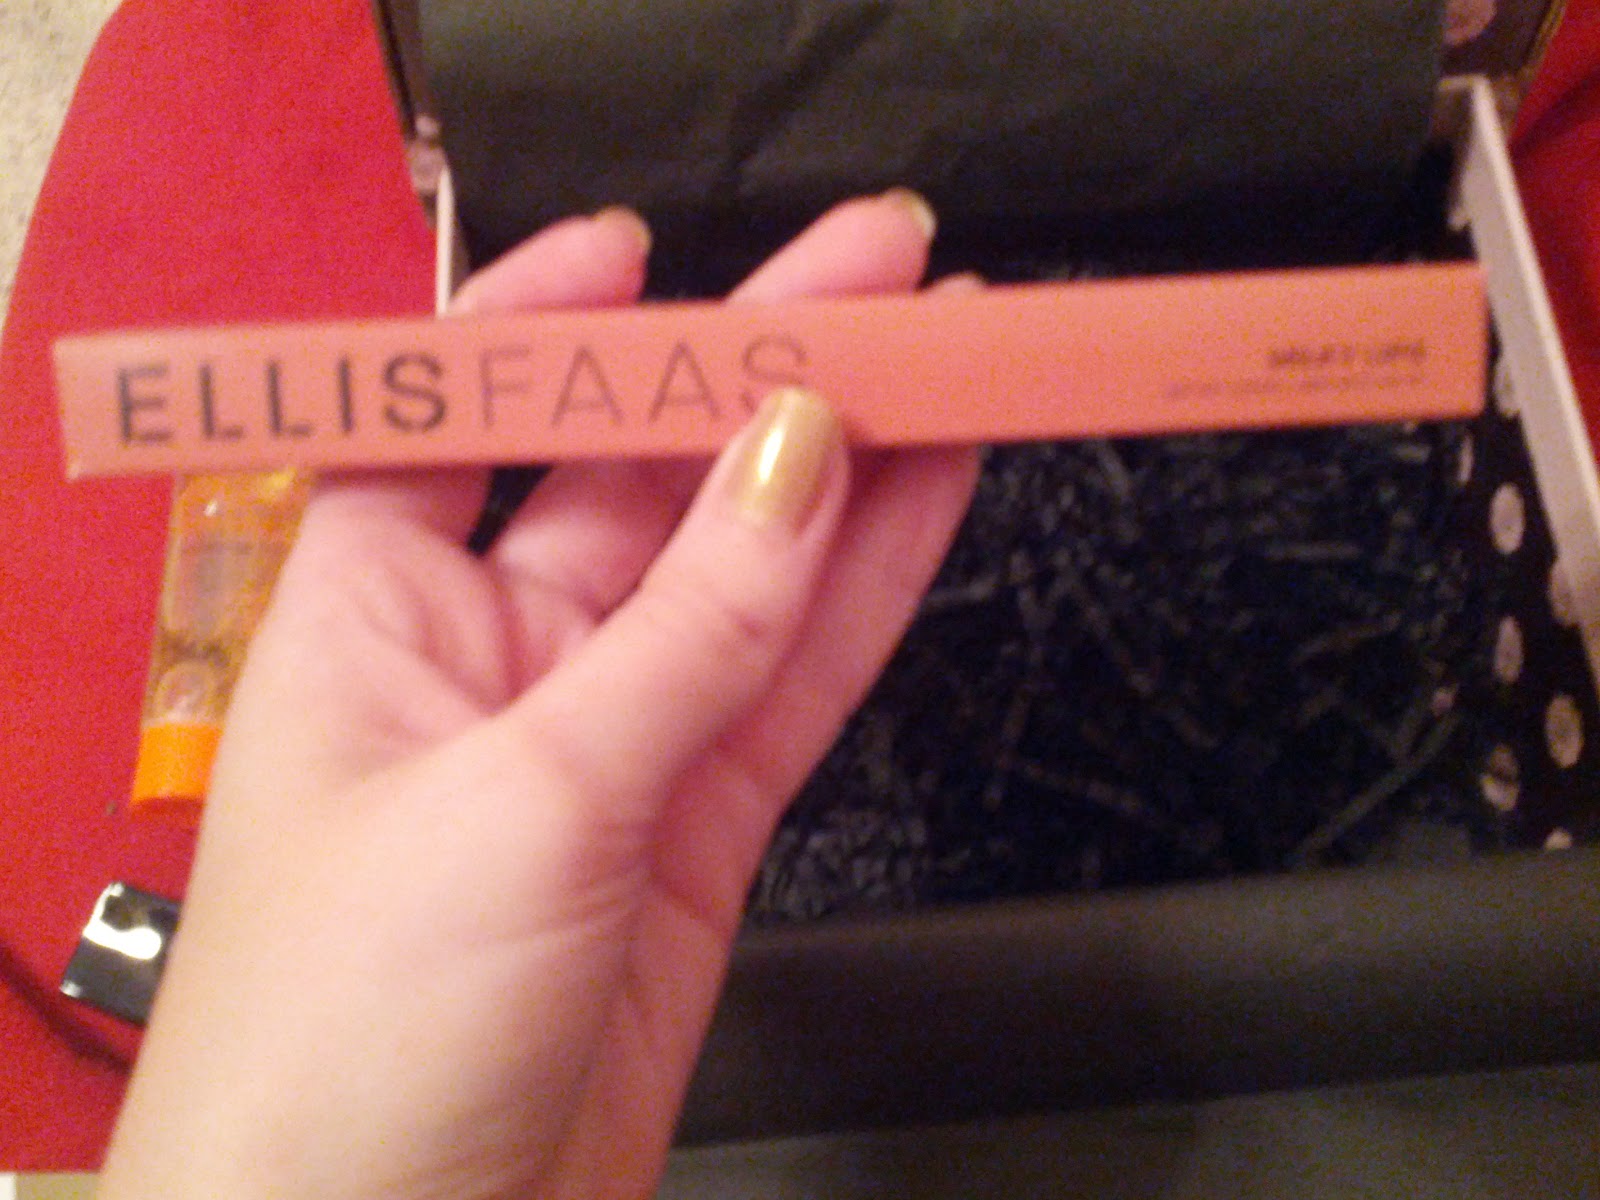
The packaging is beyond cool. Thomas said I should definitely carry it everywhere I go, since it'll work on both werewolves and vampires, and he wants to know I'm safe. I'm glad to know he cares.

The color I got was L209 (Toffee Beige) in the Milky Lips collection. I don't know why I even included swatches, since they look nothing like this in person. The color is, like the Illamasqua, a beautiful peachy-nude.

I wore this yesterday, and was pleasantly surprised at how moisturizing and lightweight it was, and at how long the color lasted. Of course, for $35, I should probably expect to be all those things while tap dancing and balancing my checkbook. Still and all, I think this might be the first nude lipcolor that has ever worked for me. It's just gorgeous for redheads.

Here's one last look at all of the products, side by side. These are some impressive products at some impressive sizes. Good job, Glossybox, and thank you!

Oh! In case you're curious, here's the price breakdown for each item:
Ole Henriksen $24 for .5 oz
Biolage $1.14 for .16 oz
Touch in Sol $18.76 for 1.06 oz
Illamasqua $14 for Full-Sized Item
Ellis Faas $35 for Full-Sized Item
Total Worth of Glossybox $92.90
Total Paid for Glossybox $21.00
That means that this box was actually worth the price of almost four and a half Glossyboxes. Wowzers.
Also, if you were wondering, the nail polish I was wearing in the pictures was Fast Track by China Glaze.
Tuesday, August 28, 2012
Theme Park Makeup, Part Trois
*Ed. Note: This is the third in a multi-part series. The first two can be found here and here.
Well, we're still waiting on the still-tropical storm, and everything's closed, so I thought I'd post a quick "this would work on water rides" theme park look. I put it on to withstand torrential rains (in case I have to get out in it), so it should be able to handle Universal's Jurassic Park flume. You know, theoretically. Nothing is going to be totally waterproof, but maybe you won't have to run to the ladies' room, bypassing GO and $200, to wash off the raccoon eyes.

Oooh! It's so fuzzy I'm gonna die!!!! This is the only snapshot I got before realizing the rain had started and the puppy was still playing outside. Seconds after this photo, I dropped the cell phone, and ran like heck to let in a dripping chihuahua, who proceeded to shake all over the living room, and run me all over the house to get his wet T-shirt off of him, then refused to let me put a dry one on him until after I'd let him pick it out first. Yes, he had to choose his own shirt. It has the Avengers logo on it. I'm proud.
Anyhoo, here's what I used:
Too Faced Beauty Balm
Benefit Boi-ing concealer
Benefit Creaseless Cream eye shadow in Sippin' 'n' Dippin' (lid and crease)
Urban Decay 24/7 Shadow Pencil in Rehab (crease and lower lash line)
Urban Decay 24/7 Glide-On Eye Pencil in Zero (upper lash line)
WATERPROOF MASCARA--I still don't have one. I can't decide!!! Anyone have a favorite to recommend?
MAC Cream Color Base in Virgin Isle (applied to cheeks with Real Techniques stippling brush)
Benefit Watt's Up highlighter (brows, inner corners, and cheek bones)
E.L.F. Brow Kit in Medium
Revlon Lip Butter in Cherry Tart
Rimmel Stay Matte powder (just to set concealer and maybe T-zone, if you think you need it)
I used my fingers for everything but the blush, brows, and powder. This is, really, a very travel-friendly look. There are eleven products, but they're all very small, and I threw this look together in less than ten minutes. Honestly, I didn't time it, but it was probably more like five minutes. The most difficult part was deciding which products to use.
Now, you've probably noticed that all of these park looks have been neutral. Keep on the look-out for a very colorful post coming up soon!
Monday, August 27, 2012
Stormy Weather: Hurricane-Inspired Makeup Look
There's a hurricane a-comin'! A HURRICANE A-COMIN'!!!
Or, you know, something like that.
My home is in a state of emergency, and just barely outside of a mandatory evactuation zone, so Thomas and I have spent the weekend preparing for the worst and hoping for the best...which would be a day off from work and just enough rain to knock the pollen off the cars. Right now, it's absolutely gorgeous outside, so I decided to celebrate the beautiful weather with a colorful, Hurricane cocktail-inspired (sunset-colored), almost Fall makeup look.

I like it. It kind of makes me think of a 1920s flapper, but maybe I'm just weird. Here's how it breaks down:
Skin
Primer: Tarte Clean Slate
Foundation: MAC Studio Sculpt in NW15
Concealer: Benefit Boi-ing
Powder: Rimmel Stay Matte
Blush: NARS Orgasm
Highlight: MAC Mineral Blush Duo in Moon River
Eyes
Primer: Benefit Creaseless Cream Shadow in Sippin' 'n' Dippin'
Shadows: Stila in Prize, Urban Decay in Free Love, Urban Decay in Woodstock, LORAC in Sand
Liner: Urban Decay 24/7 Glide-On Eye Pencil in Zero, Urban Decay in Suspect, Urban Decay in Dark Horse
Mascara: Buxom Lash in Black
Brows: E.L.F. Brow Kit in Medium

To get the gradated effect, I began with Prize in the inner corners, and took it a third of the way across the eye. I added a thick layer of Free Love to the center third of the eye, and a thick layer of Woodstock at the outer corner. I blended Woodstock through the crease, then used a fluffy blending brush to sort of rake the color across my lids, going from hot pink to gold, only in one direction. Under the eyes, I lined the lash line with the same colors, in the same order, then used a thin line of Suspect to blend them together. Dark Horse lines the outer half of the lash line. Sand fills in the area from crease to brow.

Lips
Liner/Lipstick: Buxom Big & Healthy Lipstick in Bombay
Gloss: Buxom Lips in Amber
I hope you enjoyed this! I know I had fun putting it together. For those of you down here: stay safe!! For everyone else: have a great Monday, and I'll try to post tomorrow. Comments? Leave 'em below!
Or, you know, something like that.
My home is in a state of emergency, and just barely outside of a mandatory evactuation zone, so Thomas and I have spent the weekend preparing for the worst and hoping for the best...which would be a day off from work and just enough rain to knock the pollen off the cars. Right now, it's absolutely gorgeous outside, so I decided to celebrate the beautiful weather with a colorful, Hurricane cocktail-inspired (sunset-colored), almost Fall makeup look.

I like it. It kind of makes me think of a 1920s flapper, but maybe I'm just weird. Here's how it breaks down:
Skin
Primer: Tarte Clean Slate
Foundation: MAC Studio Sculpt in NW15
Concealer: Benefit Boi-ing
Powder: Rimmel Stay Matte
Blush: NARS Orgasm
Highlight: MAC Mineral Blush Duo in Moon River
Eyes
Primer: Benefit Creaseless Cream Shadow in Sippin' 'n' Dippin'
Shadows: Stila in Prize, Urban Decay in Free Love, Urban Decay in Woodstock, LORAC in Sand
Liner: Urban Decay 24/7 Glide-On Eye Pencil in Zero, Urban Decay in Suspect, Urban Decay in Dark Horse
Mascara: Buxom Lash in Black
Brows: E.L.F. Brow Kit in Medium


Lips
Liner/Lipstick: Buxom Big & Healthy Lipstick in Bombay
Gloss: Buxom Lips in Amber
I hope you enjoyed this! I know I had fun putting it together. For those of you down here: stay safe!! For everyone else: have a great Monday, and I'll try to post tomorrow. Comments? Leave 'em below!
Friday, August 24, 2012
Frugal Friday: Rediscovery
One way I've been able to save a little bit of money, lately, has been by trying to see some of the makeup I already own in a different light. For example: I have a Vincent Longo Hydro-something-or-other that I almost never use. I tried it as a blush; I tried it as a highlighter; I even tried it as lipgloss and eyeshadow. Nada. Into the abyss--I mean, drawer--it went, probably never to be heard from again...until I saw this video on YouTube:
My Hydro-whozee-whatsit is very similar to the stick product used in the video! Also, that eye shadow looks an awful lot like that weird Snakebite color in my Naked 2 palette! And I'd never thought of lining my eyes with that technique! Now, I'm no Victoria's Secret model, so I didn't follow the tutorial to the letter, but I did use it as inspiration and, using only products that were on-hand, came up with this:
I really like this! Plus, I now have a use for a couple of products that were previously collecting dust.
Looking for inspiration, yourself? Here are some of my favorite tutorials that I've stumbled upon recently. I hope you enjoy them as much as I have! The ladies in these videos are incredibly talented, and a lot of fun to watch. Please click on the "More Info" button at the top of each video for information on how you can subscribe to their channels. Thanks!
My Hydro-whozee-whatsit is very similar to the stick product used in the video! Also, that eye shadow looks an awful lot like that weird Snakebite color in my Naked 2 palette! And I'd never thought of lining my eyes with that technique! Now, I'm no Victoria's Secret model, so I didn't follow the tutorial to the letter, but I did use it as inspiration and, using only products that were on-hand, came up with this:
 |
| Again, pardon the car. It's the best lit area I have. Seriously. Also, someone please tell me that the model in the above video started out with bronzer in the hollows of her cheeks, and make me feel better. Pretty please? |
I really like this! Plus, I now have a use for a couple of products that were previously collecting dust.
Looking for inspiration, yourself? Here are some of my favorite tutorials that I've stumbled upon recently. I hope you enjoy them as much as I have! The ladies in these videos are incredibly talented, and a lot of fun to watch. Please click on the "More Info" button at the top of each video for information on how you can subscribe to their channels. Thanks!
Wednesday, August 22, 2012
Theme Park Makeup, Part Deux
Ed. Note: This is the second in a multi-part series. The first can be found here.
You know how it is. You go on vacation to a theme park, where you know you're going to be walking the equivalent of a half-marathon everyday, in the heat and humidity. Of course, this is also one of those occasions where you're going to have your picture taken a bajillion times.
"Oh, look! It's Mickey! Smile!"
"Oh, look! It's Hogwarts! Smile!"
"Oh, look! It's been five seconds since we took a photograph! Smile!"
True Story: On our last trip to Hollywood Studios, my mom wanted to take a picture of me and Thomas in front of a horse and buggy. It was crowded and loud, and neither of us could figure out what my mom wanted, but we saw the camera and guessed, but couldn't figure out what landmark she wanted in the background. We wandered around, totally confused, for a couple of minutes, until the buggy started to leave. Mom, not wanting to miss a picture of the buggy, snapped a quick photo, seemingly without us. It wasn't until we got to sit down in the shade for a second and look through the photos that we noticed that she had, indeed, gotten us in the shot--still trying to figure out where the heck we were supposed to stand. That may be my favorite picture of the trip.
Anyhoo, in the first installment, I showed you a barely-there, fairly matte look (on a horribly puffy face, and I am so sorry!) that could get you out of the hotel room pretty quickly, not require much (if any) touching up, and give you just enough polish to look camera-ready, but not made up. Of course, I've also been known to go to the parks sans makeup, so that's right up my alley. Not everyone wants to go that bare, so I've come up with a look that gives a little more coverage and is a bit more glam and shimmery. It's still really low-maintenance, but some of the products are on the higher-end, and you might want to invest in a Z-Palette or UNII Palette to keep from lugging around a million items.
Here's what we have:

- Too Faced Beauty Balm
- Buxom Big & Healthy Lip Polish in Amber
- Benefit Boi-ing concealer
- Benefit Hoola bronzer
- Urban Decay Primer Potion in Sin
- ELF Brow Kit
- Rimmel Stay Matte powder in Transparent
- Urban Decay All-Nighter setting spray
- Real Techniques Blush, Buffing, Shadow, and Brow brushes
- UNII Palette
- NARS Orgasm blush
- Stila eye shadows in Kitten, Prize, and Sparkle
- Urban Decay eye shadow in Twice Baked
- Not Pictured: Urban Decay 24/7 Glide-On Eye Pencil in Zero and a waterproof mascara of your choice. I don't have one. Yet. I'm wearing Buxom Lash, though, if you're interested. Anything not linked to was linked in the first installment.


Here's the whole she-bang. I used my fingers to apply the beauty balm and concealer. Then, I did my eyes like I just showed you, and my brows with the brow kit and brow brush (sure, the brush in the kit is fine, but the Real Techniques is better and faster, and it's so small that it doesn't take up enough space to count). Next, I powdered down with the powder and buffing brush. I used the blush brush to add bronzer to the tops of my cheeks, bridge of my nose, forehead and chin, then used the same brush to dust the blush on the apples of my cheeks. I used a clean finger to add a little Stila Kitten to the tops of my cheeks as a highlight, then, finally, swiped on a little long-lasting lip gloss. Done. Spray down with a little setting spray for extra insurance.
This has done really well in the heat and humidity down here, and I actually like it a lot better than the first look I came up with. The beauty balm covers so much better than the tinted moisturizer, but it's still not heavy. I would suggest tossing a powder compact or blotting papers in your backpack or totebag. You may not need them, but you could always touch-up on trips to the ladies' room, without taking any extra time out of your visit.
And now, for a little behind-the-scenes action. This is why I took pictures in the car. The little dude didn't much care for the photo shoot.

Tuesday, August 21, 2012
Hey, Kids! Let's Make a Movie!
.jpg) |
| Photo Credit: Fighting Owl Films Artist: Jeff Bell |
Night of the Krampus will be a half-hour holiday special, featuring the main characters from The Night Shift. Rue Morgan, Claire Renfield, and Herbie West venture away from Pinewood Oaks Cemetery to investigate a series of kidnappings. Could Santa's "helper", the deadly Krampus, be checking off his Naughty List?
Right now, we're at the fundraising stage, and have a campaign in progress on indiegogo. I'm not asking any of you guys for a dime. What you could do, if you're interested, is share, like, favorite, tweet, embed, plus, pin, or blog about the project. We have a little over 40 days, and every bit of support helps. Thanks!
Monday, August 20, 2012
UPDATED! Five Dollar Find: Rimmel Clean Finish Foundation Review
It's still hotter than hades around here, and the humidity is so thick in the air, you practically need to breathe through a straw. The thing is, in another month, we'll be in sweaters. They'll be lightweight sweaters over tank tops, sure, but by Halloween, we'll need jackets. My point is, it's almost that lovely time of year when tinted moisturizers and beauty balms make way for heavier foundations. I guess I need to get one...
So, I'm on the hunt. I already tested out the Urban Decay Naked Skin, which was unbelievably gorgeous, but caked a bit and didn't last in the humidity. Still, it's in the running, since it won't be a gazillion degrees and muggy when I actually go to wear it. It is pricey, though, so I thought I'd check out the other end of the spectrum, and try the super-inexpensive Rimmel London Clean Finish. $4.99, Ulta. I love Rimmel's powder, so maybe this would work for me, too.
According to the bottle, Clean Finish is supposed to leave you 100% poreless. To put it to the test, I applied my True Ivory shade without a primer. Before applying, though, I noticed that there's a little spatula attached to the inside of the lid, to allow you to scoop out however much product you need. I like that. There's no way that spatula will ever reach the bottom or sides well enough to scrape out the dregs, but for now, it's a lot neater than having to try to pour out the foundation, and more hygenic than trying to use a sponge.
I used a Real Techniques expert face brush to buff the product into my skin. The shade match was spot-on, which is always a nice surprise when you don't get to test out a product in the store. The texture is not heavy, and leaves a not-matte, but not-dewy finish. It's actually a very similar finish to the Naked Skin, but the coverage is nowhere near the same. I didn't see where there was much more coverage--maybe a touch--than my Too Faced Beauty Balm. That almost defeats the purpose of switching to a foundation, but the Clean Finish does photograph better.
After several hours of wear, I was pleasantly surprised to see that there was very little settling or caking (and even that was easily smoothed back out), and the shine was minimal and blotted away in a jiff. I was not, however, 100% poreless. If anything, the pores on my nose seemed more prominent.
This is not bad--not bad, at all. It's not the best foundation I've ever used, but it's definitely not the worst. It does the job, and it does it for only $4.99. Is it my Holy Grail foundation? No. But for now, it'll do.
Shade Range: There are what appear to be eight shades of pale. I'm day-glo, and somehow managed to match to the second lightest shade, and not the first. 3 out of 10.
Application: It went on like moisturizer, and wasn't buildable. It did sink into my skin easily. 6 out of 10.
Packaging: I love the spatula, and the glass container is very nice, indeed. 9 out of 10.
Appearance: Natural, not too matte, not too dewy. Light coverage. Not 100% poreless. Photographs well. 8 out of 10.
Wear: Fairly long-wearing. Not oil-controlling. Minimal caking and settling. 8 out of 10.
Price: $4.99. That's a steal. 10 out of 10.
Final Verdict: 7.3 out of 10. It's a decent, light-weight foundation for a dream of a price. Just hope they have your shade.
UPDATE: I've worn this with a primer for a couple of days, and it feels so heavy on my skin, I just want to run in the bathroom and wash my face. This is my usual primer, and I've never had this experience with it before, so I have to attribute it to the foundation. Still and all, I do recommend this as a good drugstore foundation, but I thought, in the interest of full-disclosure, that you guys needed to know this.
So, I'm on the hunt. I already tested out the Urban Decay Naked Skin, which was unbelievably gorgeous, but caked a bit and didn't last in the humidity. Still, it's in the running, since it won't be a gazillion degrees and muggy when I actually go to wear it. It is pricey, though, so I thought I'd check out the other end of the spectrum, and try the super-inexpensive Rimmel London Clean Finish. $4.99, Ulta. I love Rimmel's powder, so maybe this would work for me, too.
According to the bottle, Clean Finish is supposed to leave you 100% poreless. To put it to the test, I applied my True Ivory shade without a primer. Before applying, though, I noticed that there's a little spatula attached to the inside of the lid, to allow you to scoop out however much product you need. I like that. There's no way that spatula will ever reach the bottom or sides well enough to scrape out the dregs, but for now, it's a lot neater than having to try to pour out the foundation, and more hygenic than trying to use a sponge.
 |
| Foundation Only. *shudder* You can still see some pores, and a little discoloration around the eyes. |
I used a Real Techniques expert face brush to buff the product into my skin. The shade match was spot-on, which is always a nice surprise when you don't get to test out a product in the store. The texture is not heavy, and leaves a not-matte, but not-dewy finish. It's actually a very similar finish to the Naked Skin, but the coverage is nowhere near the same. I didn't see where there was much more coverage--maybe a touch--than my Too Faced Beauty Balm. That almost defeats the purpose of switching to a foundation, but the Clean Finish does photograph better.
 |
| Pay no attention to the puffy eyes. It's allergy season. This is just a pretty, inexpensive, decent, everyday foundation. It does photograph much better than a beauty balm, even if the actual coverage is only slightly heavier. That's a good thing. |
This is not bad--not bad, at all. It's not the best foundation I've ever used, but it's definitely not the worst. It does the job, and it does it for only $4.99. Is it my Holy Grail foundation? No. But for now, it'll do.
Shade Range: There are what appear to be eight shades of pale. I'm day-glo, and somehow managed to match to the second lightest shade, and not the first. 3 out of 10.
Application: It went on like moisturizer, and wasn't buildable. It did sink into my skin easily. 6 out of 10.
Packaging: I love the spatula, and the glass container is very nice, indeed. 9 out of 10.
Appearance: Natural, not too matte, not too dewy. Light coverage. Not 100% poreless. Photographs well. 8 out of 10.
Wear: Fairly long-wearing. Not oil-controlling. Minimal caking and settling. 8 out of 10.
Price: $4.99. That's a steal. 10 out of 10.
Final Verdict: 7.3 out of 10. It's a decent, light-weight foundation for a dream of a price. Just hope they have your shade.
UPDATE: I've worn this with a primer for a couple of days, and it feels so heavy on my skin, I just want to run in the bathroom and wash my face. This is my usual primer, and I've never had this experience with it before, so I have to attribute it to the foundation. Still and all, I do recommend this as a good drugstore foundation, but I thought, in the interest of full-disclosure, that you guys needed to know this.
Friday, August 17, 2012
Frugal Friday: E.L.F. Mineral Lipstick Review
E.L.F. has eighteen shades in their line of five-dollar mineral lipsticks. I have three of them. Let's play!

Here, we have Ripe Rose, Barely Bitten, and Cheerful Cherry. I have to say, in the tubes, they look fairly similar. Barely Bitten is obviously the lightest, but the other two are darn near identical. I do detect a hint more brown in the Ripe Rose, and a teeny smidge more berry in the Cheerful Cherry. Let's see how they swatch, shall we?

Oooh! Now, I can see a difference! Ripe Rose is definitely more of a dusty rose, with brown tones. Barely Bitten is more of a true rose, and Cheerful Cherry is a gorgeous berry red. They swatch easily, are nicely pigmented, and are almost impossible to remove. They should last a good, long time on your lips. So, how do they feel and look on the lips?

I only swatched one on my lips, because I was literally running out the door. I ended up just wearing this one as my lipstick du jour. This is Ripe Rose. It's not as brown on my lips as it was on my hand. Here, it's just a really lovely rosey shade. While I am glad that it's a pretty color, I am a little perturbed that it doesn't match the swatch on my hand, or the shade in the tube. Still, it feels like butter on, and has lasted all day, even through lunch, with only minimal touching-up.
Pros: packaging looks very high-end, moisturizing feel, beautiful color and pigmentation, long-wearing, great price point
Cons: not even slightly true to color
Final Verdict: 8.3 out of 10. For five bucks a piece, snag a few of these high-quality lipsticks and play around with figuring out the colors.
Thursday, August 16, 2012
Theme Park* Makeup, Part Un
Ed. Note: This is the first in a multi-part series.
I still have almost two months to slog through until I get to visit Hogwarts and trick-or-treat with Mickey and Minnie, and it's just about to kill me. To pass the time, I've started stalking forums, mentally packing and unpacking, and seriously over-planning.
For giggles, I decided to use the crazy temperatures and humidity we've been experiencing to my advantage. Over the past few days, I have played around with several different travel-friendly makeup combinations, to see which was the quickest to apply, easiest to tote-around, most natural, and longest-wearing under our tropical conditions. See, when I go to the parks, I don't like to wear a ton of makeup. Sure, it might look cute when you first arrive, but after six or seven hours of hiking in the heat, you come to realize that, just maybe, the smoky eye or strong lip you started out with wasn't such a great idea. Still, I am going to be taking pictures, and I'd like to look presentable in public, so a little something to keep me from scaring small children is kind of necessary. Anyhoo, here's what I came up with:

There's no good way of going left to right, or clockwise, or whatevs, so I'm just going to list this out.
Now, remember how I said price was a factor? I threw the Naked 2 in for three shades, and only three shades: Foxy (all over), Bootycall (highlight), and Tease (crease and lower lashline).

You can find very similar shades in the much smaller, much cheaper NYX eyshadow trio with Aloha, Mink Brown, and Deep Bronze. They're a little more shimmery than the mattes and satin in the Naked 2, but will still work really well. Of course, if you have the Naked 2 already, it does come with an awesome travel brush. Speaking of brushes, if you take the Naked 2 and the E.L.F. Brow Kit (with actually decent brush), you can get away with only bringing two more brushes along...

...blush and powder. These are from Real Techniques, and please pardon how dirty they are. I'd just used them. I picked the buffing brush for powder because of its small size, but a kubuki would work just as well.

Here's the full look on my seriously broken out, puffy from allergies, in need of an eyebrow shaping face. You're welcome, world. *sigh*
I used my fingers to apply the moisturizer, concealer, and primer potion, and the brushes we talked about for the rest. I purposefully left out anything heavy (like foundation or face primer) because, personally, I feel gross sweating to death in full makeup. I also omitted anything sparkly or shimmery, because after a day in the parks, I'm shiny enough. I don't need to add to it. Lastly, I kept the budge-proof eyeliner thin, and just on the top lashline, because I only wanted a little definition, and not to advertise I was wearing makeup. A little brown eyeshadow (Tease) runs along the lower lashline, and is more than enough, in my opinion. Heck, I wouldn't have even bothered with my brows if they came anywhere close to matching my hair color (they don't), and weren't in such horrible shape.
You will need the eye primer. Even Urban Decay, for all it's pigmentation and staying power, has been sliding right off my lids in this humidity. If you're going to be in Florida, like I will be, it's going to be even worse.
As for the lips, I like the Revlon because it stains. The color sticks around for freaking ever, and if I don't feel like toting the balmstick around, I can just toss a teeny lip balm with SPF in my pocket for easy sun-protection top-offs.
It's not photo-shoot gorgeous, but it's not meant to be. It's functional, and I think it looks pretty. This is just meant to give you enough color and coverage to look polished in the umpteen vacation photos you'll be a party to, and, if you're me, not frighten the other tourists.
OH! Before I forget--toss the face wipes in the fridge. You'll be glad you did. :)
P.S. In case you were wondering what the heck all that stuff is lying on, it's a nifty little makeup bag from Lay-N-Go. I bought mine from OpenSky, and am not being compensated for telling you about it. I just thought it was cool. See, you lay your stuff on it...

...then pull the drawstring closed! That's it! No wondering how such-and-such is going to fit in it, or how on Earth you managed to get whatchamadingle in there the first go-round. Just toss in the stuff and pull. Plus, there are little zippered and velcro pockets for extra-valuables, like jewelry or contacts.

It's not huge, either, so it won't take up much space in the suitcase. For reference, the little red doohickies sticking out from underneath are the corners of a Netflix envelope.
I don't recommend it for toiletries, since they can leak, but for makeup, it's a dream. 9 out of 10.
*or music festival, or art festival, or film festival, or frisbee golf, or picnic, or camping, or flea market, or antiquing, or hiking, or...well, you get the drift.
I still have almost two months to slog through until I get to visit Hogwarts and trick-or-treat with Mickey and Minnie, and it's just about to kill me. To pass the time, I've started stalking forums, mentally packing and unpacking, and seriously over-planning.
For giggles, I decided to use the crazy temperatures and humidity we've been experiencing to my advantage. Over the past few days, I have played around with several different travel-friendly makeup combinations, to see which was the quickest to apply, easiest to tote-around, most natural, and longest-wearing under our tropical conditions. See, when I go to the parks, I don't like to wear a ton of makeup. Sure, it might look cute when you first arrive, but after six or seven hours of hiking in the heat, you come to realize that, just maybe, the smoky eye or strong lip you started out with wasn't such a great idea. Still, I am going to be taking pictures, and I'd like to look presentable in public, so a little something to keep me from scaring small children is kind of necessary. Anyhoo, here's what I came up with:

There's no good way of going left to right, or clockwise, or whatevs, so I'm just going to list this out.
- Urban Decay Naked 2
- E.L.F. Tinted Moisturizer
- Benefit Boi-ing concealer
- Rimmel Stay Matte powder
- Urban Decay Primer Potion (travel-size)--Eden is pictured and Original is linked to. Either works.
- E.L.F. Brow Kit
- Benefit Coralista blush (travel-size)
- Revlon Just-Bitten Kissable Balm Stain in Honey
- Urban Decay All-Nighter setting spray (travel-size)
- Urban Decay 24-7 Glide On Eye Pencil in Zero (travel-size)--Full-size is linked to, but travel sizes come in several kits. I have more than one of these guys.
- Buxom Lash Mascara (travel-size)--DISREGARD! Get something waterproof! This is all I had in the house!
- Real Techniques Blush Brush
- Real Techniques Buffing Brush
- Yes to Cucumbers Facial Towelettes
Now, remember how I said price was a factor? I threw the Naked 2 in for three shades, and only three shades: Foxy (all over), Bootycall (highlight), and Tease (crease and lower lashline).

You can find very similar shades in the much smaller, much cheaper NYX eyshadow trio with Aloha, Mink Brown, and Deep Bronze. They're a little more shimmery than the mattes and satin in the Naked 2, but will still work really well. Of course, if you have the Naked 2 already, it does come with an awesome travel brush. Speaking of brushes, if you take the Naked 2 and the E.L.F. Brow Kit (with actually decent brush), you can get away with only bringing two more brushes along...

...blush and powder. These are from Real Techniques, and please pardon how dirty they are. I'd just used them. I picked the buffing brush for powder because of its small size, but a kubuki would work just as well.

Here's the full look on my seriously broken out, puffy from allergies, in need of an eyebrow shaping face. You're welcome, world. *sigh*
I used my fingers to apply the moisturizer, concealer, and primer potion, and the brushes we talked about for the rest. I purposefully left out anything heavy (like foundation or face primer) because, personally, I feel gross sweating to death in full makeup. I also omitted anything sparkly or shimmery, because after a day in the parks, I'm shiny enough. I don't need to add to it. Lastly, I kept the budge-proof eyeliner thin, and just on the top lashline, because I only wanted a little definition, and not to advertise I was wearing makeup. A little brown eyeshadow (Tease) runs along the lower lashline, and is more than enough, in my opinion. Heck, I wouldn't have even bothered with my brows if they came anywhere close to matching my hair color (they don't), and weren't in such horrible shape.
You will need the eye primer. Even Urban Decay, for all it's pigmentation and staying power, has been sliding right off my lids in this humidity. If you're going to be in Florida, like I will be, it's going to be even worse.
As for the lips, I like the Revlon because it stains. The color sticks around for freaking ever, and if I don't feel like toting the balmstick around, I can just toss a teeny lip balm with SPF in my pocket for easy sun-protection top-offs.
It's not photo-shoot gorgeous, but it's not meant to be. It's functional, and I think it looks pretty. This is just meant to give you enough color and coverage to look polished in the umpteen vacation photos you'll be a party to, and, if you're me, not frighten the other tourists.
OH! Before I forget--toss the face wipes in the fridge. You'll be glad you did. :)
P.S. In case you were wondering what the heck all that stuff is lying on, it's a nifty little makeup bag from Lay-N-Go. I bought mine from OpenSky, and am not being compensated for telling you about it. I just thought it was cool. See, you lay your stuff on it...

...then pull the drawstring closed! That's it! No wondering how such-and-such is going to fit in it, or how on Earth you managed to get whatchamadingle in there the first go-round. Just toss in the stuff and pull. Plus, there are little zippered and velcro pockets for extra-valuables, like jewelry or contacts.

It's not huge, either, so it won't take up much space in the suitcase. For reference, the little red doohickies sticking out from underneath are the corners of a Netflix envelope.
I don't recommend it for toiletries, since they can leak, but for makeup, it's a dream. 9 out of 10.
*or music festival, or art festival, or film festival, or frisbee golf, or picnic, or camping, or flea market, or antiquing, or hiking, or...well, you get the drift.
Wednesday, August 15, 2012
Back-To-School Beauty 101
My little brother started high school yesterday. High School. I was about to graduate from high school when he was born. I. Feel. Old.
Anyhoo, because li'l bro is now a high school boy, I tend to pay more attention to high schoolers when I'm out. You know, to see what the kids are into these days, so I have an idea of what the brother might like for Christmas, birthdays, whatever. I haven't seen any of the kids he's going to school with, but I have seen a lot of way-too-made up little girls running around the mall, and it got me thinking that, along with pencils, books, and protractors, a high quality, daily makeup routine should be on the school supplies list. I'm all for playing with looks and trends, but just like math and history, a good, everyday-appropriate makeup style is something that every smart girl should learn.
So, my pick for back-to-school makeup kit is this Passport Collection from Buxom. For starters, it's housed in a sleek, mirrored, zip case that can easily fit in a backpack, purse, or locker. Each item has a secure spot in the case, and there are travel brushes included for easy after-gym-class touch-ups.
The colors were the big draw for me, though, along with the fact that there's a nearly complete look, here. The shadow quad includes three lovely neutral shades, plus a darker navy color that can be used as an alternative to a harsh black liner. The blush is a universally-flattering peachy pink, and the gloss--not thick, heavy lipstick--is also a soft peach. Buxom Lash mascara rounds out the palette. All you need to finish the look is a tinted moisturizer (no need for foundation on a day-to-day basis), concealer, and oil-absorbing powder. The palette's not cheap, at $49, but you could consider it an educational investment. Have a great year, guys!
Anyhoo, because li'l bro is now a high school boy, I tend to pay more attention to high schoolers when I'm out. You know, to see what the kids are into these days, so I have an idea of what the brother might like for Christmas, birthdays, whatever. I haven't seen any of the kids he's going to school with, but I have seen a lot of way-too-made up little girls running around the mall, and it got me thinking that, along with pencils, books, and protractors, a high quality, daily makeup routine should be on the school supplies list. I'm all for playing with looks and trends, but just like math and history, a good, everyday-appropriate makeup style is something that every smart girl should learn.
So, my pick for back-to-school makeup kit is this Passport Collection from Buxom. For starters, it's housed in a sleek, mirrored, zip case that can easily fit in a backpack, purse, or locker. Each item has a secure spot in the case, and there are travel brushes included for easy after-gym-class touch-ups.
 |
| Photo credit: Sephora |
The colors were the big draw for me, though, along with the fact that there's a nearly complete look, here. The shadow quad includes three lovely neutral shades, plus a darker navy color that can be used as an alternative to a harsh black liner. The blush is a universally-flattering peachy pink, and the gloss--not thick, heavy lipstick--is also a soft peach. Buxom Lash mascara rounds out the palette. All you need to finish the look is a tinted moisturizer (no need for foundation on a day-to-day basis), concealer, and oil-absorbing powder. The palette's not cheap, at $49, but you could consider it an educational investment. Have a great year, guys!
Tuesday, August 14, 2012
"I Love Princesses"..."I Know"...
I'M TOO OLD!!!!!!!!!!!!!!!!!!!!!!! NOOOOOO!!!!!!!!!!!!!!!!!!!!
You may have heard about Disney's limited-time merchandising...I'm going with "experience", here...where you could purchase a figurine of your likeness frozen in Carbonite? It was launched during Star Wars Weekend, and much to Thomas' weeping and gnashing of teeth, we missed it. Well, now the personalized action figure opportunity is back, only slightly different.
Yes, you can now be a Disney Princess! At least, you can be one if you're between 3 and 12 years-old and have a parent or legal guardian's permission. I'M TOO OLD!!!!!!!!!!!!!!!

The "D-Tech" process takes about ten minutes, and the princess of choice will be personalized to match the child's hair and skin color, as well as bear the child's likeness. In 5-7 weeks, the 7-inch figure will arrive at your door. Pricing runs $99.95 plus $15.95 shipping, with additional 7-inch figures running $74.95, and 3-inch figures priced at $39.95. A silver charm bracelet is included with each purchase.

Admittedly, the finished product can be a little...I don't want to say "creepy", but that's the only word I can come up with. I don't know what it is, but I find them just a bit off-putting. I still want one--don't get me wrong--but I think it's just seeing a child's face on an adult's body that's throwing me. I also don't understand the age restriction. There wasn't a max age for the Carbonite figure. Why one for princesses? I know some 13 and 14 year-olds who would go bonkers for these! Plus, an adult face on an adult body makes more sense. I think Disney is missing out on a very important demographic here. Plus, think of all the Mother/Daughter sales they could be making! The mind boggles.
What do you think? Creepy or Cute? What about the age limit? Leave your comments below!
You may have heard about Disney's limited-time merchandising...I'm going with "experience", here...where you could purchase a figurine of your likeness frozen in Carbonite? It was launched during Star Wars Weekend, and much to Thomas' weeping and gnashing of teeth, we missed it. Well, now the personalized action figure opportunity is back, only slightly different.
 |
| Photo Credit (This and All): Disney Parks Blog |
Yes, you can now be a Disney Princess! At least, you can be one if you're between 3 and 12 years-old and have a parent or legal guardian's permission. I'M TOO OLD!!!!!!!!!!!!!!!

The "D-Tech" process takes about ten minutes, and the princess of choice will be personalized to match the child's hair and skin color, as well as bear the child's likeness. In 5-7 weeks, the 7-inch figure will arrive at your door. Pricing runs $99.95 plus $15.95 shipping, with additional 7-inch figures running $74.95, and 3-inch figures priced at $39.95. A silver charm bracelet is included with each purchase.

Admittedly, the finished product can be a little...I don't want to say "creepy", but that's the only word I can come up with. I don't know what it is, but I find them just a bit off-putting. I still want one--don't get me wrong--but I think it's just seeing a child's face on an adult's body that's throwing me. I also don't understand the age restriction. There wasn't a max age for the Carbonite figure. Why one for princesses? I know some 13 and 14 year-olds who would go bonkers for these! Plus, an adult face on an adult body makes more sense. I think Disney is missing out on a very important demographic here. Plus, think of all the Mother/Daughter sales they could be making! The mind boggles.
What do you think? Creepy or Cute? What about the age limit? Leave your comments below!
Monday, August 13, 2012
Watt's Up, Doc?: Benefit Watt's Up Highlighter Review
I dipped down into the magic bag o' samples again, today, and pulled out Benefit's Watt's Up! highlighter. $30, BenefitCosmetics.com. I could have sworn I'd already reviewed this! I dug and dug through the archives, but can't seem to find anything on it, so if I have, let's pretend I didn't, okay? Thanks!

The sample I have is a deluxe size, and honestly, it's big enough that I may never have to buy the full-size! The packaging is also very cute and sturdy. I only mention this because it's occasionally possible to purchase the deluxe sizes in travel sets. There's also a ton of product in the tube.

The product comes in a stick form, not unlike a lip balm or concealer stick. The texture is a firm, dry cream, and you can either apply straight from the tube, or you can rub onto your fingers for fingertip application.

You can see from the swatch that Watt's Up is a lovely champagne color with lots of sparkle, and is very subtle on your skin.

For fun, I kept my makeup* pretty matte, to show off the highlighter. As I said, it's very subtle. I used Watt's Up under my brow, in the inner corner of my eyes, on my cheekbones, and also on my lips and in my cupid's bow (better picture of that coming up). I like that it adds just a hint of glow, without being overly discoball shiny.

Here's that better picture of the cupid's bow and lips. The lipstick I chose, Buxom Big & Healthy Lip Stick in Amsterdam, is what I'd call a demi-matte. I added this highlighter to the center of the lips for a little fullness and shimmer, and I have to admit that I'm loving the way it looks.
The Good: beautiful color, subtle glow, long-wearing (over 4 hours, and it's still noticeable on the cupid's bow, even after eating and drinking), not greasy, muti-purpose
The Bad: It's $30 for a full-size. That's crazy expensive. Sure, it'll probably die from old age before you even come close to using it all up, but that's still on the high side for a highlighter--even a higher end one.
Final Verdict: It's a 10 out of 10 for the deluxe size, and a 7 out of 10 for the full-size. If you can get your hands on a deluxe sample, it's definitely worth it.
*In case you're wondering, the rest of the makeup was:
Benefit Some Kinda Gorgeous in Medium
Benefit Boi-ing concealer in Light
Benefit Coralista blush
Buxom eyeshadows in Mutt and Collie
Buxom eyeliner in Onyx
Buxom Lash mascara
Buxom Lip Stick in Amsterdam
ELF Brow Kit in Medium
Subscribe to:
Posts (Atom)