With Halloween rapidly approaching (and Christmas rapidly attacking, but don't get me started on that. We'll save that for another rant.), I'm sure at least a few of you are planning costumes, and that some of those costumes are going to need wigs...
...and that Halloween wigs suck.
I'm sorry, but they do. I'd imagine it has a lot to do with the fact that they're shoved in flat plastic bags (and that they tend to be poorly made to begin with...), but they never look anywhere remotely close to what's pictured on the model. Of course, when the price is low, I'm not going to expect too much, and I'm certainly not going to complain. The higher-priced ones irk me, but, again, that's another rant for another time.
Anyhoo, the point of this post is to give you some tips on styling your own cruddy party-store wig into something you'd actually be okay instagramming at a party. These are not "pro tips", but are some things you can do without having to buy (too much) special equipment. Heck, I'm not an expert. I wouldn't even know where to begin styling a high-quality wig. I have, on the other hand, had plenty of experience dealing with cheap synthetics.
So, a few weeks back, Thomas and I filmed a short about goofy supervillains. One of our actresses was supposed to be very glamorous in a retro-sixties way, and while she's gorgeous, I had no idea what I was going to do with her hair. It's absolutely lovely--don't get me wrong, this girl is stunning--but Thomas wanted a very specific look that would require extensions and pieces and about an hour longer than I had. I lost sleep over this, guys. Then, the heavens opened and the angels sang, and this appeared in the Halloween aisle at Target:

Yeah...it sucks. But it was eight bucks, and I could take as long as I needed to style it. You know, as long as "as long as I needed" was less than about 14 hours. I didn't find it until the day before the shoot.
To start, I pulled the wig out of the bag and surveyed the damage. It was...rough. I tried it on, and the bangs were completely uneven and reached my chin, with longer strands dangling lower. The waves and curls were practically non-existent, and what was there was scraggly. That said, the construction of the wig wasn't terrible. The layers were ugly, but they were even, and the color was beautiful. This was definitely a workable situation. I grabbed a hairbrush and started trying to unsnarl the knots.
Now, they do make wig combs for styling, but on a cheapie wig like this, I don't see the point in spending the extra money. I used a regular brush on my hair pieces for theatre, and those were worn and re-styled a lot. I never had any trouble with them, other than some shedding. As it was, this wig came out of the bag shedding. I worked in sections from the bottom up, brushed gently, and did not try to brush directly from root to end. Sure, I did end up with a tribble's worth of fake red hair in my brush in the end, but the hair didn't come out in clumps, or anything like that. In other words, use your own judgement. If you'd feel better using the pro brush, go for it. I just, personally, didn't see a need.
Once the knots were untangled, I set to work styling. First, I grabbed a wig head (mine was from Hobby Lobby, and I think around $10) and pinned the wig in place using big straight pins with colorful ball tips. I wanted to be able to find them easily when time came to put the wig on the actress. Then, I just started styling the hair as if on a real person.
The thing to remember is that this is not real hair. Synthetic hair is plastic and rather thick. It'll hold its shape pretty well without gel or mousse, or anything like that. Also curling irons and hot rollers (and heat implements, in general) will melt the strands. You can tease the hair to a certain extent, and you can roll it by misting sections with water, rolling on foam curlers, and allowing to dry. You can pin it, you can braid it, you can manipulate it into whatever style you choose, just don't use heat or products. Here's a picture of mine on the stand, rollers still in place:
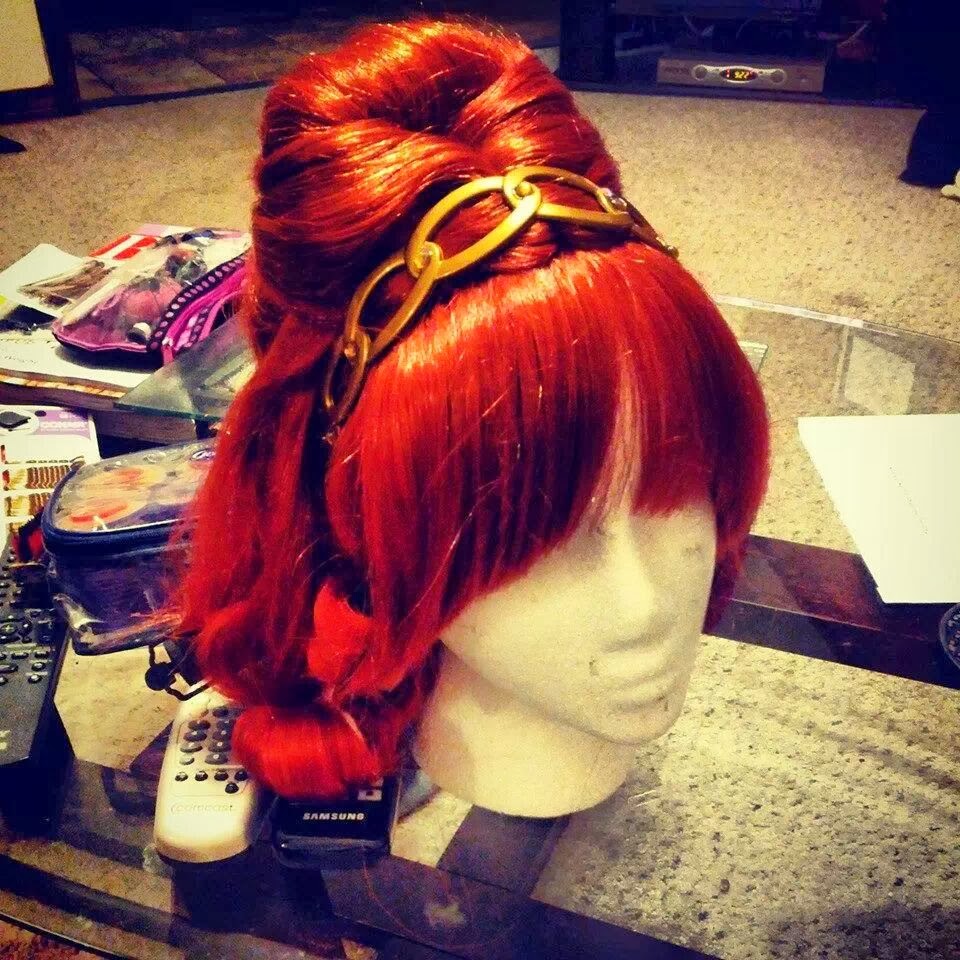
For this look, I kept the existing middle part and divided three sections off of it. These were clipped out of the way while I teased the crown into a bouffant. I wrapped the middle divided section over the teased portion and pinned the ends under to create the pouf. Then, I pinned the front sections around that, hiding all pins as I went. The ends were misted with water, then twisted and rolled on satin-covered foam rollers (from Sally Beauty Supply) to create waves, and then the bangs were trimmed to a more reasonable length, with the intention of finishing the trim once the wig was on the actress (and we all know about good intentions...). I added the headband the actress would wear to make sure the placement was about what I wanted.
As luck would have it, I wasn't even in the same building as the actress when the wig went on, and wasn't able to even see it in place until shooting had already started and it was too late to trim the bangs any further. Here is a really lousy, heavily cropped, way too dark shot of the actress wearing the wig:

Why yes, that is a clown on her left and a gorilla on her right. Why do you ask?
And here's the promo photo from the short. They're channeling The Breakfast Club. I think the wig looks particularly nice here:

Should anyone else need to wear this, I can wash it. I would have to be very careful with the pouf, since I really don't want to have to do that again, and it would definitely have to be re-curled, but washing these kinds of wigs is not a problem. Just use cool water and a very mild soap, like baby shampoo. Again, there are special wig shampoos out there, and you can use those if you want, of course, but the baby shampoo will work just as well, and it's a little more readily available.
So, in conclusion, here are the basic tips again:
- If you use a regular hairbrush, start at the ends and work your way up. Avoid putting any stress on the roots. You can also use a professional wig comb, available at Sally Beauty and any number of online retailers for fairly cheap.
- Do not use hair products. A little finishing hairspray is okay, but nothing else is necessary. It'll hold on its own.
- DO NOT USE HEAT! EVER! THE HAIR WILL MELT!
- Curl the wig by misting with water and rolling on foam curlers. Allow to air dry.
- You can cut the wig, if necessary.
- You can wash the wig with cool water and baby shampoo. Allow to air-dry, then re-style.
I hope this helped! Have a great Halloween, and be sure to share any cool wig pics in the comments.
No comments:
Post a Comment
Add your own ramblings, musings, or existential ponderings here--just keep it clean and keep it kind.