Showing posts with label DIY. Show all posts

Monday, March 31, 2014

Attack Of the Pint Glass!: Quirky B-Movie Themed Coaster DIY


Hi, all! I'm back (sort of)! Things have been nuts, but I'm happy to report that my sunroom renovation is about 90% done. There's still some light clean-up to do, and a couple of small decorative pieces to buy...and, of course, an air hockey table to pawn off find a good home for, but the room is functional again. That's huge, y'all. I was starting to wonder if we had a house elf sabotaging us--sort of a "Harry Potter must not finish the sunroom!" kind of deal.
 
Anyhoo, while I'm not quite ready to inundate you with pictures just yet, I did want to share a DIY project that worked out. I'm not even going to say "worked out well". It did, but the mere fact that it worked out, period, makes it one of the most successful projects I've tried, to date. Basically, the idea of spending upwards of twenty bucks for a set of coasters made me ill. We needed them, but even the cheapest, ugliest ones at, oh, pick a store, were hella 'spensive. I don't want to spend more on something to set a glass on than I did for the glass. Maybe I'm cheap, but it irritated me.
 
Somewhere along the way--can't remember where, but if I can find it, I'll link it--I heard about using decoupaged ceramic tiles, and thought, "Well, duh. Why didn't I think of that?" I already had the perfect decorative pieces ready to go. Thomas bought some B-movie poster postcards a few years ago, but we repurposed their frame, so they've been collecting dust. How cool would they look sitting around the bar? Thomas loved the idea, so I set to work.


This is a very simple project, so very few supplies are needed, and you probably have most of them if you're even slightly crafty. I wanted to make six coasters, so I needed:
 
  • 6 movie poster postcards. I already had mine, but you can find them for pretty cheap on ebay. The linked ones are $5.99 for a lot of six.
  • 6 ceramic tiles. These cost a whopping $.16 each at Lowe's.
  • Mod Podge. This was the priciest component at $7.99, but I barely used any. This bottle will last for ages, and pay for itself in future crafts.
  • Clear spray paint. You need this to seal the coaster, and take away any of the tackiness from the Mod Podge. (side note: Thomas wanted to know if we could use clear spray paint to take the tackiness out of other stuff, like reality shows or leisure suits. I said I didn't think so.) Again, I already had this, but it runs about $3 at Walmart.
  • Plastic bumpers. I got two packs for $5 at Walmart.
  • A brush of some sort. I had a sponge applicator left over from another project, so I used that. Honestly, a makeup wedge would probably work. You shouldn't have to spend more than a few cents on this, if that.
     
If you have to buy everything, this project could run about $23, which is more than the store-bought ones I refused to buy on principle. That said, I had some stuff, already, bringing the total down to slightly less than $14. The next time I do this, I won't need to buy the Mod Podge, which will bring the total down to about $6, plus whatever decoration I put on the tiles.
 
I apologize for not taking in-progress shots, but this is pretty self-explanatory, anyway.
 
  • Measure the tile, then cut your decorative piece to fit. You'll want to leave a little room on the outer edges, so, if your tile is 4"x4" (for example), you might want to cut your decoration to 3.5"x3.5".
  • Using your sponge applicator, spread a thin layer of Mod Podge over the tile.
  • Center your decorative piece, and allow to dry.
  • Using your sponge applicator, spread another thin layer of Mod Podge over the tile, covering the decoration, and allow to dry. Multiple coats may be needed, depending upon the thickness of your decoration. I used four thin coats, with a little extra built up over the corners. The finish will be textured, so keep that in mind.
  • Seal with 1-2 coats of clear spray paint.
  • Attach bumpers to the underneath corners, to prevent the tile from scraping up your furniture. You could also use felt or cork--anything that can act as a safeguard for your tabletops.
 
This may seem like a lot of applying and waiting for tiles to dry, but each coat only takes about 15 minutes to set. If you do these in an assembly-line fashion, by the time you finish the last tile, it's time to start in on the first again. Here's the finished coaster:
 

Top View


Side View. You can see some of the texture, and where the bumpers lift the tile off of the table.


Here are a few on display in the wine bar. I think they work well with the orange, gold and brown color scheme.


And here's a final look at a couple on our pub table. The shot glass centerpiece is going to hold candles...eventually. Until then, tequila, anyone?
 
I hope you've enjoyed this project and sneak peek at the finished room. Have a great week, everyone!

Tuesday, March 11, 2014

InstagRandomness

I am so tired.

I mean, I am flat-out, fall-on-your-face, dear-God-I-should-not-be-driving exhausted. Poor Thomas is, too. I'd like to blame it all on the time change, but we've been burning the candle at both ends for so long now, this was bound to happen. At this point, I'm sitting upright. Please don't ask any more of me...and pass the coffee. Thank you.

Now, for your viewing entertainment, I give you: Random Instagram Photos! InstagRandomness, if you will. If you enjoy these, you can follow me @adorablenapalm. I don't have a hashtag (I'm not hip with all this newfangled social media hullaballoo. In my day, I had to dial-up to get to the world wide web. I had to wait for a connection and listen to a whole lotta screeching, just so I could reach America Online. Also, I'm apparently 106 years old now.) but I am always open to suggestions.

And now, the InstagRandomness!

Considering the March ipsy bags have already started arriving, I should probably show you a picture of the February bag. I actually took about two-dozen photos, with close-ups, swatches...the whole nine yards...and they all turned out orange. All of them. This was the best one of the bunch.


My bag contained Zoya nail polish in Odette, City Color Be Matte blush in Fresh Melon, Tini Beauty Eyetini in Spiced Rum, POP Beauty lip gloss in Peony Petal, and a Nume hair mask. The bag was a very cute hot pink with pink leopard lining.

Briefly, the Zoya is a lovely plum cream. For me, the name Odette conjurs up visions of soft white feathers, but this is beautiful, just the same. The blush is ginormous, crazy pigmented, and the perfect Spring-y coral. It's sitting in my current rotation. The Eyetini is fabulous. It's a rich bronze cream that applies easily, blends well, and reminds me a lot of my favorite MAC eyeshadow, Woodwinked. I lucked out with the POP Beauty lip gloss. It seems that several subscribers had issues with a gasoline-like smell, but mine is fine, so far. The rubber cap does have a distinct rubber odor, but that's to be expected. The gloss itself is more like a liquid lipstick. It's opaque, a pretty orange-leaning pink, and stays on fairly well. It's not my favorite thing, but I've worn it quite a bit. Lastly, the Nume hair mask conditions nicely and smells of Patchouli (to me, anyway). All in all, February was a very good bag month.

Now, if you've been reading this blog for any length of time, then you probably have noticed my complaining about the renovations we're doing to our sunroom. Well, folks, here's a sneak peek:


The walls are Orange Spice (or Spiced Orange? I can't remember) from the Better Homes and Gardens collection at Walmart. The door is Tierra Brown from the same line. The blue is painter's tape, and I'd better get used to it, because it has embedded itself into the walls and glass. Yay.

The floor is mostly done, now (just a few more planks. Thank God), but here's a shot of the new floor going over the old laminate tile.


I am in love with this floor. The wooden planks are actually stick-down vinyl tile! You can cut it with scissors (and I have...oh boy, have I ever). The brand is Style Selections in Antique Woodland Oak, and Thomas and I found it at Lowe's. If I hadn't put it down myself, I'd never believe it was stick-down tile. It even feels like real wood. Ah-maze-ing!

This little "weekend project" has been going on for a solid month and a half. Of course, we did take one weekend off to go to the brand-new Pensacon convention in Pensacola. Remember, this was the first year EVER of this con. First. Year. Now, look at the vendor floor:


Holy hordes of people, Batman! There were eleven thousand attendees on Saturday. Not over the course of the weekend. Saturday. That's nuts. And awesome. We were there Saturday and Sunday, and had an absolute blast. I got to see Axel from The Walking Dead, and nearly bumped into Nicholas Brendon in a hallway. It was magical. If you get a chance, read the article I linked to and join me in being highly impressed with this fledgling con.

In addition to celeb-spotting and souvenier shopping, Thomas got to participate in a panel on Indie Filmmaking. I sat in the front row and grinned like an idiot while snapping pictures. I'm so proud of him. There were six other highly accomplished speakers, and we were so honored to have Fighting Owl counted among their work.


So, this happened...


I kind of love him. He sits in our office/studio, next to a shadow box filled with zombie faces. That seems fitting. My voice students haven't had a chance to meet him, yet, so I'll have to let you know how that goes. The dog likes him. He also likes the Krampus. However, Batman is not allowed anywhere near him. The chihuahua may not be the best judge of character...

Speaking of Ronnie, I leave you with a visual representation of the word "spoiled":


I love that little face. Both those faces, actually. :)

Friday, February 21, 2014

The More You Know *Cue Shooting Rainbow Star*

The longer this room renovation goes on, the more I've come to view it as a learning process. For example: I now know that I will hire professionals in the future.

Recently, I posted an If You Give a Mouse a Cookie-esque recap of the construction side of the project. We're still nowhere near done with that, but I decided to go ahead and work on getting the decor part going, so that when the room is finished, it might actually *be* finished. I mean, how hard could it be to pick up some pillows and a throw rug? Right?

DID YOU KNOW

If you paint a room orange, you will realize that the most common color for whatever it is you're looking for is orange, but never the right shade--not even close?

Once you buy a curtain with an accent color of, say, yellow, you are stuck with that color, and have to find a way to tie it into the rest of the room, no matter what?

The color yellow is downright impossible to find? Closetmaid doesn't even make a yellow fabric bin for their ever-popular cube system. No one does.

Stein Mart has gorgeous stuff? I had no idea. Unfortunately, their website doesn't specify colors. They do have a wonderful return policy, though. They also only carried one (1) yellow pillow in the shade I needed. I got it. Of course, I need two...

For every three cans of spray paint you buy, at least one will have a faulty, broken, or missing spray nozzle?

Furniture can reject spray paint? The color can, literally, slide right off. (And yes, I used "literally" correctly. I watched this happen.)

The price difference between DIY-ing a questionably attractive drink cart out hardware store and amazon finds, and buying a beautiful, ready-made, actual-piece-of-furniture wine bar is surprisingly negligible?

Oil-rubbed bronze is all the rage until you actually need it?

Circleware Moonlight wine glasses are ginormous, and only $6.99 for four at Ross? Who wants to help me put together the wine bar? There may still be painter's tape on the walls, and the subfloor may be completely visible, but I'm sure it'll all look much better once the furniture's in place. Right? Now, be a dear and pass me that Moscato.

Monday, February 10, 2014

If You Decide To Paint the Sunroom: A Cautionary Tale

If you decide to paint the sunroom, you're going to have to take down the curtains and blinds.

When you take down the curtains and blinds, you're going to find that not all of the window trim is intact, and some of it doesn't even exist. You'll also see that none of the windows are completely straight, so blinds don't fit well. For a while, you won't have any window treatments, and your neighbors will get to know you quite well.

That's when you'll decide to frost the windows.

When you decide to frost the windows, you're going to need a dust mask, and white powder is going to blanket everything in the room. You'll have to keep a designated pair of shoes out there, so you don't track toxic dust into the house, and the dog will be afraid to walk through the room to get outside, so you'll have to carry him. The windows will look great, though, and you can finally get around to painting.

When you finally start to paint the sunroom, you'll notice what looks like water damage near the floor. You'll have to pull the carpet back to inspect. There won't be water damage (thank God!), but you will notice cracks and breakage in the subfloor. You'll need to rip up the carpet to fix it. Luckily, you were already planning to take up the carpet, so you go ahead and throw the carpet outside until the next trash day.

That's when it'll snow. In lower Alabama. For the first time in God knows how long.

When it snows (okay, ices) in lower Alabama for the first time in God knows how long, the trash schedule will be thrown completely out of whack, and you'll end up with wet, mildewing carpet on your courtyard for three weeks. It's okay, though, because the neighbor's cat will love to use it as a scratching post. At least now you can lay down the new floor.

When you go to lay down the new floor, you're going to find that it doesn't completely fill in the gap that the carpet left between the subfloor and the wall. When that happens, you're probably going to curse a bit, and then go to Lowe's to get transition pieces. While you're there, you can pick up that window trim you're going to need, some drywall tape and mud, and pick out a new light fixture and ceiling fan for the sunroom. You'll probably waste the remainder of the time you could have been working in the sunroom, but at least you'll have escaped the fumes from the window frost for a bit.

Once you have the transition pieces and window trim, you're going to realize that you can't use any of it until you've painted the walls. That's when you'll finally slap on the first coat of paint.

When you slap on the first coat of paint, it will become apparant that you'll need at least two more coats. That's when you'll have to go to Walmart to get another gallon.

When you get to Walmart, you'll find that everyone in the paint department is on lunch. While you're waiting, you'll notice that pool tables are on sale. You'll spend the next fifteen minutes on your phone, trying to see if you can get one delivered. You won't be able to, but the diversion will keep you from snapping. Eventually, a very nice, albeit disgruntled, manager will come and mix up your paint, and you can go home.

When you get home, you'll start painting again. Somewhere between the second and third coats, you'll discuss the possibilty of re-enacting The Shining with the chihuahua and his toys. That's when you'll realize that the fumes have gotten to you, and you'll open the outside door to let in some fresh air.

When you open the outside door to let in some fresh air, you're going to look out onto your patio and notice that it's uneven.

And when you notice the patio's uneven, you're going to want to level it.

And when you want to level it...

...you're going to admit that you need help and call a licensed professional to come out to your home and do it properly.

The End.


Friday, December 13, 2013

Sparkle, Baby!!: Easy DIY Holiday Decor Ideas

Seriously? Are there really only eleven more days until Christmas Eve? Two more Saturdays? The heck?

Given that we are at, basically, the last minute, here are a couple of last minute ideas for gussying up the old homestead. The first one should take, oh, maybe half an hour, tops. If the second one takes more than five minutes, I'll be gobsmacked.

First up, how about a fancy-schmancy candle-holder? Granted, I'm using mine to store makeup brushes and pencils, but a flameless candle would be equally at home and worlds prettier.


Stupid me forgot to take in progress shots, probably because it was such a quick and easy process. I started with a cleaned out candle jar from Bath and Body Works. Glassware from Dollar Tree would work just as well, though.

First, I spritzed the inside of the jar with spray adhesive. Then, I dumped in a ton of fine glitter, held a paper plate over the top, and shook (the lid would have been a much better idea, but I accidentally threw it away. Don't be like me; keep the lid). The excess glitter went back onto the paper plate, and that was that. You can stop right there.

Of course, I am an over-achiever, and never "stop right there", even when I probably should. Once I had the inside of the jar glitter-coated, I attached some black ribbon to the jar with a little hot glue. Before I did that, though, I tied on a rhinestone pendant that I got in a pack from Michael's. And, seriously, that's all there is to it. Between coupons and stuff I already had at home (jars, adhesive, hot glue), I spent less than ten bucks, and could still do several more. Come to think of it, I bought the pendants for another project, and these were leftovers, so you could say that I did these for the cost of the glitter. Wow.

The second project was a slap-dash effort, because I needed something to go on my mantle. These are some glass vases from Dollar Tree. I bought them for a candy buffet, and they were just collecting dust. A couple of packs of mini-ornaments from Walmart, and a few larger leftover tree ornaments later, I have an attractive mantle display. (Well, I think it's attractive. You might not. I wouldn't know. I'm not you. I'm me, so it's attractive.)

The hardest part was arranging the mini-ornaments so that I had enough for three vases. If you count the cost of the vases and the cost of the mini-ornaments, I have about ten bucks invested. Again, I already had the vases, so I don't count them--seven dollars, then. I separated the three with last year's Bath and Body Works candles (gee...do I like Bath and Body Works candles, or what?), and I really like the effect.

Here's my low-key, easy-peasy, holiday-decorated mantle. Yes, the puppy has his own stocking. Yes, it does hold more than either of his people's. Yes, he is incredibly spoiled.

I wish I had a picture of this at night. The stars light up (it's a card holder!!), and the candles give off a warm, cozy glow. Anyway, those are two super-cheap, super-simple DIY projects that might come in handy if you're throwing a party in the next couple of weeks and need some extra decor. Or, if you're a homebody like me and just enjoy glitter. On everything. Including the poor, spoiled puppy. That'll teach him to demand attention when there's crafting going on. Guess who's getting a bath! Merry Christmas!

Tuesday, October 15, 2013

Wigging Out: How To Make Your Halloween Costume Wig Look Less Terrible

With Halloween rapidly approaching (and Christmas rapidly attacking, but don't get me started on that. We'll save that for another rant.), I'm sure at least a few of you are planning costumes, and that some of those costumes are going to need wigs...

...and that Halloween wigs suck.

I'm sorry, but they do. I'd imagine it has a lot to do with the fact that they're shoved in flat plastic bags (and that they tend to be poorly made to begin with...), but they never look anywhere remotely close to what's pictured on the model. Of course, when the price is low, I'm not going to expect too much, and I'm certainly not going to complain. The higher-priced ones irk me, but, again, that's another rant for another time.

Anyhoo, the point of this post is to give you some tips on styling your own cruddy party-store wig into something you'd actually be okay instagramming at a party. These are not "pro tips", but are some things you can do without having to buy (too much) special equipment. Heck, I'm not an expert. I wouldn't even know where to begin styling a high-quality wig. I have, on the other hand, had plenty of experience dealing with cheap synthetics.

So, a few weeks back, Thomas and I filmed a short about goofy supervillains. One of our actresses was supposed to be very glamorous in a retro-sixties way, and while she's gorgeous, I had no idea what I was going to do with her hair. It's absolutely lovely--don't get me wrong, this girl is stunning--but Thomas wanted a very specific look that would require extensions and pieces and about an hour longer than I had. I lost sleep over this, guys. Then, the heavens opened and the angels sang, and this appeared in the Halloween aisle at Target:


Yeah...it sucks. But it was eight bucks, and I could take as long as I needed to style it. You know, as long as "as long as I needed" was less than about 14 hours. I didn't find it until the day before the shoot.

To start, I pulled the wig out of the bag and surveyed the damage. It was...rough. I tried it on, and the bangs were completely uneven and reached my chin, with longer strands dangling lower. The waves and curls were practically non-existent, and what was there was scraggly. That said, the construction of the wig wasn't terrible. The layers were ugly, but they were even, and the color was beautiful. This was definitely a workable situation. I grabbed a hairbrush and started trying to unsnarl the knots.

Now, they do make wig combs for styling, but on a cheapie wig like this, I don't see the point in spending the extra money. I used a regular brush on my hair pieces for theatre, and those were worn and re-styled a lot. I never had any trouble with them, other than some shedding. As it was, this wig came out of the bag shedding. I worked in sections from the bottom up, brushed gently, and did not try to brush directly from root to end. Sure, I did end up with a tribble's worth of fake red hair in my brush in the end, but the hair didn't come out in clumps, or anything like that. In other words, use your own judgement. If you'd feel better using the pro brush, go for it. I just, personally, didn't see a need.

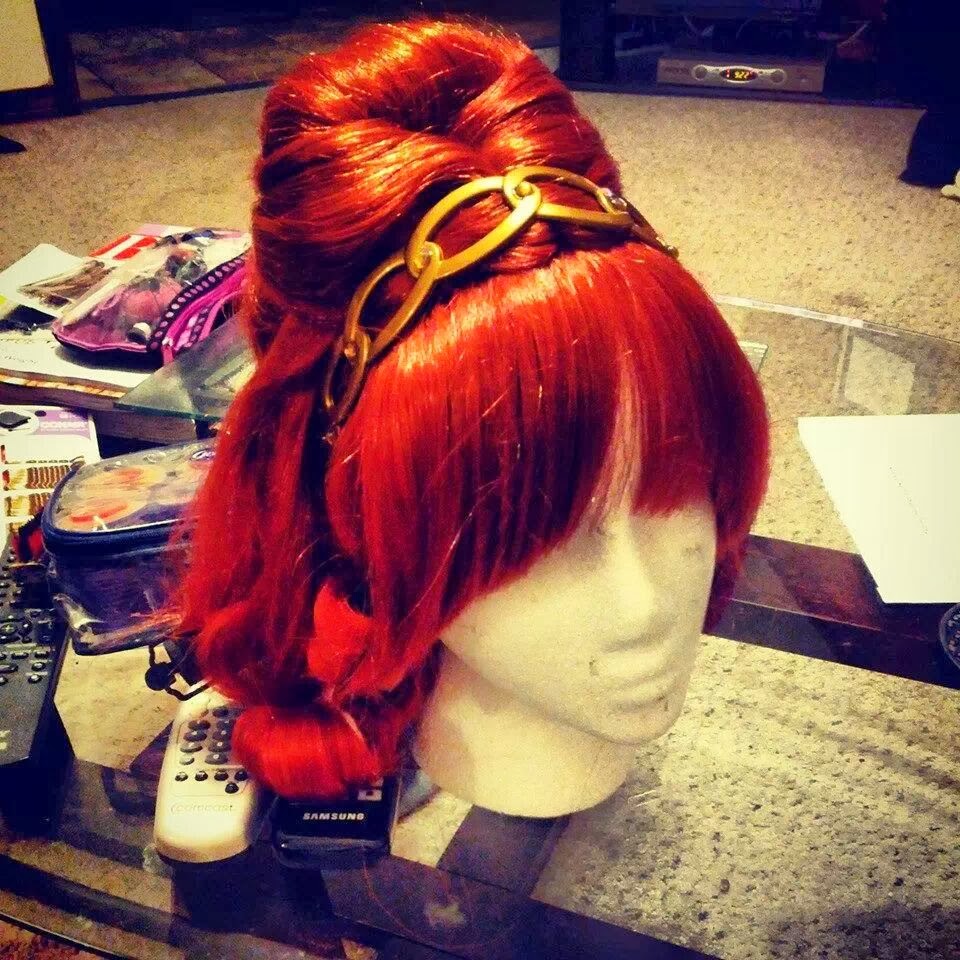
Once the knots were untangled, I set to work styling. First, I grabbed a wig head (mine was from Hobby Lobby, and I think around $10) and pinned the wig in place using big straight pins with colorful ball tips. I wanted to be able to find them easily when time came to put the wig on the actress. Then, I just started styling the hair as if on a real person.

The thing to remember is that this is not real hair. Synthetic hair is plastic and rather thick. It'll hold its shape pretty well without gel or mousse, or anything like that. Also curling irons and hot rollers (and heat implements, in general) will melt the strands. You can tease the hair to a certain extent, and you can roll it by misting sections with water, rolling on foam curlers, and allowing to dry. You can pin it, you can braid it, you can manipulate it into whatever style you choose, just don't use heat or products. Here's a picture of mine on the stand, rollers still in place: 


For this look, I kept the existing middle part and divided three sections off of it. These were clipped out of the way while I teased the crown into a bouffant. I wrapped the middle divided section over the teased portion and pinned the ends under to create the pouf. Then, I pinned the front sections around that, hiding all pins as I went. The ends were misted with water, then twisted and rolled on satin-covered foam rollers (from Sally Beauty Supply) to create waves, and then the bangs were trimmed to a more reasonable length, with the intention of finishing the trim once the wig was on the actress (and we all know about good intentions...). I added the headband the actress would wear to make sure the placement was about what I wanted.

As luck would have it, I wasn't even in the same building as the actress when the wig went on, and wasn't able to even see it in place until shooting had already started and it was too late to trim the bangs any further. Here is a really lousy, heavily cropped, way too dark shot of the actress wearing the wig:


Why yes, that is a clown on her left and a gorilla on her right. Why do you ask?

And here's the promo photo from the short. They're channeling The Breakfast Club. I think the wig looks particularly nice here:


Should anyone else need to wear this, I can wash it. I would have to be very careful with the pouf, since I really don't want to have to do that again, and it would definitely have to be re-curled, but washing these kinds of wigs is not a problem. Just use cool water and a very mild soap, like baby shampoo. Again, there are special wig shampoos out there, and you can use those if you want, of course, but the baby shampoo will work just as well, and it's a little more readily available.

So, in conclusion, here are the basic tips again:
  • If you use a regular hairbrush, start at the ends and work your way up. Avoid putting any stress on the roots. You can also use a professional wig comb, available at Sally Beauty and any number of online retailers for fairly cheap.
  • Do not use hair products. A little finishing hairspray is okay, but nothing else is necessary. It'll hold on its own.
  • DO NOT USE HEAT! EVER! THE HAIR WILL MELT!
  • Curl the wig by misting with water and rolling on foam curlers. Allow to air dry.
  • You can cut the wig, if necessary.
  • You can wash the wig with cool water and baby shampoo. Allow to air-dry, then re-style.
I hope this helped! Have a great Halloween, and be sure to share any cool wig pics in the comments.

Monday, September 30, 2013

Life Hack: $1 Magnetic Palette

I'm probably super late to the party on this little life hack, so I claim absolutely no ownership of the idea. I've seen it on countless blogs and youtube videos, and thought, "Well, shoot! That's brilliant. Why didn't I think of that?"

So, for those of you out there who also didn't think of that, I give you this post:

HOW TO TRULY CUSTOMIZE AN E.L.F. CUSTOM COMPACT


This is the E.L.F. Custom Compact. It measures 3x3 (perfect purse size), and costs a buck. I picked mine up from Target, but they're available online, and possibly at Walmart or Walgreen's, if your's has started carrying E.L.F. A couple of the stores in my area have.

And here's the inside:

Photo Credit: E.L.F. Cosmetics
I totally forgot to take a picture of the inside before I started this little project. Whoops.

Now, looking at the above photo, you see that the top half of the compact is a mirror, and the bottom half is sleek white with openings for four small pans and a tiny applicator. We're going to leave the mirror alone, and use a butterknife to pop that bottom white portion out. (It works best to slide the knife under the inside edge of one of the circles) Once you've done that, you'll be left with a shiny metal insert, and the inside of your compact will look like this:


The pretty shiny metal isn't attached to the compact, so you will want to use some super glue or hot glue to make sure it stays put inside. If you use hot glue, make sure that the glue is completely melted, waste NO time, and press the metal in as flat as you can get it. I waited a second too late, and my hot glue hardened enough to keep me from being able to press the metal down fully, and I couldn't get my compact to close when filled. It works now, but I got to spend a good ten minutes peeling and scraping out all of that thick glue, and let's just say that was less than fun.

Sticking in the de-potted pans was a cinch. There are two ways you could do it: A. Stick a full magnet sheet in the bottom, or B. stick magnets to each pan. Either way will work, but I chose to stick the magnets on to each pan. I thought it looked nicer. If you do decide to use the full sheet, you can skip gluing in the metal liner.

The finished compact isn't huge, but I was surprised at how much I could fit in it. Above, I have the three de-potted (de-plastic and cardboard-ed?) EM Cosmetics eyeshadows and lipgloss, an Urban Decay blush and teeny-tiny shadow from an old Face Case, and a Stila shadow from the Pro Artist Palette No.1. I honestly couldn't tell you how many, say, MAC shadows would fit, but this is great for all of those little sample sizes or fragments of palettes that most of us have lying around. I'm actually planning to take this on vacation with me, and this palette alone gives me multiple eye looks, as well as a blush and lipgloss. I may not have to take any other shadows, blushes or lippies. I probably will take more, but I don't have to.

I will warn you, though: the compact isn't the highest quality. It's sturdy, and I feel like my products will be protected in my purse, but the construction is not the greatest. The closure is flimsy and easily breakable. I also feel like a drop onto a hard floor would be catastrophic. That said, the mirror is huge and actually usable, and the lid stands up without having to be propped against something. Also, allow me to remind you that this thing costs a dollar! One dollar. One. A small Z-Palette, which is only marginally larger, runs $14 and doesn't come with a mirror. Also, taking the larger Z-Palettes I own into consideration, I really don't think it would be much more likely to survive a hard drop--at least, not without a few casualties.

So, there you go. That's my life hack o' the day. Has anyone else tried this? Any suggestions for decorating it? Let me know in the comments.   


Tuesday, September 10, 2013

Bizarre Halloween Tutorial: What Did You Do Today?

Oh, nothin' much. Just cleaned the bathroom, mopped the kitchen, and painted a severed hand? You?

I've gotta say, it looks pretty darn good, too.

Here's what it started out as:

Photo Credit


 And here's how it looks now:


As I've said before, my world is a little strange. The hand's for a short we're filming next weekend, and while it's still not quite finished (those seams! My God, those seams!), I'm really happy with it. Now, I know most of you guys aren't going to need to film a severed hand, but some of you may be planning Halloween decorations, so I thought I'd share how Thomas and I livened up the undead hand.

The hand, itself, came from the local party supply store. It was in a mesh bag with another hand and a couple of feet (and that is a sentence I never thought I'd write). The hand is almost exactly the same size as my hand. Aside from the zombie color and plastic bone sticking out, it was fairly realistic, and the whole bag cost about ten bucks. I guess, if we ever need any severed feet, we're all set.

I'm not counting that out...

Anyhoo, Thomas gave the entire hand a base coat of Apple Barrel acrylic in Lite Mocha (two coats), which looks like my liquid foundation, and repainted the red "blood". The red is really just a guideline for where to put the fake blood...that I still need to make and just remembered. Great. Once all the paint was good and dry, I started detailing.

The nails are fake press-ons from the drugstore. The hand had some nail bed detailing that I was able to use as a guide for sizing. The nail kit came with glue, but I opted to attach the nails with some rhinestone glue. Honestly, I figured there was less chance of gluing my fingers together that way.

Once the nails dried, I was able to file them into the shape I wanted. Then, I painted them with two coats of Essie Naughty Nautical. After that dried, I took a small detailing brush and touched up the skin-colored paint, adding in cuticles as I went. Finally, I painted one more coat of the Essie, just to clean up the cuticle area a bit.

When all of that dried, I was able to add the finishing touches. With a sponge, I applied a cream foundation over the entire skin area, giving the hand more of a natural skin finish. I set the foundation with a powder, then brushed a berry blush very lightly over the entire hand, concentrating the color around the knuckles and nails--where my own skin is naturally pinker. Then, I used a fluffy brush to apply a matte bronzer over the entire hand. The final effect is a little unnerving. It looks real. And off-putting. And kind of cool.

So, if you're in the market for a life-like severed hand...well, here you go. Now, if you'll pardon me, I'm going to go reevaluate my life choices.

Oh, who am I kidding? I freaking love this kind of stuff. Bring on Halloween!

Monday, July 22, 2013

While I Was Out: Random Phone Pictures Edition!

As any of you who have been following for a while know, things are never quite "normal" at my house. For crying out loud, this happened in my backyard:

Krampus Peek-a-Boo! I see you!

That's my sweet, adorable hubby, by the way. He was the stunt double for our creature actor. Truth be told, though, I think he just wanted an excuse to run around the backyard and scare people. 

Now, that was back in...February? I think? Anyway, things are still bonkers around the Smith crib (see? I'm hip and with it), which is one reason I've been MIA so much around here. I thought, for fun, I'd sift through my camera phone pics and see what popped up. Maybe they'll better illustrate the weird.


So, we made a mascot head. This is (just the head) of Punchy the Fighting Owl. The rest of the costume is still in progress, but the hard part is done. In case you're wondering, we made the body out of insulation foam and a hard hat, the eyes out of layers of screen door mesh and acrylic paint, and the whole thing is covered in polyfill, felt, and furry cloth. Oh--and about 612 hot glue sticks. We ended up sort of making the whole thing up as we went along, but the inspiration for the design came from this Instructable.


No. I did not make my own DIY Redneck Wine Glass (sold in other stores for $15.99, apparently). We're in pre-production for a couple of shorts, so my "grocery" lists are a little...funky. I had to run into Dollar Tree to look for a laser pointer, a car phone charger, some rubber snakes, glass stones, paint supplies, and a fake goldfish. (Oddly enough, the hardest to find item on that list has been the bag of rubber snakes.) I saw this set-up and couldn't resist snapping a picture. Then, I went home and glued (no kidding) 436 amber rhinestones onto leopard material.


I know I've mentioned it about a gazillion times on here, but Thomas and I have been working really hard to clean up our backyard. Because we're gluttons for punishment, we decided to add a water feature to this strange little random patch of dirt that lay in the middle of a rockwork embankment. Here it is at the OMG-I'm-almost-finished-with-this-bleepidy-bleep-bleep-thing-and-I-ran-out-of-rock-! stage. It's finished now, though, so I'll have to take a picture and let you guys see it in all it's waterfall-y glory.

Good Lord, we need to power wash the courtyard! Here's Thomas, doing his best Vanna White impression to show off the piece de resistance in our backyard makeover: the movie screen. It was a DIY project, made from movie screen material bought off of Amazon, and some lightweight wood pieces from Lowe's. It took about five minutes to screw together the wooden frame, and then the fabric is just stretched over it and stapled. We've hung it onto a couple of fence posts using picture hanging hooks, and the screen lives indoors when not in use.

And, because I've just been so bored, I decided to completely renovate my closet. This is still at the "in progress" stage. I've still got a ways to go on organizing, and then I have to empty it all out and paint. Expect a blog post on this when it's done...if it's done...


And, most exciting of all, I took the puppy to the vet. Trust me, he wasn't anywhere near as happy as he looks.

There's a lot of really cool stuff coming up in the next few weeks. Fighting Owl Films is doing a panel at Pensacola Paracon, and then Thomas and I are (most likely) going to the Sidewalk Moving Pictures Festival. Our short, C.U.P.I.D., was accepted, so if you're in the area in August, you should go check it (and the rest of the festival--should be awesome) out. 

Have a great Monday, y'all!

Tuesday, July 2, 2013

The Project

I'm sorry that I haven't written much here lately. It's been...interesting...

Okay, so Thomas and I bought a house. If you've been following me for any length of time, you probably already knew that. You probably also know that the backyard was in shambles, and we've been trying to get it cleaned up, lest Adam the Woo think us abandoned and try to explore our flower beds (in which case we would happily invite him in for a Mountain Dew). Well, getting it cleaned up wasn't the only project. You see, we're attempting to build an outdoor movie theatre.

We're nothing if not ambitious. And mosquito-bitten. Very mosquito-bitten.

So, for the past several weekends (and any other time we could fit in), Thomas has been working on building a fence and screen, we both put together a grill area, and I've been constructing a rock work fountain and some decorating.

We are nowhere near finished. Not even close, but it is starting to take shape. Also, have I mentioned that we have absolutely no construction experience? The set we put together for The Night Shift was mostly foam, and the one wooden piece kept falling apart. The set for SuperFriends was nothing but sheeting, and we couldn't keep that up. This is foreign territory, but it was either DIY or have it all done professionally, and we sure as heck couldn't afford that. I was brought up by parents who taught me that I could do anything I wanted if I used my brain and put forth the effort--be it painting a t-shirt or laying concrete--and they taught me this in true-DIY fashion: by doing it themselves. My fifth birthday was amazing. I had a Rainbow Brite-themed backyard carnival, complete with games, races, and a beautiful cake. All the neighborhood kids were invited, too, so it was huge. My parents couldn't spend a lot of money because my dad was in and out of work, so they made everything. Mom figured out how to pipe Rainbow Brite onto a homemade cake, and sewed little bean bags for the toss game Daddy made out of plywood. I think I even had a little outfit that Mom threw together on the sewing machine. Twenty-eight years later, I still remember that party and how much fun we munchkins had at it.

It seems fitting that I'm carrying on that "well, we'll figure it out" spirit in that same backyard. Every day, I walk through the living room with my parents' wainscot experiment (a success!), into the sun room that my Dad built (it's still standing and up to code...even if I don't know which light switches go to what), out onto the courtyard that Daddy laid, concrete brick by concrete brick, and look at the terracing that he and Mom designed. There are still boards and posts and half-empty bags of mortar lying around, but now they're mine and Thomas'. The yard is still being figured out, just by a new generation.

This weekend, I "finished" the fountain. By "finished", I mean that I've taken the rock that we salvaged from an old, random flower bed, and pieced it together to surround some liners and a pump that Thomas put down, then mortared it all together. You wouldn't think that would be too tough, but it's like putting together a puzzle where you have no idea what the finished picture should look like, and you're not entirely sure that all the pieces in the box are actually from the same puzzle. Oh, and you have to glue it all down as you go. In 100-degree heat. On an angle. And the glue sucks, so the pieces move and knock each other out of place, so you have to start over from time to time. One rock still won't stay down, and the surrounding ground cover hasn't been laid, yet, but I'm calling the fountain, itself, done.

As for the rest of the yard, the gated fence is up, and all the posts for the surrounding fence and movie screen are up and mostly cemented into place. Of course, we now think that we (and by we, I mean Thomas and my brother. I was off cursing at rocks) may have mis-measured and might have to reconfigure those posts. I have no idea where the furniture is going to go (and the paint may or may not have caused me to have an allergic reaction), but the cushions sure are comfy. The misting system and grill are ready and rearing to go, and all I need to do now is order the movie screen material and the projection equipment.

The string lights are awfully pretty.

We've got a long way to go, and no idea what we're doing, but it'll be okay. We'll figure it out.

Friday, May 31, 2013

Pinteresting: A Wreath For All Seasons, Part the Second

Yesterday, I teased that I had made a wreath with interchangeable decorations, so I could just swap them out every season instead of having to buy/make a new wreath. You know, in case you missed that post. Today, I'm going to tell you how I did it!

Ready?

You sure?

Positive?

Here you go: Pins. Bridal and Lace Pins, to be exact. You can find them in pretty much any fabric/craft store, and they run about three bucks. I like these because they're super tiny, so they're not too obvious. In fact, you can even make them part of the design.


I got the idea from my Aunt Peggy. She makes the most gorgeous Christmas ornaments by pinning jewels onto fabric-covered styrofoam balls. I have one in my dining room that I leave out year-round because it's just too pretty to pack up. (And I realize that makes me sound like a crazy person, but I assure you, the color and pattern actually go with the rest of the decor. Wow...that sounds worse...IT'S NOT TACKY!! How's that?)

Now, I didn't pin jewels, but I did pin on some really pretty (and insanely inexpensive) appliques. You can pin on just about anything you want, so long as you can stick a pin through it. When you're ready to swap out the decorations, simply unpin. Voila! Here's the finished product:


I have a wreath hanger...somewhere. Until I find it, though, I attached it to the door by tying the ribbon around some of the wrought iron on the screen door. If you make a wreath following this tutorial, you will need to wrap the ribbon around the ring itself before tying it. Otherwise, gravity makes the ring fall and rest on the top of the letter, and that just looks silly.

See? I kind of like the look of the wrapping, anyway, as it turns out.

Overall, I'm thrilled with how this turned out. Now, I just need to clean up the rest of the front of my house. It's looking pretty sad by comparison...

Next project: FIREPIT!!!!!!  (Dear Lord, what have I gotten myself into?)

Thursday, May 30, 2013

Pinteresting: A Wreath For All Seasons


frus·tra·tion
noun \(ˌ)frəs-ˈtrā-shən\
: a deep chronic sense or state of insecurity and dissatisfaction arising from unresolved problems or unfulfilled needs

Example:

You see that white space? That's styrofoam. You know why it's there? Because, even after buying out that particular style of ribbon at Michael's, there wasn't enough to cover it. The wreath stayed like that for about two weeks, during which time I stalked Michael's like an unstable spurned lover. Finally, Thomas suggested we drive over to the next town and check their store. Luckily, they had the same style, so the wreath is now finished (pics to come). Today, though, I thought I'd walk you through how I put this baby together. I call it, "A Wreath For All Seasons".

See, a few months ago, I went surfing around Pinterest. This generally proves dangerous, because I love the idea of DIY-ing something cool, but tend to pick things that turn out to be a heck of a lot more difficult than I'd imagined. (I'm klutzy...things break...I get hurt...you get the picture. My next project is a fire pit, by the way. God help us all...) Anyhoo, I ran across this:

Pin originally came from here.

I absolutely loved the idea of hanging our initial (which also happens to be an S) from a ribbon, as seen in the middle picture. "I can do that!" I thought. So, off to Michael's I went, armed with a sale paper and a 40% off coupon.

I wanted a year-round wreath, so I decided to go with very simple, basic colors, and no flowers or leaves or anything seasonal. Black and white go with pretty much everything, so I settled on a damask ribbon to cover a styrofoam ring. For the initial, I found a white wooden S, and painted it with some metallic silver spray paint I had lying around the house.

Owl pajama pants. Very glam.

The ribbon's just wrapped tightly around the ring. Easy peasy.
Anytime a roll of ribbon ended, I hot glued the edge down (preferably in the back) and started up a new roll exactly where the last one left off. Seriously, absolutely zero skill was needed for this project. The S is looped through a length of black ribbon with white edging, and the ribbon is hot glued to the back of the S for stability. I did tie the ribbon around the ring before hanging the S, and left plenty of ribbon hanging down so I could use that to attach the wreath to the front door.

The reason it's a "Wreath For All Seasons"? The decorations that I later added to it can be swapped out at will, meaning I can use this for Easter, Fourth of July, Halloween, Christmas--you name it! How'd I do that? Stick around and find out...

Friday, March 22, 2013

It's Two, Two, Two Posts In One!

Today is nasty, rainy, humid, and all around ugly. On top of that, it's Casual Friday. Of course, my work environment is pretty relaxed to begin with, so you can read that to mean I traded in my "nice" jeans and "respectable" top for comfy old jeans and a t-shirt. This one, specifically. It made me giggle.

Basically, it's one of those days when I expect the What Not To Wear folks to knock on my door at any moment.

Seeing how I wasn't really trying with my look today, and had a million (not sure that's an exaggeration) errands to run in the icky weather, I thought today would be the perfect day to try out a sample that caught my eye, as well as a neat DIY hair product. Both are made for quick, easy, natural looks, and that is definitely the name of the game today.

The Magic Bag O' Samples

Somehow--and I honestly can't remember how--I ended up with a sample of L'Oreal Revitalift Miracle Blur. Supposedly, it's a "finishing cream" that you put on after your moisturizer, and can either wear alone or under makeup to blur wrinkles, lines, pores, and other minor imperfections. I have minor imperfections, so why not? I popped open the foil packet and applied the opaque ecru cream to my face.

It's a dupe for the Urban Decay Naked Skin Beauty Balm. Flat out. There's a higher SPF and it costs about $14 less, but those are the only differences I found. Unfortunately (and if you click the link you read my review of the UD), it just doesn't do it for me. I can't quite figure out a purpose for it. There's zero coverage, so it doesn't even out your skin, and you still need, at least, a concealer. You could use it as a primer...or you could just use a primer. As I said in the UD review, there are better and cheaper out there. If you have perfectly even skin and just want a little protection or some skincare benefits...you could use an anti-aging moisturizer with sunscreen and skip this extra step. I just really can not find a point to this. But, if you were planning to buy the UD BB cream, L'Oreal just saved you fourteen bucks. There you go.

Frugal Friday

Many of you are probably familiar with beauty blogger and youtube guru PinkSoFoxy. If you're not, you should be, because she's amazing. Her approach to beauty blogging is unique in that she takes a "less is more" approach. Instead of constantly buying new stuff, she "shops her stash" and pulls from items she already owns, rediscovering old favorites along the way. Her videos also show fantastic tips for decluttering and simplifying your space, and in the process, your life. Seriously, I encourage you all to go check out her sites.

Anyhoo, she recently uploaded a video and blog post on how to DIY a sea salt spray for beachy waves. I've been using Bumble & Bumble Sea Spray, but I'm about to run out and thought that this might be fun to try. I had all of the ingredients, anyway, and if it worked, I could save the $25 I'd have spent on a replacement bottle. So, this morning, I whipped up a batch while I waited on my coffee to brew. By the way, I have a Keurig, so that's about three minutes.

Bottom line: this stuff rocks.

After my shower, I towel dried my hair and gave it a rough blow-dry until it was just damp. Then, I sprayed my concoction all over, scrunched, and let it finish air drying. The results are amazing. I have messy, beachy waves that aren't at all crunchy or sticky. My main complaint with the Bumble & Bumble was that it always looked great at first, but as soon as I ran a brush through it, my hair became a frizzy, dry, hot mess. My hair is so soft with this that I can run my fingers through it, brush it, whatever. It still looks pretty and wavy. If you have three minutes, I highly recommend giving this a shot!

The ingredients you'll need are all linked here. I used Herbal Essences Body Envy gel, which is discontinued, turns out. It's a light hold, volumizing gel, so anything like it should work similarly. I omitted the essential oil, because A) I didn't have any, and B) my hairspray is scented, and I thought that might be too much going on at once. For the shimmer, I used (no kidding) a little bit of an old E.L.F. mineral eyeshadow. Worked like a charm. Thank you, PinkSoFoxy, for this awesome DIY project!

Wednesday, October 3, 2012

DIY: Halloween Candy "Spell Book"

Last year, Thomas and I found this "spell book" at Hallmark. If the link doesn't work (and that's a very real possibility), it's a hollow box, decorated to look like a Witch's spell book. You fill it with candy, and can use it instead of a trick-or-treat bucket. They talk, too, which is really cute. I considered getting one, but they were around twenty bucks, and were just a little too cartoony for my taste. I gave it some thought, and realized it could probably make a more realistic one for a lot less money. I mean, it wouldn't talk, but it would still look really cool, and that's what mattered. This year, I got to work, and can now proudly show you my creepy book of candy spells! But first, let's see how you can make one, too:

First, I started with a store-bought hollow book. This one cost about $5.99 at Ross. It's probably around 8 or 9 by 12 or 13 inches. I didn't measure it, but it's not much larger than a sheet of printer paper. It's probably about 1.5 to 2 inches deep. That's enough to hold plenty of candy.


Nice enough, but not really the look I was going for.


Inside the "book"
 The first thing I did was tape off the "pages" of the book. They were already detailed with a nice gold finish that I wanted to keep. I used a little painter's tape I had lying around from when we painted the bedroom to protect the edges. Then I sprayed the entire book down with a coat of the stickiest, yuckiest, ungodliest black paint known to man. Seriously, this paint has been the bane of my existence. I also forgot to take a picture of it. Oops.


Once I had the base coat on and it had dried, I taped off the areas I wanted to keep black (the spine), and sprayed the rest of the book silver. Thankfully, it was a lot easier to work with.


The darn thing still sticks to everything, and you can see where some black is already showing through.
I kind of like that, though. Gives it a little age.
 Next came the hard part. I wanted a harlequin pattern, but wasn't sure how to do it. This turned out to be the easiest method. It's time consuming, but it works. (I just wish I'd remembered to take more pictures...ugh...sorry...) First, tape off your first set of diamonds. I found it easiest to make my tape go corner to corner. Spray these, and once they dry, tape off your next set. If you mess up, you can just spray over the whole thing and start over. It's not an exact science, and it is frustrating, but it's worth it.


See?! Again, that black was awful, so I had a little bleed through and smudging, but overall, I'm really pleased with how it turned out. I did the same pattern on the back of the book, as well. Okay, to be perfectly honest, I did the pattern on the front of the book, as well. I accidentally did the back, thinking it was the front. I was going to leave the back silver. Oops.


Then, to add a little interest, I brushed some gold leaf I had leftover from another project onto every other gold diamond. 


Here's the leaf. I don't remember how much it was, but it wasn't very expensive. It came from Michael's.


And here's the book with the gold leaf.

After everything dried, I used a glue gun to add some jewels to the spine, and a label on the front. The label came from Hobby Lobby, in a pack of four. This is the original placement. I didn't like it, so I moved it over later, as you'll see in the final pictures.


As a finishing touch, I used a little more of the liquid leaf to freehand a title onto the spine of the book. I tried to mimic the lettering in the label. Thomas and Ronnie decided to photobomb, I guess.


And here is the mostly-finished product, on the mantle with the rest of the Halloween decorations. I say "mostly-finished" because I still need to clear-coat it. that black paint is ridiculously sticky and stains my hands when I touch it.


Thanks for making it all the way through this! I hope you enjoyed it, and please let me know if you try this yourself. I'd love to see pictures!
Related Posts Plugin for WordPress, Blogger...