Dear God, we are about to head into the very last weekend before Halloween! How did that happen? I haven't finished my Christmas shopping, yet!
Seriously, though, it may seem like it's too late to put together a fantastic costume for any last-minute parties you may be planning to attend. I assure you...
...yeah, it is. But there's still plenty of time to throw together a half-way decent ensemble. Below, I've come up with four low-to-no cost, practically zero-effort, toss together in no time costume ideas. They're not great, but hey, desperate times and all that. So, without further ado, here are my 2013 suggestions.
1. Melissa McCarthy Elle Cover
This cover has caused a bit of an uproar recently, concerning body issues in Hollywood and in the fashion industry. McCarthy, herself, has defended the photo, and even admitted that she's the one who picked the coat, so I'm all for letting the offense over this photo drop. That said, one thing about this photo is undeniable: she looks freaking hawt. I mean, wowzers! Honestly, between the gorgeous subject, stunning photography, and public drama, this shot could very well become iconic. Plus, it's the easiest Halloween costume since the t-shirt that says, "This IS My Halloween Costume". All you need is smokin' hot makeup, drop earrings, a black dress, heels, your winter coat (or one from the local thrift shop), and a metric ton of hairspray. This costume also gets bonus points for being wearable away from the party, as well.
2. Daryl Dixon from The Walking Dead
I happened to run across this little gem at the Halloween store, and had a minor conniption fit at the $29.99 price tag. I'm sorry, but if you want to dress as Daryl Dixon, you don't need to buy a pre-made costume. Heck, I could put together a feminine version with stuff out of my closet. All you need (male or female) is a brown, green, or white tank top, some old jeans, boots (if you've got them. Dark sneakers would work in a pinch), and, well, a lot of dirt. If you want, you can always mix up a tiny batch of fake blood to smear on your face and body. Now, if you want an ear necklace, you're on your own. (Spirit Halloween does sell one...ew...)
3. Rejected Angel Vessel from Supernatural
This is, by far, the easiest costume. I can't find a decent photo online, but if you're a fan, you know what I'm talking about (and if you're not a fan...A) why not? and B) why would you want a costume from it?). Wear whatever clothing you want. Be comfy. Be cute. Be sexy. Be whatever. It's the makeup that makes this costume. Do your normal makeup, but skip the eyes. Then, use black greasepaint to black-out your eyes, like you would if you were going to put on a superhero mask. Lastly, using either fake blood or, as a last resort, lipstick, add blood dripping from the eyes. Done.
*BONUS: You could add the greasepaint and blood to nostril and mouth areas to go as a fresh walker from this season of The Walking Dead.
4. Ridiculously Photogenic Running Back
This is more for the guys, but ladies can feel free to give it a go. I don't know if you've heard about this viral photo, but it's adorable. A football player for Notre Dame lost his helmet during a recent game, and finished the play before stopping to put it back on. In the short time he was sans chapeau, a photographer snapped this pic that looks like an ad in a catalog. I think it's the little half smile that sends it over the top. Anyway, if you're in a bind and happen to have a football jersey lying around, dab a little greasepaint under the eyes, toussle your hair, and go be your ridiculously photogenic self.
Have a great weekend, guys!
Showing posts with label Halloween. Show all posts
Showing posts with label Halloween. Show all posts
Friday, October 25, 2013
Thursday, October 17, 2013
A Brief Interlude: Rant and Random Observations
I'm actually working on a "real" post right now, but thought I'd stop in for a sec for a mini-rant and some random observations.
*Begin rant...now
Why, in the name of all that is holy, is Halloween already being clearanced out?!?! Today is the 17th. That's...one, two, three...14 days before the actual holiday, and it was already on clearance over the weekend, so really...19 days before the actual holiday. The pop-up Spirit store didn't open until September, and nothing made it to Target or Walmart's shelves until the very, very, very end of the month (and even then it was only a few items). Christmas trees, on the other hand, have been on the floors for two weeks.
In addition to Halloween items barely being in stores, the selection has been godawful. I had to go to three stores before I found glow-in-the-dark nail polish, and then it was overpriced. In the past, I've found throw pillows, baking supplies, nice table linens, welcome mats--you know, decent decorating items--but this year, the best I could find was a clearanced out centerpiece at Michael's, left over from last year. I know that I've already ranted and raved over the lack of costumes in stores, so I won't go into that again, except to say this: my little brother needed a Batman mask for Homecoming Week at his school, and I told my Mom I'd pick it up for her. I eventually ended up in the toy department at Target, because I couldn't find one anywhere else. Let me say that again: I ended up in the toy department. Not the Halloween aisle. The toy department. That's just sad, folks.
Normally, I try to do a Halloween post per day in October. It's something that I really look forward to, but this year, I really don't have anything to write about. According to the merchants, Halloween is over, and it wasn't really worth dealing with, anyway. There aren't any awesome new costumes out this year, unless you count Sexy Captain America. I'm going to be a Despicable Me minion, but that doesn't require special makeup or hair. There was a great Toy Story Halloween special on last night, but aside from that, there's been very little holiday-specific programming. I'm just...I'm just disappointed.
I'm still going to try to post some Halloween-related things around here, but it's not going to be everyday. The post I'm working on now is a product review. I am going to attempt a makeup tutorial, but really have no idea what it'll be. Maybe a sugar skull? Thomas wanted me to do that last year, but I chickened out. Anyway, I should probably wrap this up. After all, there are only 68 days till Christmas, and I haven't even started shopping.
*End of rant.
Recently, I've learned and/or noticed some things that I thought I'd share with you.
If you cross my puppy, he will b**ch-slap you. Pardon the language, but I really don't know how else to describe it.
College kids look like babies. When did that happen?
Phone chargers work really well when you remember to plug them into both the wall and your phone.
I don't care how uncool or inauthentic it may be, I really like Olive Garden, and I could go for some fettuccine alfredo right now.
Equate Weight Loss Shakes may taste like Slim-Fast, but they are nowhere near as effective at controlling hunger.
I think I figured out why I'm craving Olive Garden.
All day long, I've had both Time Warp and Seasons Of Love stuck in my head. They keep alternating, so now, apparently, there are 525,600 ways to jump to the left and take a step to the right.
That's it for the randomness. Have a great day, and I'll be back with an honest-to-God post soon. Thanks!
Tuesday, October 15, 2013
Wigging Out: How To Make Your Halloween Costume Wig Look Less Terrible
With Halloween rapidly approaching (and Christmas rapidly attacking, but don't get me started on that. We'll save that for another rant.), I'm sure at least a few of you are planning costumes, and that some of those costumes are going to need wigs...
...and that Halloween wigs suck.
I'm sorry, but they do. I'd imagine it has a lot to do with the fact that they're shoved in flat plastic bags (and that they tend to be poorly made to begin with...), but they never look anywhere remotely close to what's pictured on the model. Of course, when the price is low, I'm not going to expect too much, and I'm certainly not going to complain. The higher-priced ones irk me, but, again, that's another rant for another time.
Anyhoo, the point of this post is to give you some tips on styling your own cruddy party-store wig into something you'd actually be okay instagramming at a party. These are not "pro tips", but are some things you can do without having to buy (too much) special equipment. Heck, I'm not an expert. I wouldn't even know where to begin styling a high-quality wig. I have, on the other hand, had plenty of experience dealing with cheap synthetics.
So, a few weeks back, Thomas and I filmed a short about goofy supervillains. One of our actresses was supposed to be very glamorous in a retro-sixties way, and while she's gorgeous, I had no idea what I was going to do with her hair. It's absolutely lovely--don't get me wrong, this girl is stunning--but Thomas wanted a very specific look that would require extensions and pieces and about an hour longer than I had. I lost sleep over this, guys. Then, the heavens opened and the angels sang, and this appeared in the Halloween aisle at Target:

Yeah...it sucks. But it was eight bucks, and I could take as long as I needed to style it. You know, as long as "as long as I needed" was less than about 14 hours. I didn't find it until the day before the shoot.
To start, I pulled the wig out of the bag and surveyed the damage. It was...rough. I tried it on, and the bangs were completely uneven and reached my chin, with longer strands dangling lower. The waves and curls were practically non-existent, and what was there was scraggly. That said, the construction of the wig wasn't terrible. The layers were ugly, but they were even, and the color was beautiful. This was definitely a workable situation. I grabbed a hairbrush and started trying to unsnarl the knots.
Now, they do make wig combs for styling, but on a cheapie wig like this, I don't see the point in spending the extra money. I used a regular brush on my hair pieces for theatre, and those were worn and re-styled a lot. I never had any trouble with them, other than some shedding. As it was, this wig came out of the bag shedding. I worked in sections from the bottom up, brushed gently, and did not try to brush directly from root to end. Sure, I did end up with a tribble's worth of fake red hair in my brush in the end, but the hair didn't come out in clumps, or anything like that. In other words, use your own judgement. If you'd feel better using the pro brush, go for it. I just, personally, didn't see a need.
Once the knots were untangled, I set to work styling. First, I grabbed a wig head (mine was from Hobby Lobby, and I think around $10) and pinned the wig in place using big straight pins with colorful ball tips. I wanted to be able to find them easily when time came to put the wig on the actress. Then, I just started styling the hair as if on a real person.
The thing to remember is that this is not real hair. Synthetic hair is plastic and rather thick. It'll hold its shape pretty well without gel or mousse, or anything like that. Also curling irons and hot rollers (and heat implements, in general) will melt the strands. You can tease the hair to a certain extent, and you can roll it by misting sections with water, rolling on foam curlers, and allowing to dry. You can pin it, you can braid it, you can manipulate it into whatever style you choose, just don't use heat or products. Here's a picture of mine on the stand, rollers still in place:
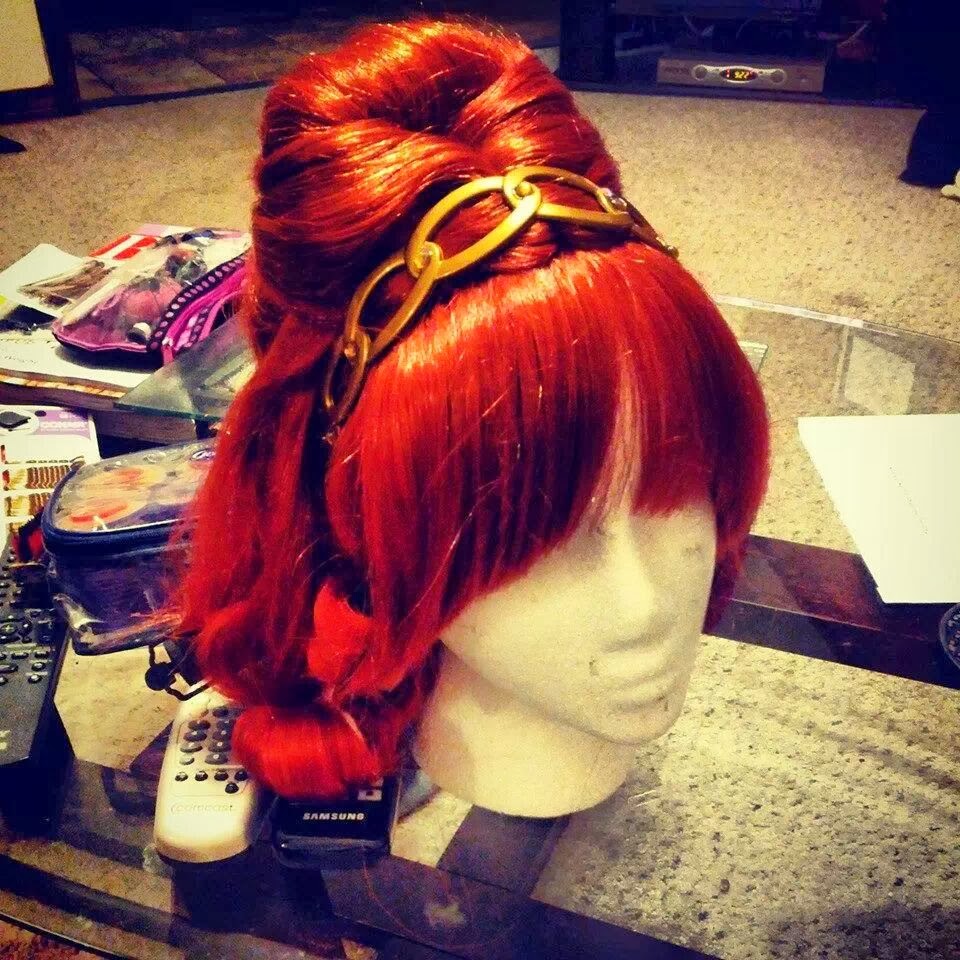
For this look, I kept the existing middle part and divided three sections off of it. These were clipped out of the way while I teased the crown into a bouffant. I wrapped the middle divided section over the teased portion and pinned the ends under to create the pouf. Then, I pinned the front sections around that, hiding all pins as I went. The ends were misted with water, then twisted and rolled on satin-covered foam rollers (from Sally Beauty Supply) to create waves, and then the bangs were trimmed to a more reasonable length, with the intention of finishing the trim once the wig was on the actress (and we all know about good intentions...). I added the headband the actress would wear to make sure the placement was about what I wanted.
As luck would have it, I wasn't even in the same building as the actress when the wig went on, and wasn't able to even see it in place until shooting had already started and it was too late to trim the bangs any further. Here is a really lousy, heavily cropped, way too dark shot of the actress wearing the wig:

Why yes, that is a clown on her left and a gorilla on her right. Why do you ask?
And here's the promo photo from the short. They're channeling The Breakfast Club. I think the wig looks particularly nice here:

Should anyone else need to wear this, I can wash it. I would have to be very careful with the pouf, since I really don't want to have to do that again, and it would definitely have to be re-curled, but washing these kinds of wigs is not a problem. Just use cool water and a very mild soap, like baby shampoo. Again, there are special wig shampoos out there, and you can use those if you want, of course, but the baby shampoo will work just as well, and it's a little more readily available.
So, in conclusion, here are the basic tips again:
- If you use a regular hairbrush, start at the ends and work your way up. Avoid putting any stress on the roots. You can also use a professional wig comb, available at Sally Beauty and any number of online retailers for fairly cheap.
- Do not use hair products. A little finishing hairspray is okay, but nothing else is necessary. It'll hold on its own.
- DO NOT USE HEAT! EVER! THE HAIR WILL MELT!
- Curl the wig by misting with water and rolling on foam curlers. Allow to air dry.
- You can cut the wig, if necessary.
- You can wash the wig with cool water and baby shampoo. Allow to air-dry, then re-style.
I hope this helped! Have a great Halloween, and be sure to share any cool wig pics in the comments.
Monday, October 14, 2013
Behind the Screams: Universal Orlando Halloween Horror Nights Part II
***This is part two of my overview and review of Universal Studios Orlando's Halloween Horror Nights. It's stated throughout the post, but there are spoilers for the houses, as well as for the movies The Cabin In the Woods and An American Werewolf In London.
Because I'm a wuss and can't go through the haunted houses without crying, but am also extremely interested in set and prop design, Thomas and I opted to go on the Behind the Screams tour. This is a lights-on, actor-free, in-depth guided tour of three of the haunted houses. It takes slightly over two hours, and I highly recommend it if you have any interest in theatrical set design--for movie or stage. The production values are astonishing, and they encourage picture taking.
It's also still really creepy, at times.
***WARNING! The pictures you are about to see are some of the least graphic in nature that I was able to take. They still contain some images that may too violent or off-putting for some. If you have a problem with gore or monsters, or if you are planning to go to HHN and don't want to be spoiled on three out of eight houses, STOP READING NOW***
Before the tour, we checked in at the VIP office (fancy) and got our lanyards that denoted we were on the tour. They were the same limited edition lanyards being hawked outside the gates, and a nice touch. We then waited in a gorgeous conference area with the cleanest, most opulent ladies' room I've ever seen. For some of you, that might not mean much, but when you've been stuck using theme park, fast-food joint, and gas station restrooms for several days, it's a god-send.
Once everyone was present and accounted for, we were split into our groups (there were three going at the same time, with each starting at a different house) and headed for the first house. Ours was the La Llorona tent (yes, tent, but you'd never know once inside), patterned partially after the house of the same name at last year's Hollywood Halloween Horror Nights.
Now, if I'm going to be totally honest, I have to point out that I really didn't want to go in this house. I also hated pretty much every second of being in there. See, I hate the urban legend. HATE the legend. If you don't know it, it's a Spanish tale about a beautiful young widow who falls in love with a handsome young nobleman. Unfortunately, while he's taken with her, he's not a fan of kids, and she has two from her previous marriage. So, she drowns them in the river. Seriously. As our tour guide (who felt the same way I did, I guess) sarcastically put it, "Nothing says fun like dead babies." Obviously, this doesn't go over well with the nobleman, and the woman poetically drowns herself in the same river. Depending on which variation of the story is being told, she also could have been murdered by a lynch mob. It was horrific, and involved a horse, and that's all I'm saying. Anyhoo, once she's died, she ascends to Heaven where she is promptly turned away, with the caveat that she can come in once she's found her children. Now, La Llorona (the weeping woman) wanders the Earth searching for her children, and because she doesn't remember what they looked like, she'll take anyone.
I'm a softie. I love kids, and can't bear to even think of anything like this happening, even in a fictional sense, so I spent most of this house staring at the architecture, which was gorgeous. Stunning. Unbelievable, especially considering this was a tent. They built a Spanish villa, complete with river running through it. There are water effects galore. It's a beauty of a house, and I could only bring myself to take one picture.

This is the outside. It's lovely. Inside, the highlights would be the river, the pepper's ghost effects, and some super cool "Weeping Angel"-ish statues that come to life. You'll walk past several alcoves with real statues, and then past alcoves with actors dressed identically, stonework and all. It's a really neat effect, and brilliant in its simplicity.
Next up, The Cabin In the Woods. If you haven't seen this movie, drop everything and watch it now! There be spoilers ahead!! Seriously. I'll wait.
(Elevator music...shuffling of feet...awkward looking around the room...)
All done? Good. Hope you enjoyed it.
This one begins by queueing through the facility, and then trekking through a (small) forest to the cabin. Supposedly, you're maintenance for the facility and they need you to fix some equipment. When you get to the cabin, Jules has already been decapitated and is slumped against a tree. Inside, the level of detail is remarkable. The interior matches the movie to a tee, right down to the keg, Solo cups, and chip wrappers in the kitchen. Fun fact: stupid people at the event have been trying to steal things from the houses (and have succeeded), so everything is bolted down, and quite a few objects have been coated in Vaseline. Yum...

And yes, the "moose" is on the wall. No, I did not make out with it. (That would be frowned upon.)
You then make your way through the bedroom with the horrifying painting and two-way mirror, and down into the basement, where you see all of the totems that the kids could choose from. Again, I can't express the level of detail involved here.


Everything you remember from the movie, plus about a hundred other things that you would never see going through the event, but would certainly miss if they weren't there.
The basement leads to the black room, where you find torture devices, and also where the Buckner boys can reach at you from above. This leads back in to the facility, and into a ton of gore. I mean, a ton. The blood-filled elevator room, the dismembered Buckners, the Merman munching on Hadley; it's all exceptionally well-done, and again, the little things like coffee cups in the breakroom cabinets and fun signage throughout the hallways really sell that this is happening. One fun Easter egg to look for is the wipeboard. It's a spot-on replica.

Yeah, that is a Merman's tail. Yes, it is gross, and yes, it is hilarious.
The final house we toured was An American Werewolf In London. Again, if you haven't seen the movie (first of all, you should. It's amazing), go watch it and then come back. Spoilers, dead ahead!!
Back? Got Van Morrison's Moondance stuck in your head? I know I do. Alright! Moving on!
You enter this house through the Slaughtered Lamb pub, and it's just like being there. The pentagram is on the wall, the tables and coats are all as they should be, and there's even an errant dart in the wall, from where the guy who never misses missed. From there, you move into a cemetery (which isn't in the movie, but why not?) where hidden among the headstones you'll see markers for the Jaws and King Kong rides. Cute.
Now is when the house gets really impressive. Past the cemetery, you see Jack and David in the process of being mauled by a very large, very realistic, fully animated, mechanical werewolf. And it. is. gorgeous. The wolves (and there are several) were constructed by the same puppeteer who handles the work for Cirque du Soleil, and also worked on The Lion King stage show. And I can not remember his name to save my life. I'm sorry.
You'll travel through David's fever dreams, set in the hospital and his own home. The hospital set doesn't seem uber-detailed, but there are little touches that show how much thought went into this set. A copy of A Connecticutt Yankee In King Arthur's Court lies on a nightstand; an apple on a tray is missing a bite. Again, it's the little things. The house set holds far more items, and many sent me right back into my 80s childhood. We had the same videotape organizer that appears on a shelf. The carpet is exactly the same as what was in my house--that sort of thing. There was far too much to take it all in.
Down the hallway is Nurse Price's apartment, and David's transformation scene.

Just look at all of that detail! The half-read Twain novel, the Mickey Mouse that zombie-Jack plays with, and who else had that TV? I used to hook my Atari up to one just like that at my grandparents' house.
Now, you may be looking at this, thinking, "um...that werewolf-in-process doesn't have a head?" Well, yes and no. That werewolf doesn't have a head, but the actor who plays the werewolf does. He sits underneath the floor, with his head and arms sticking out. Then he can flail around and scream and all that jazz, without having to be pretty much naked and body-painted.
From here, you enter the Underground where David makes his first kill. This place looks amazing. I've been in the London Underground, and this is just like it, only more cramped. A lot more cramped. I couldn't take any pictures because I was jammed in between people like a sardine cramped. There's a wolf in here, and it'll scare the bejeezus out of you. Even with the lights on, it's frightening.
Next comes the movie theatre where David meets all of his victims and discusses his situation with Jack. With the lights on, it's just a big screen with a lot of theatre seats and mannequins. During the event, however, the actual adult film (enlarged to the point of obscurity, thankfully) plays, and live actors are mixed in among the dummies. There's also another werewolf at the exit, gnawing on the bones of an usher--the same usher who served as the icon for HHN a few years back.
When you leave the theatre, you enter Picadilly Square, complete with double decker bus, theatre marquee, and a great big blue box that may or may not be a replica of one used by a property that Universal does not own.


We were our guide's first tour that recognized the TARDIS. True story.
Once you leave the Square, you find yourself in the alley for David's final showdown with the police. It's also the best place to get a shot of the wolf.

Holy Mother of Pearl, that is fantastic! Story goes, the studios have wanted to do this house for several years, but never could get the go ahead from John Landis, the creator of AAWIL. He didn't understand how his movie could translate to a haunted house attraction. Eventually, they got him out to HHN, and he saw the craftsmanship and care that goes into building these houses and gave his blessing. I think they did it justice.
I wish I had better photos for you guys, but the houses were still quite dark with tiny spaces to walk through (for the most part). These were the photos that turned out the best, had the least amount of blood and guts (this is a family-friendly blog, after all), and--most importantly--didn't show anyone outside of the tour guide. Those folks didn't give me permission to post their photos on the interwebs, and I respect their privacy. I'd be less than thrilled if anyone posted video of me freaking out during the walker swarm.
Final little Easter egg: each house has a raven in it somewhere. This house technically has two. If you know where they are, leave a note in the comments. Thanks!
Friday, October 11, 2013
Walking With the Dead: Universal Orlando Halloween Horror Nights!
*Editor's Note: This is part one of a two-part post. Here is the overview and review. The next post will have all of the pretty pictures.
I know, I know. It's a third of the way through October, and I haven't started my Halloween posts (for reals, anyway). I have a good excuse! I've been out of town at Universal Studios Orlando's Halloween Horror Nights. Then, when I got back to town, I realized how loved and needed I am at work, and have been swamped trying to play catch-up. Anyhoo, I thought I'd give you lovelies a rundown of the event, and maybe even share some pics of the behind-the-scenes tour Thomas and I took.
***WARNING! If you are planning to go to HHN and don't want to be spoiled, STOP READING NOW!***
Alrighty, now that's out of the way, let's have some fun!
So...I'm a wimp. I didn't sleep for three nights after watching The Woman In Black, and the bride on The Haunted Mansion ride gives me the heebie jeebies. I am a grade-A, number-one, yellow-bellied, scaredy-cat wuss. Our trip to Halloween Horror Nights actually came about, oddly enough, because I'm too chicken to go to Halloween Horror Nights. Really.
See, for the past few years, Thomas and I have trekked down to Orlando for Mickey's Not So Scary Halloween Party. It's sweet. There's trick-or-treating. Small children come dressed as dwarves, Muppets, and KISS (seriously. I love those parents). The scariest thing in the park is the Headless Horseman, and last year he fell off his horse. This is my kind of Halloween, and it also happens to be more Thomas's speed. He's not really into the hard scares, either.
Again, I know, I know. Cue the record scratch. This is probably disappointing to a lot of folks, considering we make movies like Night of the Krampus. We can dish out the scares, but we can't take 'em. I'm sorry.
Anyway, every year, we go to the Disney party at night, and hit the Universal parks during the day. And every year, we find ourselves spending those days wandering amidst the un-hideable decorations, awestruck at the design and production values. And every year, we contemplate sucking it up and getting passes for the event. And every year, we chicken out.
It's the haunted houses, man. I just can't do haunted houses. Being confined in a dark space, smack in the middle of a crowd, with scary-looking people (or even normal-looking people, if we're being totally honest) jumping out and screaming at me tends to send me crying toward the nearest exit. Panic attacks ensue. It's less than fun, and the thought of spending a lot of money to not have fun doesn't appeal to me. I just want to see the pretty (creepy) decorations!
So, wonderful man that he is, Thomas did some research and found out that the park hosts Behind the Screams tours. These are lights-on, actor-free, guided tours of the haunted houses. You get to see all of the artistry that goes into the houses without getting the you-know-what frightened out of you. We signed up for an afternoon tour of An American Werewolf in London, The Cabin In the Woods, and La Llorona (morning tours visited three differing houses) the day they became available.
And then insanity set in.
After all, if we were going to see the houses, then it seemed a shame to miss out on the rest of the decorations. Plus, there was a Bill & Ted show and a tribute to Rocky Horror (which I detest, but it was a live musical performance, so I had to go). We could suck it up. We could just stay out of the houses and ride some rides and see some shows, right? It'll be fun!
Oy, vey...
I have no pictures of the actual event. I was too busy trying to avoid The Walking Dead walkers that had taken over the park, and really, it was just too dark. We did walk through most of the "Scare Zones" while it was still light out, just to see what was there, and kind of test out how well we thought we'd handle them at night.
We avoided those suckers like the plague.
I still got swarmed by about a dozen zombies.
Thomas still regrets not having the video camera rolling.
If you're planning to go this year, here's a lily-livered rundown of what's what:
Scare Zones
Atlanta: This takes place on New York Street. It's supposed to smell of death, but I only smelled concessions, so I guess that'll depend on how you feel about the park's food offerings. There are a number of walkers to contend with, but there's also a tank (!!) and some pretty cool theatrics, with ordinary people being turned into zombies.
The Farm: Herschel's barn is ablaze! Supposedly, if you walk through the barn you'll see a bunch of walkers, including the infamous "well walker". I wouldn't know... I did get into a stare-down with the cutest little "scareactor" walker, though. It was still daylight, so I didn't scream or throw-up on her, and her makeup looked amazing.
The Woodlands: This is another that we took in during the day. Michonne's zombie buddies hang out in there and look pretty cool. There's also supposed to be a deer walker, but he was off, so I only saw the deer. The "bicycle girl" zombie is also on display...just not while we were there.
Camp: The RV and some tents are set up in a very small area that feels like walker central. At night, projections on the tents make it look like zombies are eating the campers inside. You really can't avoid this zone, either. It's the only unavoidable zone, though, and it is very small.
The Highway: Yeah...we just flat-out skipped this one. From what I could see, abandoned cars and a school bus are around the Disaster attraction. We had no reason to go down that way, and no desire to get attacked.
The Van: This is a roving scare zone. It's a van full of walkers that, more or less, randomly appears, lets loose its cargo, and then gathers them all back and moves on. It's terrifying.
Clear: Technically, this one has the fewest walkers, and those are impaled on scaffolding and easy to spot. The entire street (over by Terminator) has grafitti projections to match the ones in the episode that the zone was based on. The only time that it really becomes frightening is when the *&$#@ van comes through and dumps a ton of walkers and they decide you look nice and weak and swarm you, causing you to scream and your husband to laugh and try to lure more over. *ahem* The walkers are effective.
*Word of warning: As the night wears on, and guests become tired and/or drunk, it becomes more and more difficult to tell guest from walker. Just sayin'...
Shows
Bill & Ted: In a word: Excellent!!! This is a rip-roaring, high-energy, ridiculously funny, musical treat. Nothing in pop culture is sacred. This is PG-13, however, and definitely raunchy. Someone brought a small child who was seated next to me, and I felt more than a little awkward at moments, so bear that in mind if you have kiddos.
Rocky Horror Picture Show Tribute: Meh. The performances are fantastic, but if you're not a die-hard fan, you can probably skip this. Several people walked out of the performance I caught. Also: You will get wet. If you are a fan, you're going to love it. Gorgeous costumes, wonderful singers, and lots of audience interaction.
Concessions
Drinks: We ate at the Simpson's food court, so I can't rate the event fare, but I did order a drink in a souvenier glass from one of the bar carts. The glass is heavy plastic with a light-up element in the bottom, and worth the ten bucks I paid for it, including the drink. I ordered a mixed drink (from a very limited bar) of cherry vodka and cola. It tasted incredible, but it was very weak. For me, that was perfect, but if you're looking for a buzz, this isn't it.
Shots: I didn't get one, but I had to ask. There are "nurses" roaming the park with "blood bags" of jell-o shots. They're vodka, peach schnappes, and cherry jell-o. I kind of regret not trying one.
Overall
I loved it, and really hope to go back next year. Maybe I'll be a little braver by then.
Next Post: The House Tour!
Friday, September 27, 2013
All I Want For Halloween Is a Costume That Fits: Rant and Audience Participation
Why can't I buy a freaking Halloween costume?
Let me rephrase that: Why can't I walk into a store, try on, and then buy a freaking Halloween costume? You almost have to order online. My local Party City isn't sure they're even getting in some of the costumes they have on their Wall O' Stuff because the warehouse has already sold out online. If you go to the Spirit Halloween website, you can scroll through pages before you find anything that isn't "online only". Walmart has only a handful of adult costumes, and Target isn't stocking any in stores. I don't want to have to order a costume online!!
And why not, you ask? Because it's a crap-shoot, that's why. Back when we did The Night Shift, I needed to order a few costumes for our zombies and ghosties. Everyone was measured, and I used those measurements to choose sizes based on the provided size charts. Of those costumes, only one was usable out of the bag. Barely. And only because it was stretchy. Everything else was either waaaaay too big or waaaaay too little, or bore, in no way, any resemblance to the picture on the website. At least two costumes had to be scrapped entirely, one was altered and dyed, and we were able to salvage the accessories from another. Frankly, it was pitiful.
Of course, that was three years ago. Surely, the size charts would be improved by now, you say. Let's fast-forward to last year. I decided to be Belle. I researched, read reviews, studied Google Images, and decided on a very sweet costume. Again, I chose my size based on my measurements and their size chart. Again, my online costume arrived in a size that was nowhere near close, and the entire dress was sewn lopsided! Now, I don't expect a Halloween costume to be of the highest--or even decent--quality, but I do expect the sleeve openings to be sort of close to the same size. I wore the costume. It wasn't pretty, and it certainly wasn't flattering, but I wore it. Had I had the opportunity to try it on, I never would have purchased it. I would have found another one that was sewn a bit more symmetrically, and in the proper size.
So, we skip ahead to this year. Having been burned several times in the past, I decide not to buy online. Unfortunately, that means I'm left with only a meager selection of skanky cops, slutty red riding hoods, and store-bought zombies (and there's nothing sadder than a store-bought zombie. Seriously, just rip up something from the thrift store--it'll have more personality). A few generic sequinned slips and satiny catsuits (cause those are flattering) dot the aisles, but very little else. For fun, I tried on a random costume, based on what the online size chart recommended. I grabbed a sexy Robin (Yes, Batman's sidekick) in a size Large, and headed for the dressing rooms. It was entirely too big. Like, I would have to take it up several inches in the waist. In addition, it looked absolutely nothing like the costume pictured on the package. I'm not going to lie, it was cute, but it didn't fit and it wasn't what was advertised. Had I plunked down fifty bucks to order it off the website, I'd have been royally miffed.
Most likely, I won't buy a costume this year. Maybe, if I can find a good enough coupon, I might get a superhero corset and tutu (cause that's all they've got) and modify it to be trick-or-treater friendly. At least I can make sure that each piece fits. The thing is, as much as I complain, poor Thomas has it even worse. There are even fewer guy options, and almost all of them come with a horrible, stiff muscle chest. Let me tell you, those things hurt, and they really limit your range of motion. He won't order online, either, because of the sizing issue. He's a tall guy, and doesn't want to waste a fair amount of money on something that may very well be too short.
(And yes, we know we can return costumes, but rarely have we received them in time to do so. Either we won't have time to receive the new size, or the costume will have sold out, or it's not the size that's the problem, and we don't want to keep ordering and returning until we find something workable. Also, I really think that the order should be right to begin with. That's really the issue.)
So, I ask you: What do you think? Have any of you run into this problem, or is it more of a local thing? I'm just curious. We're heading to Florida soon, and may try to run in some Halloween stores down there. Is it worth the time and effort, or are we just going to run into the same selection? Does anyone have any tips for ordering online? Maybe I'm just doing it wrong. Anyway, leave a comment and help a girl out. Thanks!
Tuesday, September 10, 2013
Bizarre Halloween Tutorial: What Did You Do Today?
Oh, nothin' much. Just cleaned the bathroom, mopped the kitchen, and painted a severed hand? You?
I've gotta say, it looks pretty darn good, too.
Here's what it started out as:
And here's how it looks now:

As I've said before, my world is a little strange. The hand's for a short we're filming next weekend, and while it's still not quite finished (those seams! My God, those seams!), I'm really happy with it. Now, I know most of you guys aren't going to need to film a severed hand, but some of you may be planning Halloween decorations, so I thought I'd share how Thomas and I livened up the undead hand.
The hand, itself, came from the local party supply store. It was in a mesh bag with another hand and a couple of feet (and that is a sentence I never thought I'd write). The hand is almost exactly the same size as my hand. Aside from the zombie color and plastic bone sticking out, it was fairly realistic, and the whole bag cost about ten bucks. I guess, if we ever need any severed feet, we're all set.
I'm not counting that out...
Anyhoo, Thomas gave the entire hand a base coat of Apple Barrel acrylic in Lite Mocha (two coats), which looks like my liquid foundation, and repainted the red "blood". The red is really just a guideline for where to put the fake blood...that I still need to make and just remembered. Great. Once all the paint was good and dry, I started detailing.
The nails are fake press-ons from the drugstore. The hand had some nail bed detailing that I was able to use as a guide for sizing. The nail kit came with glue, but I opted to attach the nails with some rhinestone glue. Honestly, I figured there was less chance of gluing my fingers together that way.
Once the nails dried, I was able to file them into the shape I wanted. Then, I painted them with two coats of Essie Naughty Nautical. After that dried, I took a small detailing brush and touched up the skin-colored paint, adding in cuticles as I went. Finally, I painted one more coat of the Essie, just to clean up the cuticle area a bit.
When all of that dried, I was able to add the finishing touches. With a sponge, I applied a cream foundation over the entire skin area, giving the hand more of a natural skin finish. I set the foundation with a powder, then brushed a berry blush very lightly over the entire hand, concentrating the color around the knuckles and nails--where my own skin is naturally pinker. Then, I used a fluffy brush to apply a matte bronzer over the entire hand. The final effect is a little unnerving. It looks real. And off-putting. And kind of cool.
So, if you're in the market for a life-like severed hand...well, here you go. Now, if you'll pardon me, I'm going to go reevaluate my life choices.
Oh, who am I kidding? I freaking love this kind of stuff. Bring on Halloween!
I've gotta say, it looks pretty darn good, too.
Here's what it started out as:
 |
| Photo Credit
|

The hand, itself, came from the local party supply store. It was in a mesh bag with another hand and a couple of feet (and that is a sentence I never thought I'd write). The hand is almost exactly the same size as my hand. Aside from the zombie color and plastic bone sticking out, it was fairly realistic, and the whole bag cost about ten bucks. I guess, if we ever need any severed feet, we're all set.
I'm not counting that out...
Anyhoo, Thomas gave the entire hand a base coat of Apple Barrel acrylic in Lite Mocha (two coats), which looks like my liquid foundation, and repainted the red "blood". The red is really just a guideline for where to put the fake blood...that I still need to make and just remembered. Great. Once all the paint was good and dry, I started detailing.
The nails are fake press-ons from the drugstore. The hand had some nail bed detailing that I was able to use as a guide for sizing. The nail kit came with glue, but I opted to attach the nails with some rhinestone glue. Honestly, I figured there was less chance of gluing my fingers together that way.
Once the nails dried, I was able to file them into the shape I wanted. Then, I painted them with two coats of Essie Naughty Nautical. After that dried, I took a small detailing brush and touched up the skin-colored paint, adding in cuticles as I went. Finally, I painted one more coat of the Essie, just to clean up the cuticle area a bit.
When all of that dried, I was able to add the finishing touches. With a sponge, I applied a cream foundation over the entire skin area, giving the hand more of a natural skin finish. I set the foundation with a powder, then brushed a berry blush very lightly over the entire hand, concentrating the color around the knuckles and nails--where my own skin is naturally pinker. Then, I used a fluffy brush to apply a matte bronzer over the entire hand. The final effect is a little unnerving. It looks real. And off-putting. And kind of cool.
So, if you're in the market for a life-like severed hand...well, here you go. Now, if you'll pardon me, I'm going to go reevaluate my life choices.
Oh, who am I kidding? I freaking love this kind of stuff. Bring on Halloween!
Wednesday, September 4, 2013
I Do Believe In Spooks, I Do, I Do, I Do!!!!!!!
In the five and a half years that I've been married to Thomas, some of the strangest sentences have come out of my mouth:
The oddest utterance to date, though, has to be the one that occurred over the weekend: "Yeah, we should totally do Halloween Horror Nights."
What have I done?
In my thirty-three years on this Earth, I've been in a grand total of four haunted houses (okay, seven, if you count the real ones. Oddly, two out of those three didn't bother me, and the third was more annoying than anything else, but that's another story, nevermind). Now, out of those four, one was the Haunted Mansion at Disney World. Not going to lie, it makes me nervous. I love it, but it ups the anxiety level. One was my little brother's elementary/middle school fundraiser house, where the ghouls kept yelling out, "Boo, Curt's sister! I'm going to get you, Curt's sister!"
It was truly frightening, as I'm sure you gathered.
One house was at Niagara Falls, and boasted the most polite, well-mannered Ghost Face known to man. I ran through it with my eyes closed, clutching the jacket of a friend who was nice enough to go first. The last haunted house I attempted was at Universal Studios Hollywood, and I made it almost through the foyer before having to be escorted out by the Phantom of the Opera.
What have I done?
Truth be told, I'm really looking forward to going. For the past few years, Thomas and I have done the Mickey's Not So Scary Halloween Party at Magic Kingdom (and loved it!), but only toured Universal during the day. In broad daylight, you can see some of the decorations and scenes for the Horror Nights, and they looked really cool. I was especially impressed by the Walking Dead set up last year, with a car waiting for Sophia, and an abandoned school bus. We could also see ads for the shows that only run during Horror Nights, including one featuring Bill and Ted of the excellent journey fame. This year, they've added a live Rocky Horror show to the mix. It's never been my favorite movie, but I can see where a live performance might be a hoot. On top of all that, we're both super interested in horror makeup and scenic design. Why have we not been doing Horror Nights, again? Oh, yeah...I'm a coward. That's right.
We'd decided months ago that we wanted to do the behind the scenes tour (Unmasking the Horror. I still can't link--thanks, Blogger--but you can google it) that takes you on a lights-on, actor-free tour of three houses. Little by little, though, we started talking about maybe, possibly, trying to do Horror Nights just for the shows and cool decor. We could skip the houses, since we'll already have seen two of the ones we were most interested in (our tour includes Cabin In the Woods, American Werewolf in London, and La Llorona.), and the roaming scareactors (pronounced s-characters) are mostly Walking Dead themed, so they shouldn't bother me too badly. I've dealt with more than my fair share of zombies. I think I'll be okay. (key word: think) We'll just do the shows and ride some rides, and get to see the neat scenery. Plus, I hear they have margaritas. That's always a plus.
All of this is to say that, for the next few weeks, I'll be in mental preparation mode. There will be loads of research done on the event, the movies and legends behind the houses, and all that jazz, and it's most likely going to make its way over here. I'm a novice Horror Nighter, and a wussy, scaredy cat one, at that, so if nothing else, my probably idiotic attempt at conquering my fears might prove entertaining for you guys. Happy Haunting, y'all. Wish me luck.
- "Do you think that body'll fit in the trunk?"
- "If it looks too bad, just cover it in blood."
- "I swear, I'm done with that skeleton! I'm just leaving him here!"
- "Seriously, there has got to be a price tag for that bag of limbs around here somewhere!"
The oddest utterance to date, though, has to be the one that occurred over the weekend: "Yeah, we should totally do Halloween Horror Nights."
What have I done?
In my thirty-three years on this Earth, I've been in a grand total of four haunted houses (okay, seven, if you count the real ones. Oddly, two out of those three didn't bother me, and the third was more annoying than anything else, but that's another story, nevermind). Now, out of those four, one was the Haunted Mansion at Disney World. Not going to lie, it makes me nervous. I love it, but it ups the anxiety level. One was my little brother's elementary/middle school fundraiser house, where the ghouls kept yelling out, "Boo, Curt's sister! I'm going to get you, Curt's sister!"
It was truly frightening, as I'm sure you gathered.
One house was at Niagara Falls, and boasted the most polite, well-mannered Ghost Face known to man. I ran through it with my eyes closed, clutching the jacket of a friend who was nice enough to go first. The last haunted house I attempted was at Universal Studios Hollywood, and I made it almost through the foyer before having to be escorted out by the Phantom of the Opera.
What have I done?
Truth be told, I'm really looking forward to going. For the past few years, Thomas and I have done the Mickey's Not So Scary Halloween Party at Magic Kingdom (and loved it!), but only toured Universal during the day. In broad daylight, you can see some of the decorations and scenes for the Horror Nights, and they looked really cool. I was especially impressed by the Walking Dead set up last year, with a car waiting for Sophia, and an abandoned school bus. We could also see ads for the shows that only run during Horror Nights, including one featuring Bill and Ted of the excellent journey fame. This year, they've added a live Rocky Horror show to the mix. It's never been my favorite movie, but I can see where a live performance might be a hoot. On top of all that, we're both super interested in horror makeup and scenic design. Why have we not been doing Horror Nights, again? Oh, yeah...I'm a coward. That's right.
We'd decided months ago that we wanted to do the behind the scenes tour (Unmasking the Horror. I still can't link--thanks, Blogger--but you can google it) that takes you on a lights-on, actor-free tour of three houses. Little by little, though, we started talking about maybe, possibly, trying to do Horror Nights just for the shows and cool decor. We could skip the houses, since we'll already have seen two of the ones we were most interested in (our tour includes Cabin In the Woods, American Werewolf in London, and La Llorona.), and the roaming scareactors (pronounced s-characters) are mostly Walking Dead themed, so they shouldn't bother me too badly. I've dealt with more than my fair share of zombies. I think I'll be okay. (key word: think) We'll just do the shows and ride some rides, and get to see the neat scenery. Plus, I hear they have margaritas. That's always a plus.
All of this is to say that, for the next few weeks, I'll be in mental preparation mode. There will be loads of research done on the event, the movies and legends behind the houses, and all that jazz, and it's most likely going to make its way over here. I'm a novice Horror Nighter, and a wussy, scaredy cat one, at that, so if nothing else, my probably idiotic attempt at conquering my fears might prove entertaining for you guys. Happy Haunting, y'all. Wish me luck.
Wednesday, February 27, 2013
Renewing My Subscription to Better Tombs and Graveyards
Folks, I apologize for dropping off the map for a while. I've been fighting off an illness, and it's left me an absolute zombie--and not the cute and cuddly kind from The Night Shift. More like that bicycle torso from The Walking Dead, but with less energy, so I just sort of lay around and flail for the remote control until Thomas takes pity on me and changes the channel to something either wedding or Disney-related. I'm a mess, y'all.
Anyhoo, I did find these today, which are sort of undead and Disney-related, so score!
Disney is releasing brand-new merchandise for The Haunted Mansion!! I have no idea about store dates or prices, but I already have a few favorites picked out for jazzing up my Halloween decorations. Then again, I have a skeleton in my closet and zombie masks on my wall, so I could probably just leave them out all year and no one would think me any more strange than normal...hmm...
So, who else is excited? Let me know in the comments.
Anyhoo, I did find these today, which are sort of undead and Disney-related, so score!
 |
| Coasters based on the cemetery! Photo Credit (This and All): Disney Parks Blog |
 |
| Throw Pillow |
 |
| Candleholders |
Friday, November 2, 2012
Attack of the Deadly Spider-Lashes!!: KISS False Eyelash Review
Well, Halloween happened, and I think the neighborhood kids enjoyed Mom's spooky front-yard cemetery. A very confident little Harry Potter made the low-lying fog "expelliarmus", and at least one mom thought Thomas' Batman was "sexy". Me? I fought my false eyelashes all night.
Note to self: Do NOT try something new on a day when you will NOT be able to do anything about it if it sucks.
Okay, so a couple of weeks back, I received the Beauty Blogger Influenster VoxBox, which was filled with products for me to play with and report back to you on. For the most part, I've been impressed with the items, and even gave some mini-reviews on my box opening post. However, I decided to save the KISS false eyelash kit to use on Halloween...'cause I'm an idiot.
I should have known better than to wait until the day of to try out a foreign object that must be attached to my eyes with glue. I mean, seriously, there are way too many things that can go wrong! Yeah...idiot...
Luckily, for me, the glue did not irritate my eyes. It's actually a very nice glue. There was a slight odor, but, as I said, no irritation, and the stuff really held. I wore these lashes for twelve hours straight, with no worries of the lashes coming off. That said, they did remove easily, and the glue wisked away with a little makeup remover. My only complaint with the glue is that it took ages to dry enough to apply, but I can deal with that.
The applicator was a nice idea. It didn't work as well as a pair of tweezers, and I ended up just using my fingers, anyway, but it was helpful for clamping the lashes to my natural lashes.
The lashes, however, were terrible. They looked fine when worn, but the strips were ridiculously stiff. Normally, I flex my strips a few times to help them contour to my eyes, but these wouldn't flex. I had to bend them in half--so that there was a crease and a point--before I could attempt to apply them. On top of that, I still couldn't get the inner corners to lay flat. I tried bending, I tried trimming, I tried yelling obscenities at them (that probably worked the best, believe it or not), but nothing did the trick. I spent the next twelve hours checking, clamping, re-checking, and re-clamping. On top of that, they were so heavy that they weighed down my natural lashes and impaired my vision. I had to close my eyes, from time to time, just to have a rest from the weight! Let me tell you, it sucked. When the last trick-or-treater exited the graveyard, those furry little spider lashes went straight into the trash can. I'll reuse the glue, and I'll hang on to the applicator, but I'm not bothering with any more of those strip lashes.
Final Verdict: 5 out of 10. You can make 'em work...just don't plan to wear them too long.
 |
| They look fine, but they just don't feel good. |
In unrelated news, I'm starting a challenge Monday! It's self-imposed! 'Cause I don't have enough on me, already!
It's, ready or not, the Holiday season. I know a lot of you will be looking for makeup gifts to either give or put on your own lists, and I thought this might help you out. Last year, my "had to have" item was the Urban Decay Naked 2 palette. I didn't do a review on it because it seemed unnecessary. We all knew that the shadows were fantastic quality, the packaging was amazing, and the brush was pretty darn good for a freebie. The colors, themselves, were completely open to debate, but it all boils down to personal preference. Me? I love it, and use it a lot. Other bloggers...not so much. The main complaint I run into is that it's not versatile. I haven't really run into that, but that could just be me. So, as a public service, I am going to wear and photograph a different eyeshadow look, made exclusively with shadows from the palette, every day for a week. God, help me. Then, you can judge for yourself if you think that the palette is versatile enough for you or your loved one. I know it's still a very popular, wished-for item, but it's also a fairly pricey item. I'd hate for anyone to spend the money on it, only to be disappointed. Conversely, I'd hate for anyone to miss out on something that would really enhance their routine. After all, 'tis the season for coupons and sales.
Monday, October 29, 2012
Why Is That Inflatable Snowman Holding a Rifle?
Over the weekend, Thomas and I did a little shopping at the local Wally World. As we stood in line with a carving pumpkin and some Halloween candy, Thomas asked me what, quite frankly, might be my new favorite question, ever:
"Why is that inflatable snowman holding a rifle?"
Sure enough, there was an inflatable snowman displayed on a shelf. He wore an inflatable hunting cap, and carried an inflatable rifle, which was trained on an inflatable reindeer. The last part was merely coincidence, but I could easily see the entire tableaux winding up in a neighbor's yard. Heck, I could probably tell you now which yard. We shook our heads at the silliness, paid for our stuff, and went on to our next stop, Big Lots. We needed to pick up some more lights for Mom's Halloween yard display.
When we got to the store, we were thrilled to find the lights on sale. In fact, all of the Halloween decorations were on sale, and had been moved up to the very front of the store, because the "seasonal" area of the store had been decked out with Christmas trees and tinsel. The leftover macabre merch had no place left to go but out the door.
At Target, it was nice to see that the pumpkins hadn't already been clearanced into oblivion, but that was probably only because so very few items remained. The stragglers had been consolidated, though, and light-up candy canes and glittering greeting cards were already encroaching upon their former territory.
We managed to find the fog machine and liquid we needed, and made our way through the mall to Penney's, where I wanted to grab some tights to go underneath my costume. The weather had suddenly switched from Summer to Winter, completely bypassing Fall, and I had no desire to freeze my trick-or-treats off on Halloween night. Walking through the connecting hallway, neither of us could help but notice the illuminated "icicles" dripping from the ceiling.
"Gosh Darnit!" (Okay, so Thomas didn't say exactly that, but this is a family-friendly blog) "Christmas decorations?!" And sure enough, the store's Ladies' department was already swimming in styrofoam snowflakes.
"You know," I told him, "when I worked at Barnie's (a now-defunct coffee shop inside the main area of the mall), we were appalled when the mall maintenace guys started putting the Christmas wreaths up on Halloween. Now, we're doing good to even make it to Halloween." We went home, carved a jack-o-lantern, and watched a marathon of haunted attraction and creature-building television shows.
This morning, I had a few minutes to kill before heading into work, so I stopped by the strip mall next to my office building. Ross had a tiny rack of picked-over Halloween items, and probably a dozen tables and half a dozen shelving systems filled with stocking stuffers and barware, each designated as "holiday" by a glitzy red sign. Bed Bath & Beyond didn't even pretend to have any Halloween stuff left--not even on sale--and I soon found myself surrounded by crystal-encrusted mistletoe and gingerbread candles.
Now, I don't mean to come off as down on Christmas. I love Christmas. Every year on the Day after Thanksgiving, I do my Black Friday shopping, then come home to wrap presents and decorate the tree. The first available Saturday after Thanksgiving, I fire up the oven and bake cookies and breads while Miracle on 34th Street and Christmas Vacation play on the television (last year, Galaxy Quest somehow made it into the mix, too, but I think that's just because the cranberry walnut cookies took too long in the oven). I drink egg nog lattes even though I have no idea what egg nog actually is. Thomas and I set up our Christmas village just like my family always did when I was a kid. I get a Christmas dress for Vigil Mass. A little part of me still hopes Albert the Elf will stop by for a nibble of pumpkin bread.
I adore the entire holiday season...during the holiday season. The problem is when the holiday season preempts other holidays. First of all, it's just downright weird seeing the Baby Jesus next to a life-size, animated skeleton with glowing eyes and special-action fogger. My mind goes into a very trippy place when I shop for headstones and cobwebs while "Good King Wenceslas" plays overhead. One of these things is not like the others, and my poor little overworked brain can't justify what it's taking in.
Secondly, the longer the holiday season lasts, the fatter I get and the less money I have. See, Black Friday circulars have already begun circulating. The sales are beginning, and try as I might, my genetic makeup absolutely prevents me from resisting a good sale. Normally, I can turn away from 20 and 30-percent off events, but the holiday season brings with it 50 and 75-percent off prices, free gifts with purchase, and special bonuses just for coming in the store! All that free and cheap stuff nearly breaks me every. darn. year. Plus, since Thanksgiving (a day when I normally don't pig out, oddly enough) gets passed over before it even arrives, holiday cookies, cakes, pies, and coffee drinks get a head start. I can avoid buying them, but it seems rude to turn down a homemade snack from a proud coworker, or a pre-rehearsal nosh from a sweet choir lady. If I only had a month to get through, I could maybe handle it, but it's only October, and it's already starting! We're looking at over two months of penny and calorie-counting, and I'm stressed out just thinking about it.
Lastly, and most importantly, the longer the holiday season, the meaner people get. I hate that. You'd think it would be the opposite, since this is supposedly the time for joy, peace, and love, but it's not. It's the time for fighting over parking spaces, clutching your handbag a little tighter out of fear, and forgetting that the world doesn't revolve around you. I felt it start today, and that's really what prompted this entire rant. Trying to leave the strip mall, I had two (TWO!) drivers honk their horns at me, not because I was driving recklessly or not paying attention, but because I existed. As I pulled out of my parking space, I heard the first horn. The driver was at the other end of the aisle, but didn't want me to pull out because she'd have to wait ten seconds for me to drive away. However, she had no problem making me wait for a couple of minutes while she blocked the aisle and held a conversation with the people she was dropping off at the door. Immediately after that, I encountered the other horn as I yielded at a yield sign to a driver who had the right of way, and was physically blocking my path. The car behind me didn't view the laws of physics as a good enough excuse to keep her waiting, again, for a matter of seconds. Those feathered tophat ornaments weren't going to buy themselves, I guess.
Last Black Friday, my car was nearly hit, and a pedestrian nearly flattened, by a driver who felt the need to speed around me to get the parking spot I was about to turn into. She flipped us off and cursed at us as they passed, causing several onlookers to shake their heads and shrug their shoulders. No one had a clue why the driver felt so entitled to that spot, or why she felt it warranted attempted vehicular homicide. Back in my retail days, I was yelled at for not smiling enough, for not being the store they'd meant to go to, for not making the line shorter, for not playing the song they wanted to hear. I've been made to cry on more than one occasion, and once had to have mall security walk me out to my car after I received a death threat. The reason: I'd told a large group of customers that they needed to make their final purchases, as the mall was closing and I didn't want them to be locked in. It was nearing midnight on Christmas Eve, and the store had already technically been closed for nearly half an hour.
Apparently, the holidays are upon us. Santa Claus has already started making cameo appearances in commercials, and it's only a matter of days before that annoying Target lady shows back up. 'Tis the season of brotherly love, and 'tis going to be that season for a heck of a long time. If you take nothing more out of my tirade, please, at least take this much to heart: We're all in this together. Try not to be a jerk.
Thank you, and Merry Hallogivmas.
Friday, October 26, 2012
Frugal Friday: Cheap (or Free!) Last-Minute Costume Ideas
Wow!!! Halloween is only five days away, and Halloween weekend is upon us!! Over the next few days, some of you may find yourselves unexpectedly invited to costume parties, with no costume hanging in the closet. Oh, no! What to do?! I know the last thing I'd want to do is hit the costume/party/Halloween pop-up store the weekend before Halloween (no, thank you), so I did a little of what I like to call "Closet Shopping" to put together workable costumes out of items I already had lying around the house.
Yes, they are all kind of lame. No, it doesn't matter. It's Halloween. I think you might even get extra points for having a lame costume. Points for what, exactly? Not a clue. I just make this stuff up as I go along.
1. Tourist
Pull out the shorts, flip-flops, sandals, backpacks, fannypacks, and the loudest Hawaiian or theme park shirt you can find. Bonus points if the t-shirt has Marty Moose on it (again, no idea what the points mean. Just go with it). Sun visors, baseball or trucker caps, knee socks, and a dab of sunscreen on the nose (greasepaint or white cream makeup work, too) complete the look.
2. Proud Parent
You know how some Baseball dads and Pageant moms have t-shirts, noisemakers, and a dozen, or so, pins, posters, and the like? What if every club did that? A fun spin (and one not likely to offend any parents who may fit this description--mine did!), is to pick a club where a cheering section would be entirely inappropriate, like Debate, or Model UN. You know, where matches and meets are notoriously quiet and require deep concentration, and where most people show up in business attire. This one may require a trip to the craft store, but maybe not. If you're already a DIY-er, you might already be all set. The basic costume is jeans and t-shirt. The fun comes in how you decorate that t-shirt, and what props you decide to carry--the louder and crazier, the better. Don't be afraid to use neon, rhinestones, and glitter, all at the same time. Proudly proclaim that you are a Scholar's Bowl Mom/Dad...foam finger and all!
3. Beauty School Dropout
You will need a cheap (five dollar-range) stylist's smock from the beauty supply shop, some spray in hair color from the drugstore or Walmart (look on the Halloween aisle. It's still much safer and far less crazy than going to a party store!), and foam rubber curlers. Spray your hair with whatever color you like (if you go for pink, you could also make a little nametag that says "Frenchie", and wear a pencil skirt or capris with cute flats under the smock), and roll onto the curlers. Then apply the tackiest makeup you can think of. I mean, make the eyes different colors and smear the lipstick (unless you're Frenchie, then stick with cute and 50s-inspired). This also works for guys, by the way. I'm just going to leave you with that mental image.
Have a great weekend!!!
Thursday, October 25, 2012
Fighting for Truth, Justice, and the Occasional Treat
My puppy thinks he's Superman.

I'm perfectly fine with that. When Thomas puts this little costume on Ronnie, the dog's entire demeanor changes. He stands up a little straighter. His ears perk up a little higher. He is SuperRonnie, the Magnificent.
I love my dog.
Happy Halloween to all of our furry little friends! If you're thinking of taking your pet trick-or-treating, here's a really helpful, informative article you might want to read first. Ronnie's going with us--no question!--but he's probably going to spend the evening watching over the city from the safety of Thomas'--I mean, Batman's loving arms. Oh, yes, there will be pictures.
Wednesday, October 24, 2012
Costume Creations: Doctor Who's Amy Pond
Hoo boy, I do not look like Karen Gillan. Not even slightly. Of course, like every other female Doctor Who fan in the world, that doesn't stop me from absolutely coveting her hair, makeup, and clothes on the show. Amy Pond is entirely gorgeous, but in that accessible, girl-next-door kind of way. I know that some of you out there might be considering an Amy costume for Halloween, or possibly as cosplay for a convention (I'm getting excited for the New Orleans Comic-Con, myself). To help out, I recreated the look Karen Gillan is wearing in this photo. I can't find where it was taken, but it looks like a press junket. This, out of all the photos I found online, struck me as the most typical "Amy" look (which is odd, since she's not in character in this shot, but whatevs):
And here's the recreation. You have no idea how badly I want her photographer and lighting and hairstylist and retouching program and genes...
 I have to say, I'm pretty happy with how it turned out! The colors are pretty close, and I finally figured out how to do the "Amy Pond Eye". So, here's what we're doing:
First, prime your face, then apply a medium to full coverage foundation. I used Tarte Clean Slate and Urban Decay Naked Skin. You can use whatever you want, of course. If you're doing this for a con, where you're going to be walking around and getting sweaty, but will still be photographed out the ears, Ben Nye cream foundations look amazing and were built for that kind of wear (see the princess tutorial from a couple of days ago, because that's what I used. Heck, see it anyway, 'cause we're going to be reusing a lot of those techniques, here).
Next, prime your eyes from lid to brow with a flesh colored base. I used Urban Decay Primer Potion in Eden, but NYX or E.L.F. would work well, too. After I primed, I went into my NYX Crimson Amulet palette and used the matte pink eyeshadow all over the lid and on up to the brow. Next, I took the lilac satin finish and applied it at the crease, then went over it with the purplish-blue color. The white shimmer went just at the brow bone. To line the eyes in that distinct Amy Pond fashion, I used a black gel pencil (Buxom's Insider Eyeliner in Black Onyx) on the top lashline, then brought it down to the bottom lashline, and ran it halfway across. It doesn't wing, but the two lines do connect. Then, I grabbed a waterproof black liner (UD 24/7 in Zero) and used it on the waterline, but only in the very outer corner. I cleaned up by lashlines by running black shadow on a flat brush across them. A white liner (NYX Jumbo Pencil in Milk) went on the rest of the waterline and in the inner corner. The look's not difficult, but there are more steps than I ever thought for. Finish up the eyes by filling in your brows and applying copious amounts of black mascara to your top and bottom lashes.
 |
| Photo Credit |

First, prime your face, then apply a medium to full coverage foundation. I used Tarte Clean Slate and Urban Decay Naked Skin. You can use whatever you want, of course. If you're doing this for a con, where you're going to be walking around and getting sweaty, but will still be photographed out the ears, Ben Nye cream foundations look amazing and were built for that kind of wear (see the princess tutorial from a couple of days ago, because that's what I used. Heck, see it anyway, 'cause we're going to be reusing a lot of those techniques, here).
Next, prime your eyes from lid to brow with a flesh colored base. I used Urban Decay Primer Potion in Eden, but NYX or E.L.F. would work well, too. After I primed, I went into my NYX Crimson Amulet palette and used the matte pink eyeshadow all over the lid and on up to the brow. Next, I took the lilac satin finish and applied it at the crease, then went over it with the purplish-blue color. The white shimmer went just at the brow bone. To line the eyes in that distinct Amy Pond fashion, I used a black gel pencil (Buxom's Insider Eyeliner in Black Onyx) on the top lashline, then brought it down to the bottom lashline, and ran it halfway across. It doesn't wing, but the two lines do connect. Then, I grabbed a waterproof black liner (UD 24/7 in Zero) and used it on the waterline, but only in the very outer corner. I cleaned up by lashlines by running black shadow on a flat brush across them. A white liner (NYX Jumbo Pencil in Milk) went on the rest of the waterline and in the inner corner. The look's not difficult, but there are more steps than I ever thought for. Finish up the eyes by filling in your brows and applying copious amounts of black mascara to your top and bottom lashes.
 |
| The Eye. Thrilling... |
Back to the skin! Grab your concealer (one shade lighter than your foundation, please), and draw a V shape from the inner corner of your eye, down the side of your nose, and back up to the outer corner of your eye. Fill it in and blend it out. This will create that cool "Kim Kardashian" highlight, and it's the same technique we used on the princess look. In fact, go ahead and highlight the center of your nose, your chin, and your forehead while you're at it. I'll wait...
Alrighty. Now, if you're not totally sleep deprived, like I was, this is when you'd want to set everything with a transluscent powder. If you're me, you'll remember that after you have a pain of a time applying your blush. Going back to the NYX Crimson Amulet palette, use the matte pink blush only on my outer cheekbone. The apples are left bare. Then, take the matte red blush and go over the pink, to create a berry color. After that, use a light bronzer to contour the cheekbones and nose. Then (even if you set with a transluscent powder earlier), grab your HD powder and give the whole look a good once over.
Next, take a berry lipliner (mine was the Night Villain color from the E.L.F. Maleficent palette) and line your lips, bringing the color in on the outer corners. Then, fill in with a berry lipstick. I used Buxom's Lip Tarnish in Scandal, but MAC Chic works well, too. Finally, if you're me, and just feel like being sparkly, grab the pretty highlighter out of the NYX palette and go over the already highlighted areas. I don't recommend it, since it photographs weird, but I was on allergy meds and punchy, and it seemed like a good idea at the time. It wasn't.
In person, you are going to look like you have on more makeup than a Norma Desmond-wannabe, but it photographs really well. Have fun exploring time and space!!!
Monday, October 22, 2012
Costume Creations: Princess for a Day
Sometimes, you just need to feel like a princess. Example: this morning, I woke up sick as a dog. My sinuses have exploded (thanks, weather change), and the last thing I wanted to do was drag my carcass out of bed. As incentive, I promised myself I could play dress-up for the blog before my trip to the grocery store. My Halloween costume this year is Belle (of course it is), so I did a dry run of the makeup look I want to go with it. Actually, it's based off the makeup I wore as the bookish beauty while on tour, but with a few tweaks, it could pass for pretty much any storybook princess.
I started this look by using a stippling brush to apply a full coverage cream foundation all over the face, ears, and neck. The stippling brush buffs the foundation into the skin, so it covers well, but doesn't look too heavy or cakey. Next, I applied a white base to just the lid areas of my eyes, blended out the edges with my finger, and set it with a bright white shadow. Then, I took a dark chocolate brown shadow, and applied it just above my crease, from inner corner to outer. Finally, I took a vanilla eyeshadow and applied it from the top edge of that brown, all the way up to the brow. Once all the shadow was applied, I used a fluffy brush to barely blend out the edges, then filled in my brows with a brown brow powder.
The liner is the key to this look. Storybook (okay, Disney...who am I kidding, here) princesses always have those wide, slightly rounded-off eyes. To acheive that, I used a pencil liner (I prefer it to a harsher liquid) to draw from the inner corner of the top lashline all the way to a winged edge. Then, I drew from the inner corner of the bottom lashline STRAIGHT across to the outer edge. Think of making a box, rather than following your eye's natural curve. The outer edge should be much thicker than the inner corner. Then, connect that edge to your wing. Then, use a white pencil to line your lower waterline and the innermost corner of your eye. You don't want the black to connect to itself on that innermost corner. See the photo below for reference if I've completely lost you, here. Lastly, coat your lashes, top and bottom, with a healthy dose of mascara. If you want, you can add falsies, but I didn't see the need.
On to the face! Grab the lightest concealer you can comfortably wear, and apply it in a V shape from your inner eye corner, down alongside your nose, and back up to the outer corner of your eye, then blend out the edges. This will give you that Kim Kardashian highlight that looks so pretty in photos. Use the same concealer down the bridge of your nose, on your browbones, on the center of your forehead, and on your chin. This will help you glow without using any shimmer, for a naturally luminous look. Then, use a dark cream to contour your cheekbones. I also used a little on the sides of my nose to slim the bridge and shorten the length. Once you're done, set it all with a pressed transluscent powder.
There's very minimal color to this look, and it's pretty much all pink. I applied a baby doll pink blush to the apples of my cheeks and blended upward to the temples. Then, I brushed on a rosy pink lipstick to the entire lip area, then used a deeper pink on the outer corners and edges, so the lighter center would look look pouty. I finished the look by polishing the edges with a pink lipliner.
There is absolutely no shimmer to any of this makeup, but you still end up with a magical glow. I hope this helped!
 |
| Hey! I'm almost rockin' Ariel hair! (Almost...) |
I started this look by using a stippling brush to apply a full coverage cream foundation all over the face, ears, and neck. The stippling brush buffs the foundation into the skin, so it covers well, but doesn't look too heavy or cakey. Next, I applied a white base to just the lid areas of my eyes, blended out the edges with my finger, and set it with a bright white shadow. Then, I took a dark chocolate brown shadow, and applied it just above my crease, from inner corner to outer. Finally, I took a vanilla eyeshadow and applied it from the top edge of that brown, all the way up to the brow. Once all the shadow was applied, I used a fluffy brush to barely blend out the edges, then filled in my brows with a brown brow powder.
The liner is the key to this look. Storybook (okay, Disney...who am I kidding, here) princesses always have those wide, slightly rounded-off eyes. To acheive that, I used a pencil liner (I prefer it to a harsher liquid) to draw from the inner corner of the top lashline all the way to a winged edge. Then, I drew from the inner corner of the bottom lashline STRAIGHT across to the outer edge. Think of making a box, rather than following your eye's natural curve. The outer edge should be much thicker than the inner corner. Then, connect that edge to your wing. Then, use a white pencil to line your lower waterline and the innermost corner of your eye. You don't want the black to connect to itself on that innermost corner. See the photo below for reference if I've completely lost you, here. Lastly, coat your lashes, top and bottom, with a healthy dose of mascara. If you want, you can add falsies, but I didn't see the need.
 |
| I just did my brows, so why do they look so awful? Ugh...carry on! |
On to the face! Grab the lightest concealer you can comfortably wear, and apply it in a V shape from your inner eye corner, down alongside your nose, and back up to the outer corner of your eye, then blend out the edges. This will give you that Kim Kardashian highlight that looks so pretty in photos. Use the same concealer down the bridge of your nose, on your browbones, on the center of your forehead, and on your chin. This will help you glow without using any shimmer, for a naturally luminous look. Then, use a dark cream to contour your cheekbones. I also used a little on the sides of my nose to slim the bridge and shorten the length. Once you're done, set it all with a pressed transluscent powder.
There's very minimal color to this look, and it's pretty much all pink. I applied a baby doll pink blush to the apples of my cheeks and blended upward to the temples. Then, I brushed on a rosy pink lipstick to the entire lip area, then used a deeper pink on the outer corners and edges, so the lighter center would look look pouty. I finished the look by polishing the edges with a pink lipliner.
There is absolutely no shimmer to any of this makeup, but you still end up with a magical glow. I hope this helped!
 |
| Seriously, I think every princess makes this face at least once per movie. OH! There are dwarves in this cottage! I just saw Sebastian on a dinner plate! A teacup and a clock just talked to me! Maybe I should have ignored the Drink Me sign! The list goes on and on... |
Friday, October 19, 2012
Costume Creations/Frugal Friday: Frankie Stein from Monster High
My little niece, Tempest, is big into Monster High. It's my fault, too. I got her a Frankie Stein rag doll for Christmas one year, and that was it. To her mother, I apologize.
Last year, Temp went as Frankie Stein for Halloween, and was so darn cute it hurt. In her honor, I thought I'd do a costume look for Frankie Stein, and I wanted to try to do it with all drugstore products. This is not intended to "transform" you into Frankie, nor is it meant to be a "going out" look. This is just to show that you don't need to buy the overpriced makeup kit that is sold alongside the costume to get a Frankie Stein look for trick-or-treating. If you want to see me do a Frankie Stein-inspired "going out" look for adults (since those costumes apparently exist. Who knew?), let me know in the comments, and that can totally be arranged. This one is more "stage makeup" inspired, and intended for ten to twelve year-olds.
For the uninitiated, this is Frankie:
I'm not a tween, nor am I a model, so this looks silly as heck. Plus, I blinked every darn time Thomas took a picture. As a stage actor, I can tell you that this--every bit as much as the whole "the actors could get distracted, fall, and die" aspect--is the reason they tell you not to take flash photos at theatrical productions. It's because we're unaccustomed to the flashes and make stupid faces. THIS is the picture I look the least stoned in, so here you go.
Alrighty, I (not being a twelve year-old with perfect skin) started out by applying a moisturizer, then used Maybelline Age Rewind concealer to cover any blemishes and dark circles. Then, I used a NYX jumbo pencil in Milk to prime my eyelids, all the way up to the brow. The white base will help keep the L.A. Colors mineral shadow in a purple color nice and vibrant. Next, I mapped out the shape I wanted for the eyeshadow, then filled in the entire area with purple,including under the lower lashline. After that, I took the pink shadow from the L'Oreal HiP duo "Reckless" and defined the crease area. Then, I grabbed my NYX liquid liner (though a black pencil would work if you're not comfortable with liquid) and created a winged cat eye on the top lashes, then lined the lower lashline, as well. We'll come back to the eyes a little bit later.
For the skin, I used a small, dense powder brush to apply the green side of the L'Oreal HiP duo "Perky" all over my face. This will take you a thousand forevers, but it's a sheerer effect than greasepaint, and easier to find in a close-to-accurate shade. If you have trouble keeping the brush out of the dark navy shadow that makes up the other half of the duo, try carefully covering that half with a little masking tape until you finish with the green. Once you have your face (and neck and ears) covered, take an even smaller brush (like a lipliner) and the same green (the smaller brush will help concentrate the color) to map out the places you want contoured, like the cheekbones and around the nose. Use the bigger brush to blend out the lines. Then, uncover the navy blue side and lightly go over those contoured areas with the bigger brush and the blue. You'll also want to go into your hairline and around your jaw. Next, take a blush brush and a hot pink blush, like E.L.F.'s Pink Passion from the Studio line, and shade the apples of your cheeks. Use the same brush to pop a bit of the purple eyeshadow over the pink, to tie the colors together. Dust a sparkly white shadow, like L.A. Colors mineral shadow, onto the cheekbones to highlight.
Back to the eyes! You're going to have to do a little clean-up, now that the green is in place. I found it easiest to do this with the NYX jumbo pencil in Milk, because it's super creamy, opaque, and you can just draw it wherever you want it. I didn't want to lose the eyeshadow shape, so I used the white pencil as a highlight for the brow, inner corner, and brought it down below the lower lashline. I also used it on the waterline. Then, I applied two coats of black mascara to upper and lower lashes. You could use false lashes, but I know a lot of kids won't sit still long enough for that, so I just went with the mascara.
To finish things up, I used a black pencil to darken my brows and to draw on her stitches. Lastly, I applied Revlon's Just Bitten Kissable Balm Stain in Romantic to my lips for her signature glossy red pout.
I hope you enjoyed this. Again, if you want to see a more grown-up version, let me know in the comments.
Last year, Temp went as Frankie Stein for Halloween, and was so darn cute it hurt. In her honor, I thought I'd do a costume look for Frankie Stein, and I wanted to try to do it with all drugstore products. This is not intended to "transform" you into Frankie, nor is it meant to be a "going out" look. This is just to show that you don't need to buy the overpriced makeup kit that is sold alongside the costume to get a Frankie Stein look for trick-or-treating. If you want to see me do a Frankie Stein-inspired "going out" look for adults (since those costumes apparently exist. Who knew?), let me know in the comments, and that can totally be arranged. This one is more "stage makeup" inspired, and intended for ten to twelve year-olds.
For the uninitiated, this is Frankie:
 |
| Frankie Stein (Credit) |
And here's what I came up with:
 |
| I know, the stitches go on the other cheek. Whoops. You'll also want to do your neck and ears, but this was for demonstration purposes only. I love you guys, but Supernatural was coming on. I have priorities. Jensen Ackles is cute. |
Alrighty, I (not being a twelve year-old with perfect skin) started out by applying a moisturizer, then used Maybelline Age Rewind concealer to cover any blemishes and dark circles. Then, I used a NYX jumbo pencil in Milk to prime my eyelids, all the way up to the brow. The white base will help keep the L.A. Colors mineral shadow in a purple color nice and vibrant. Next, I mapped out the shape I wanted for the eyeshadow, then filled in the entire area with purple,including under the lower lashline. After that, I took the pink shadow from the L'Oreal HiP duo "Reckless" and defined the crease area. Then, I grabbed my NYX liquid liner (though a black pencil would work if you're not comfortable with liquid) and created a winged cat eye on the top lashes, then lined the lower lashline, as well. We'll come back to the eyes a little bit later.
For the skin, I used a small, dense powder brush to apply the green side of the L'Oreal HiP duo "Perky" all over my face. This will take you a thousand forevers, but it's a sheerer effect than greasepaint, and easier to find in a close-to-accurate shade. If you have trouble keeping the brush out of the dark navy shadow that makes up the other half of the duo, try carefully covering that half with a little masking tape until you finish with the green. Once you have your face (and neck and ears) covered, take an even smaller brush (like a lipliner) and the same green (the smaller brush will help concentrate the color) to map out the places you want contoured, like the cheekbones and around the nose. Use the bigger brush to blend out the lines. Then, uncover the navy blue side and lightly go over those contoured areas with the bigger brush and the blue. You'll also want to go into your hairline and around your jaw. Next, take a blush brush and a hot pink blush, like E.L.F.'s Pink Passion from the Studio line, and shade the apples of your cheeks. Use the same brush to pop a bit of the purple eyeshadow over the pink, to tie the colors together. Dust a sparkly white shadow, like L.A. Colors mineral shadow, onto the cheekbones to highlight.
Back to the eyes! You're going to have to do a little clean-up, now that the green is in place. I found it easiest to do this with the NYX jumbo pencil in Milk, because it's super creamy, opaque, and you can just draw it wherever you want it. I didn't want to lose the eyeshadow shape, so I used the white pencil as a highlight for the brow, inner corner, and brought it down below the lower lashline. I also used it on the waterline. Then, I applied two coats of black mascara to upper and lower lashes. You could use false lashes, but I know a lot of kids won't sit still long enough for that, so I just went with the mascara.
To finish things up, I used a black pencil to darken my brows and to draw on her stitches. Lastly, I applied Revlon's Just Bitten Kissable Balm Stain in Romantic to my lips for her signature glossy red pout.
I hope you enjoyed this. Again, if you want to see a more grown-up version, let me know in the comments.
Subscribe to:
Posts (Atom)