Happy New Year!! To start things off on just the right foot, here's a tag that no one asked me to do!! YAY!!!
Actually, I read a blog that tagged all of its readers, so there you go. I thought this would be a really fun post to do in January, since it's, more or less, a look at what products we've all used and loved (or hated) over the past year. Some of my answers surprised me, while others were no-brainers. I hope you have fun with this post, and let me know if you agree or disagree with me in the comments.
And away we go!!!
Best Packaging
M.A.C. 2004 Limited Edition 6-Eyes Crystal Palette
Obviously, I can't still use this, since the shadows are a decade old and smell apalling. Still, this is, by far, the prettiest packaging of any palette I have owned, before or since. It's a small compact, about the size of a credit card, and the thickness of an E.L.F. Custom Color compact. The casing is lavender metal, with the MAC logo inlaid in rhinestones. Inside, a mirror takes up the top, and a decently usable brush rounds the bottom portion, where the shadows, themselves, are located. A velveteen sleeve was included, to protect the compact when not in use. I freaking love this thing. Currently, I'm trying to figure out how to remove the eyeshadows so, maybe, I can use the case for something else. Anything else. Heck, I might toss my business cards in it.
Best Color Payoff
Urban Decay Naked 1
These shadows are so saturated with pigment that they're almost difficult to apply, but they're definitely worth the extra effort! During the Summer, these bronze and gold shades are simply stunning.
Most Versatile
Urban Decay Naked 2
NARS Guy Bourdin Cheek Palette
This was a tie. For eyes, in my opinion, you can't beat Naked 2. The range easily goes from daytime casual to dramatic evening. Bootycall and Tease make for a simple, sophisticated nude eye, while Verve and Pistol are two of the most gorgeous silvery taupes. For an easy one-color eye, Snakebite is a go-to. Really, I can't say enough good about this palette.
That said, I've also found that my NARS blush palette has become a nearly irreplaceable staple. It contains four blush colors that range from neutral peachy-pink to what I can only describe as a hothouse rose. In addition, there's a sheer, yet buildable bronzer, and a universally-flattering, subtle highlighter. This was limited edition, but you may still be able to get your hands on one, and I definitely recommend it.
Best for Traveling
Stila Not So Nude
Toss in a tinted moisturizer, bronzer, and mascara, and this is really all you need for a weekend. The thin, booklet-esque palette opens to reveal a (not so useful, sadly) mirror on one side, and a plethora of products on the other. Six neutral shadows range from matte baby pink to shimmering deep grape. Below those, you find a natural-flush cream blush/shadow/lippie, as well as Stila's famous Kitten highlighter.
Biggest Regret
E.L.F. 22-Color
This was a bust, and I really hate that. There just isn't one single redeeming quality. The packaging is bulky and unattractive. The shadow colors are weak, kind of ugly, and don't really go well together. The lip colors are chalky, and the blushes are so tiny as to be unusable...I think you get the point. It's just a miss.
Best Color Names
Urban Decay Glinda
Tornado, Aura, Magic, Illusion, Oz, and South. If you're a Wizard of Oz fan, like myself, then you've probably already squeed a little over this palette. The colors are beyond gorgeous (have you seen South? Holy Moly!), but there's just something, erm, magical about putting Magic on your eyes.
Least Used
Too Faced Spun Sugar Glamour To Go
I should use this more. It's a really beautiful palette. The thing is, I bought this for travel, but the sugary nature of the shadows doesn't really lend itself to that. The shadows are lovely as toppers, but aren't very effective on their own. I do, however, use the gold highlighter on a regular basis. That thing is spectacular!
Most Used
Urban Decay Naked Basics
This is one that caused me to eat a little crow. When this palette came out, I didn't see the need for it. The colors looked boring and easily duped. Shortly after, I found myself with a gift card or discount or something (I don't remember what) that made the palette pretty much free, so I picked it up. I don't think I've put it down since. Foxy and W.O.S. are fantastic blending colors for my fair skin, and Naked 2 is the best crease color I've ever used. Hands down. Faint fills in my brows, and Crave makes a fabulous liner. I don't use Venus very much, but five out of six ain't bad. I finally took this out of my palette drawer and stuck it in my countertop organizer.
Most Loved
Urban Decay Naked 3
This probably isn't a fair category. I just got the Naked 3, and I'm sure part of my current obsession with it is due to it being the shiny new toy under the Christmas tree. That said, I don't see myself shelving it anytime soon. The rose-gold shades are perfect with my skintone, and the color range puts its versatility on par with the Naked 2. It's a truly remarkable product, and one that can picture using regularly for a very long time.
Desert Island
NYX Crimson Amulet
What? Not an Urban Decay palette? The heck, you say! Yeah, it surprised me, too. Still, were I stuck on an island (obviously, with other inhabitants and a well-stocked, comfy hotel) with no other makeup options, save for one palette and some sunscreen, this one would take care of everything. Decent shadows in an array of colors and finishes? Check! Several pretty blushes? Check! Glowy highlighter? Check! Lippies? Check! There was even a liner and eye primer included when I bought it, but those went the way of the dodo ages ago. This was another limited edition, but most of NYX's palettes are just as versatile, and they're all high-quality for a low price point.
Well, that does it for this tag, so now, I tag all of you! Go forth! Have a lovely new year, y'all.
Showing posts with label NYX. Show all posts
Showing posts with label NYX. Show all posts
Thursday, January 2, 2014

Tuesday, September 17, 2013
'Ip, 'Ip, 'Ooray: September Ipsy Unboxing
Good Lord, this year is flying by! I saw kids at Party City picking out costumes for Homecoming Week already. That's just not right. Anyhoo, here's what came in my September Ipsy bag. For those of you just joining us, Ipsy is a beauty subscription service. For ten bucks a month, you receive a (generally) cute little makeup bag filled with full-sized and deluxe sample (read: travel) sized beauty products. It's a lot of fun, and a pretty darn good deal. Now, onto the goodies!

This month's makeup bag is precious. The material isn't the best (scratchy taffeta/satin/cheapo), but the print is super cute. I honestly consider the bag to be an extra, so it doesn't really bother me if it's not the most durable. It'll be handy to toss in a purse. Besides, like my mom always said, it's what's inside that really counts, right?

First up are a trio of Freeman paper masks: Purifying, Brightening, and Hydrating. As you probably noticed, I already tried the pink brightening one, and I have to say, I'm torn. I really like the idea of a (theoretically) mess-free mask, and I saw some very encouraging results. My skin felt smooth and soft, and I seemed less dull. Unfortunately, the application was miserable. The paper mask comes out of the package dripping wet. There were little pink splotches all over my sink and countertop. It's attached to a paper backing, so I first tried applying the mask side to my face, while leaving on the backing, so I could peel it away. That went...poorly. So, I peeled off the backing and tried to apply the mask directly to my face, and the edges kept folding up on themselves like cling wrap. Finally, I got Thomas to help me hold open the edges, and it still took some fiddling to get the mask unfolded and on my face. Then, it didn't fit right. The eyeholes are entirely too close together (Thomas said they weren't meant for humans). Worst of all, the fumes from the mask hurt my eyes. I had to take it off sooner than I would have liked, simply because I couldn't see. I've still got two more to try, and I hope they fare better. I really, really, really love the concept.

Next up, a Starlooks kohl eyeliner pencil in Obsidian (black). I like this a lot. It's soft, blendable, and dark, so it's great for a smoky look. I've also used it as I would a regular black liner, and had very little smudging; just a little fallout on the corners. Now, I'm really more of a gel pencil kind of girl, but I can't complain about the quality of the pencil. It's pretty darn great.

This is a dandy little mascara. It's So Big by Elizabeth Mott is very natural looking, but does give considerable volume and length. Yes, I did need to use two coats, and yes, I did have to contend with some easily-fixed spider lashes, but there was no smudging. It isn't waterproof, though, in case that's a dealbreaker. I'm still sticking with my Buxom, but if you're on the market for a slightly less dramatic mascara, this is a good one to consider.

Alright, here's a NYX eyeshadow in Charcoal. NYX does a great shadow, and this is no exception. It's a lovely color, nicely pigmented, and I haven't experienced any fallout. I did, however, see some patchiness in application and a little creasing, but I'm blaming that on my new primer. I'm pretty sure I hate this primer... Here's a shot of the shadow, mascara, and liner in action:

I used a little Tarte bronzer in Park Avenue Princess in the crease, and the Anastasia highlighter pencil in the inner corner. The rest is all Ipsy. I actually wore this look to a film festival that was screening a short that Thomas and I produced. It looked really nice and classic, which is appropriate considering the theme of this month's bag was Classic Beauty.


Lastly, here's my favorite item from the bag, a Cailyn Tinted Lip Balm in Big Apple. First of all, I adore the packaging. It's identical, save for the color, to the Cailyn gel liner I received a few months ago. The brush is housed in the lid, which makes this perfect for popping in your purse. Second of all, the color is glorious. It's a classic matte red, and extremely pigmented, but the effect this product leaves on your lips is a softer, slightly undone red. It's less harsh than a red lipstick, and just a little sexier and more wearable. I would not, however, call this a lip balm. Nosireebobhowdy. It's a tinted lip color. Or a tinted lip stain (it does stain a bit). It's not a balm. It's not moisturizing. It's not creamy. It's kind of dry, and you might want to carry a lip balm with you for top offs. That said, the color and finish are worth any aggravation. Here's a shot of it:

Love. It's a fairly long-wearing product, as well. I've had to touch up the very center of my lips, but rarely much more than that, even after eating and drinking.

Finally, here's a look I put together using all of the products in the bag (except the face masks, obviously). I appreciate that Ipsy sent products that could be pulled together to create a look, and I hope that's a trend they keep up. Maybe my bag was just a fluke, but if not, that's a really cool and thoughtful idea.
Well, that does it for this month's bag. If you're interested in joining Ipsy, here's my reference link. Full disclosure: I do get points for people who sign up using my link. However, that's not nearly enough incentive to affect my reviews. My opinions are unbiased. If I think a product (or entire bag) is less than wonderful, I'll tell you. If I love it, I'll tell you that, too. That's me; honest to a fault.
Now, what should I use this bag for? Any ideas? Leave them in the comments.
Wednesday, June 19, 2013
'Ip, 'Ip, 'Ooray! Ipsy June Un-bagging
Holy mackerel, I am a lousy photographer!!!!!!! If June's bag taught me nothing else, I now know, without a doubt, that photography is NOT my calling!

Thomas borrowed my phone yesterday to take a picture of the dog, and I didn't remember to check my settings after he gave it back. There were several more pictures taken like that, and then I took everything out of the packaging and threw away all of the trash. So, yeah...no going back, now. My apologies. The picture of the dog turned out well, though, if that's any consolation.
Anyhoo, June's ipsy bag's theme was "On the Wild Side", and mine consisted of a Cailyn gel liner in Purple, a Chella highlighter pencil in Ivory Lace, a NYX powder blush in Spice, a Starlooks lipliner in Bare, and a J.Cat Sparkling Cream Palette (read: glitter) in Volta, all packed in a cute little leopard and neon yellow bag.
Since the pics are a no-go, here's a brief rundown of what I thought of each item. Again, my apologies.
The Bag
This is a really cute bag. The leopard and neon are both "wild", but in such a small dose, it's not tacky. The quality isn't off the charts, but this will make a fine travel bag, wallet, or clutch. I saw where someone else painted the spaces between the spots with pink glitter, then added rhinestones along the zipper. The end result was precious, and I'm planning to do the same to mine in the next few days.
Caylin Gel Liner in Purple
Starlooks Lipliner in Bare
I have not tried this, and I'm not sure I will. It's just...well, it's just an ugly color. I hate to put it that way, but that's really the only way to put it. The pencil is sort of a brownish, mauve-ish--you know what? It's the color of prune juice. I'm chucking it in with the zombie makeup.
J.Cat Sparkling Cream Palette in Volta
Wow. Not to be Negative Nancy, but this is another "miss" for me. (Oh, I hate posts like this!) Now, I love glitter. When I was five, I told my mother that glitter was my favorite color, and it still is. That said, I feel like glitter should have a purpose in your look, and I can't figure out what purpose black glitter that can not be used around eyes could possibly serve. This is not an eyeshadow. It's chunky glitter in a cream base. I'm...I'm...ready for Halloween, I guess.
NYX Blush in Spice
Here is another standout to join the gel liner! NYX knows blushes, that's for sure. This is my first single blush from the company, but my Dark Shadows Crimson Amulet palette came with five, and they're amazing. Spice is a deep rose with subtle shimmer, and is ridiculously pigmented. You have to use a light hand and a fluffy brush, but you can get a really nice, natural glow out of this product. It's a welcome addition to my collection, and I do have pictures of it!

There you have it. That's June's ipsy bag. For funsies, I put together a look using the liner, highlighter, and blush...and it's about as mild as you can get. So much for walking on the wild side!

Thomas borrowed my phone yesterday to take a picture of the dog, and I didn't remember to check my settings after he gave it back. There were several more pictures taken like that, and then I took everything out of the packaging and threw away all of the trash. So, yeah...no going back, now. My apologies. The picture of the dog turned out well, though, if that's any consolation.
Anyhoo, June's ipsy bag's theme was "On the Wild Side", and mine consisted of a Cailyn gel liner in Purple, a Chella highlighter pencil in Ivory Lace, a NYX powder blush in Spice, a Starlooks lipliner in Bare, and a J.Cat Sparkling Cream Palette (read: glitter) in Volta, all packed in a cute little leopard and neon yellow bag.
Since the pics are a no-go, here's a brief rundown of what I thought of each item. Again, my apologies.
The Bag
This is a really cute bag. The leopard and neon are both "wild", but in such a small dose, it's not tacky. The quality isn't off the charts, but this will make a fine travel bag, wallet, or clutch. I saw where someone else painted the spaces between the spots with pink glitter, then added rhinestones along the zipper. The end result was precious, and I'm planning to do the same to mine in the next few days.
Caylin Gel Liner in Purple
 |
| So, it's not a product pic. Here's the Caylin on my eye, and Chella in the inner corner. |
You know, I used MAC Fluidline for years. When that ran out, I switched to E.L.F. for economical reasons, and really liked it. Then, somehow, I ended up with Smashbox pen liner, and that led into the current trend of Urban Decay pencils. This might just make me go back to gel. It's gorgeous, creamy, practically fool-proof, and comes with its own brush, which is conveniently housed in the cap (which is genius). The staying power is excellent, and I'm definitely a fan.
Chella Highlighter Pencil in Ivory Lace
This is decent. It does what it says. It's a creamy, matte ivory pencil that you can use to highlight your brow, inner corner, cupid's bow, or what have you. I have one very similar to this that's from Anastasia, and there's another from Milani that's out in limited edition. It's a good product, but nothing ground breaking.Starlooks Lipliner in Bare
I have not tried this, and I'm not sure I will. It's just...well, it's just an ugly color. I hate to put it that way, but that's really the only way to put it. The pencil is sort of a brownish, mauve-ish--you know what? It's the color of prune juice. I'm chucking it in with the zombie makeup.
J.Cat Sparkling Cream Palette in Volta
Wow. Not to be Negative Nancy, but this is another "miss" for me. (Oh, I hate posts like this!) Now, I love glitter. When I was five, I told my mother that glitter was my favorite color, and it still is. That said, I feel like glitter should have a purpose in your look, and I can't figure out what purpose black glitter that can not be used around eyes could possibly serve. This is not an eyeshadow. It's chunky glitter in a cream base. I'm...I'm...ready for Halloween, I guess.
NYX Blush in Spice
Here is another standout to join the gel liner! NYX knows blushes, that's for sure. This is my first single blush from the company, but my Dark Shadows Crimson Amulet palette came with five, and they're amazing. Spice is a deep rose with subtle shimmer, and is ridiculously pigmented. You have to use a light hand and a fluffy brush, but you can get a really nice, natural glow out of this product. It's a welcome addition to my collection, and I do have pictures of it!

 |
| That's one swipe, by the way. Whoa. |
 |
| If you want a product list, let me know in the comments. Otherwise, I won't bore you to death. Also: Those curls lasted about thirty seconds after this photo was taken. Darn humidity!! It's in a ponytail now. :( |
Tuesday, May 7, 2013
Just In Time for Mother's Day: Norma Bates Makeup Tutorial

I started off with CoverGirl 3-in-1 foundation and a little Maybelline Age Rewind concealer, followed by Rimmel Stay Matte powder. Then I swept W.O.S. from the Urban Decay Naked Basics palette all over the lid, up to the brow bone. After that, I ran Naked 2 from the same palette along the crease. Next, I placed Gunmetal from the Naked palette in the outer corner and lashline, then used a fluffy brush to blend it across the lid and into the crease. Using a flat brush, I lined the lower lashes with Naked from the Naked palette, then ran the UD 24/7 Glide-On pencil in Zero along the top lash line, concentrating it at the roots. I finished off the eyes with Buxom Lash mascara on the top lashes, and on the outer corners of the bottom lashes. The brows are filled in with Naked 2, then set in place with E.L.F. clear mascara.
On the cheeks, I used Dollface (baby pink) from Tarte's Amazonian Clay line. I kept it more as a contour, but will probably go ahead and bring it onto the apples next time. It looks like Norma's is on the apples in some photos, but not in others. Personally, I like it on the apples. The lipstick is NYX Soft Matte Lip Cream in Stockholm, and looks pretty dead-on. It may or may not be what they use on the show, but, if not, it's a definite dupe for it.
I kind of love this look. It's great for everyday, but could easily be amped up for after work. I think I might trade the black liner for a deep purple next time, and might line the lower lashes a little more heavily, just to make it a little more "me". What do you guys think?
 |
| Photo Credit: Fanpop |
I admit it, I'm completely addicted to Bates Motel. Dear God, the people in that town are so weird, they probably vacation in Twin Peaks to escape the crazy. Freddy Highmore absolutely breaks my heart week after week (someone just hand him his Emmy and Golden Globe now, okay?), and Vera Farmiga brings such life and humor to an iconic character--that, up until now, has remained (mostly) unseen--that you can't help but be drawn into Norma Bates' special brand of cuckoo. If you haven't seen it, yet, I highly recommend it. It's soapy and silly and melodramatic and nuts and visually striking and frustrating and laugh-out-loud funny and gut-wrenching...and you'll love it.
Now, I look nothing like Vera Farmiga, but I'm in love with how the makeup department has her looking for this role. Norma's makeup style is soft, romantic, and classic. This is great for everyday, and appropriate for any age, so, for kicks, I thought I'd try to recreate it. I think I got pretty darn close, too.
In the two reference photos, you can see that her eyes are done in soft gray, while her cheeks and lips have just a subtle hint of pink. Overall, the products are matte, though the gray shadow could possibly have a little shimmer to it. It's hard to tell. I like shimmer, so shimmer it is!
 |
| Photo Credit: The Backlot |
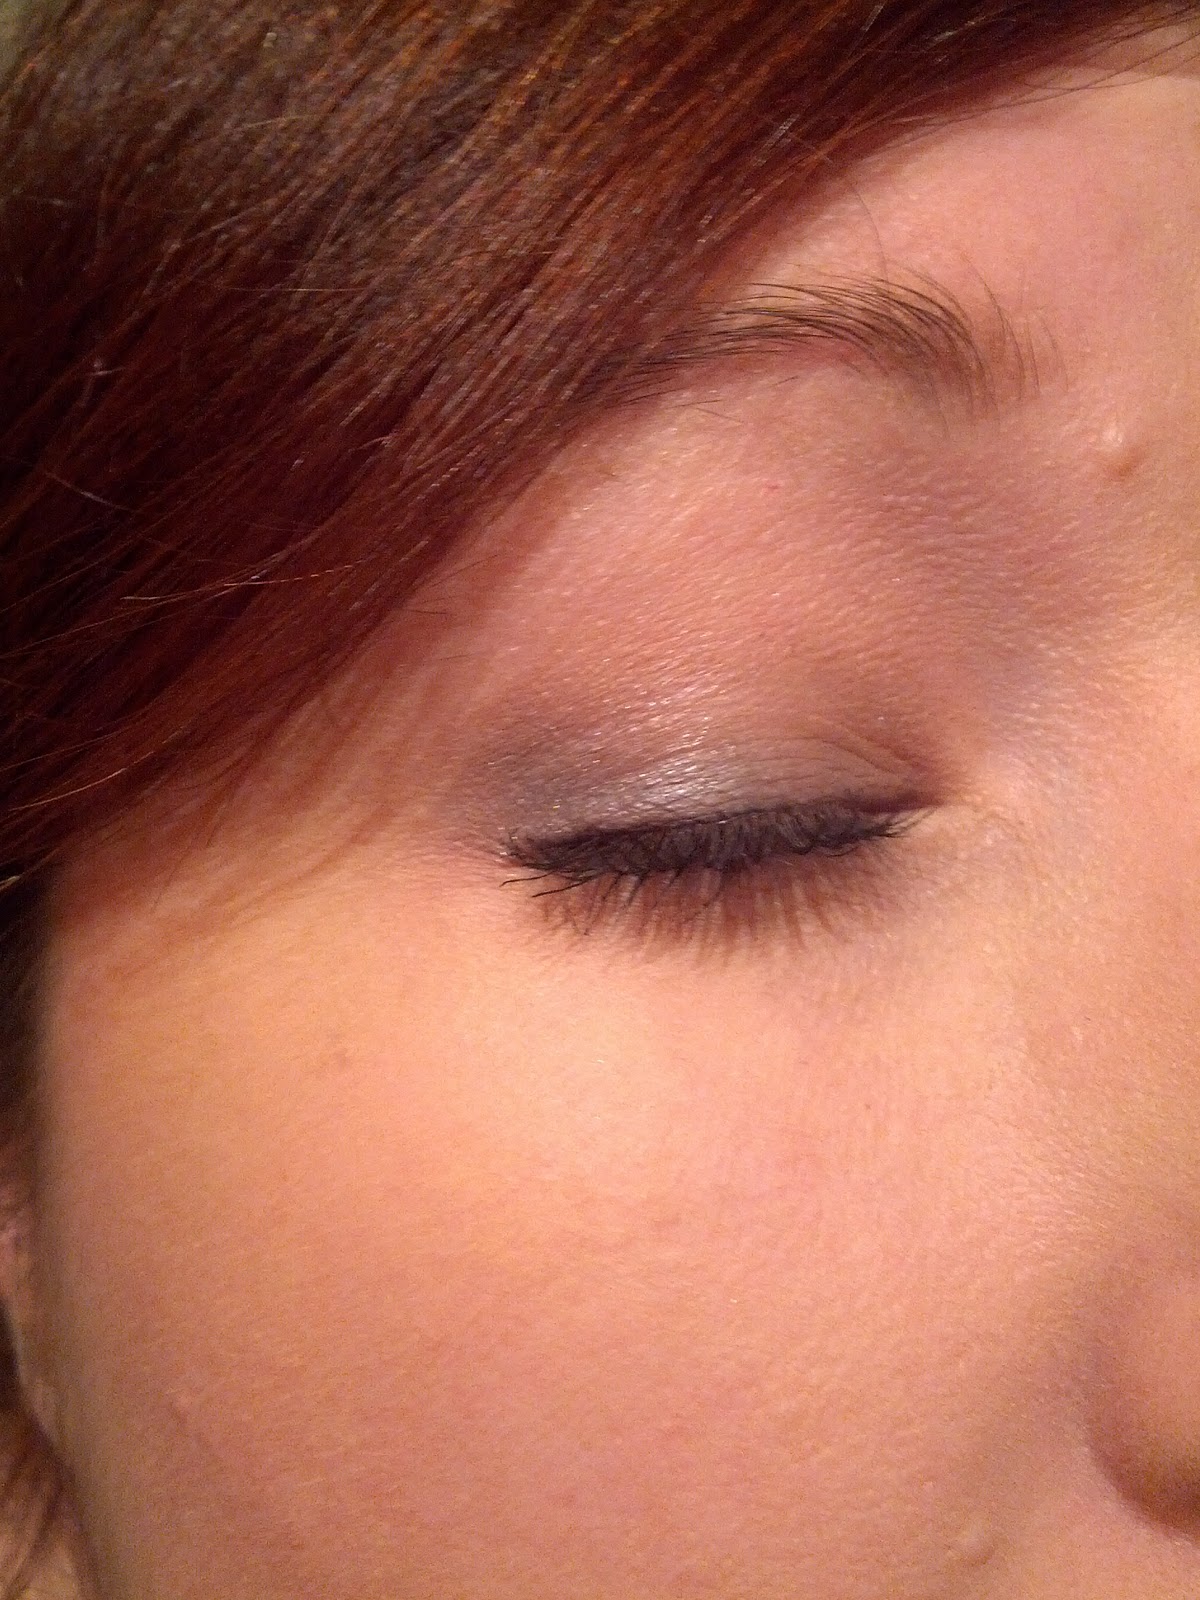
I started off with CoverGirl 3-in-1 foundation and a little Maybelline Age Rewind concealer, followed by Rimmel Stay Matte powder. Then I swept W.O.S. from the Urban Decay Naked Basics palette all over the lid, up to the brow bone. After that, I ran Naked 2 from the same palette along the crease. Next, I placed Gunmetal from the Naked palette in the outer corner and lashline, then used a fluffy brush to blend it across the lid and into the crease. Using a flat brush, I lined the lower lashes with Naked from the Naked palette, then ran the UD 24/7 Glide-On pencil in Zero along the top lash line, concentrating it at the roots. I finished off the eyes with Buxom Lash mascara on the top lashes, and on the outer corners of the bottom lashes. The brows are filled in with Naked 2, then set in place with E.L.F. clear mascara.
On the cheeks, I used Dollface (baby pink) from Tarte's Amazonian Clay line. I kept it more as a contour, but will probably go ahead and bring it onto the apples next time. It looks like Norma's is on the apples in some photos, but not in others. Personally, I like it on the apples. The lipstick is NYX Soft Matte Lip Cream in Stockholm, and looks pretty dead-on. It may or may not be what they use on the show, but, if not, it's a definite dupe for it.
 |
| Funny thing about photographs: they don't represent real life. In person, my foundation matches my skin exactly. On camera, my chest and arms look pinker than my face. I swear, I didn't walk around looking like I had Snookie's face on Snow White's body. It's just the camera. Still...yipes! |
I kind of love this look. It's great for everyday, but could easily be amped up for after work. I think I might trade the black liner for a deep purple next time, and might line the lower lashes a little more heavily, just to make it a little more "me". What do you guys think?
Friday, October 19, 2012
Costume Creations/Frugal Friday: Frankie Stein from Monster High
My little niece, Tempest, is big into Monster High. It's my fault, too. I got her a Frankie Stein rag doll for Christmas one year, and that was it. To her mother, I apologize.
Last year, Temp went as Frankie Stein for Halloween, and was so darn cute it hurt. In her honor, I thought I'd do a costume look for Frankie Stein, and I wanted to try to do it with all drugstore products. This is not intended to "transform" you into Frankie, nor is it meant to be a "going out" look. This is just to show that you don't need to buy the overpriced makeup kit that is sold alongside the costume to get a Frankie Stein look for trick-or-treating. If you want to see me do a Frankie Stein-inspired "going out" look for adults (since those costumes apparently exist. Who knew?), let me know in the comments, and that can totally be arranged. This one is more "stage makeup" inspired, and intended for ten to twelve year-olds.
For the uninitiated, this is Frankie:
I'm not a tween, nor am I a model, so this looks silly as heck. Plus, I blinked every darn time Thomas took a picture. As a stage actor, I can tell you that this--every bit as much as the whole "the actors could get distracted, fall, and die" aspect--is the reason they tell you not to take flash photos at theatrical productions. It's because we're unaccustomed to the flashes and make stupid faces. THIS is the picture I look the least stoned in, so here you go.
Alrighty, I (not being a twelve year-old with perfect skin) started out by applying a moisturizer, then used Maybelline Age Rewind concealer to cover any blemishes and dark circles. Then, I used a NYX jumbo pencil in Milk to prime my eyelids, all the way up to the brow. The white base will help keep the L.A. Colors mineral shadow in a purple color nice and vibrant. Next, I mapped out the shape I wanted for the eyeshadow, then filled in the entire area with purple,including under the lower lashline. After that, I took the pink shadow from the L'Oreal HiP duo "Reckless" and defined the crease area. Then, I grabbed my NYX liquid liner (though a black pencil would work if you're not comfortable with liquid) and created a winged cat eye on the top lashes, then lined the lower lashline, as well. We'll come back to the eyes a little bit later.
For the skin, I used a small, dense powder brush to apply the green side of the L'Oreal HiP duo "Perky" all over my face. This will take you a thousand forevers, but it's a sheerer effect than greasepaint, and easier to find in a close-to-accurate shade. If you have trouble keeping the brush out of the dark navy shadow that makes up the other half of the duo, try carefully covering that half with a little masking tape until you finish with the green. Once you have your face (and neck and ears) covered, take an even smaller brush (like a lipliner) and the same green (the smaller brush will help concentrate the color) to map out the places you want contoured, like the cheekbones and around the nose. Use the bigger brush to blend out the lines. Then, uncover the navy blue side and lightly go over those contoured areas with the bigger brush and the blue. You'll also want to go into your hairline and around your jaw. Next, take a blush brush and a hot pink blush, like E.L.F.'s Pink Passion from the Studio line, and shade the apples of your cheeks. Use the same brush to pop a bit of the purple eyeshadow over the pink, to tie the colors together. Dust a sparkly white shadow, like L.A. Colors mineral shadow, onto the cheekbones to highlight.
Back to the eyes! You're going to have to do a little clean-up, now that the green is in place. I found it easiest to do this with the NYX jumbo pencil in Milk, because it's super creamy, opaque, and you can just draw it wherever you want it. I didn't want to lose the eyeshadow shape, so I used the white pencil as a highlight for the brow, inner corner, and brought it down below the lower lashline. I also used it on the waterline. Then, I applied two coats of black mascara to upper and lower lashes. You could use false lashes, but I know a lot of kids won't sit still long enough for that, so I just went with the mascara.
To finish things up, I used a black pencil to darken my brows and to draw on her stitches. Lastly, I applied Revlon's Just Bitten Kissable Balm Stain in Romantic to my lips for her signature glossy red pout.
I hope you enjoyed this. Again, if you want to see a more grown-up version, let me know in the comments.
Last year, Temp went as Frankie Stein for Halloween, and was so darn cute it hurt. In her honor, I thought I'd do a costume look for Frankie Stein, and I wanted to try to do it with all drugstore products. This is not intended to "transform" you into Frankie, nor is it meant to be a "going out" look. This is just to show that you don't need to buy the overpriced makeup kit that is sold alongside the costume to get a Frankie Stein look for trick-or-treating. If you want to see me do a Frankie Stein-inspired "going out" look for adults (since those costumes apparently exist. Who knew?), let me know in the comments, and that can totally be arranged. This one is more "stage makeup" inspired, and intended for ten to twelve year-olds.
For the uninitiated, this is Frankie:
 |
| Frankie Stein (Credit) |
And here's what I came up with:
 |
| I know, the stitches go on the other cheek. Whoops. You'll also want to do your neck and ears, but this was for demonstration purposes only. I love you guys, but Supernatural was coming on. I have priorities. Jensen Ackles is cute. |
Alrighty, I (not being a twelve year-old with perfect skin) started out by applying a moisturizer, then used Maybelline Age Rewind concealer to cover any blemishes and dark circles. Then, I used a NYX jumbo pencil in Milk to prime my eyelids, all the way up to the brow. The white base will help keep the L.A. Colors mineral shadow in a purple color nice and vibrant. Next, I mapped out the shape I wanted for the eyeshadow, then filled in the entire area with purple,including under the lower lashline. After that, I took the pink shadow from the L'Oreal HiP duo "Reckless" and defined the crease area. Then, I grabbed my NYX liquid liner (though a black pencil would work if you're not comfortable with liquid) and created a winged cat eye on the top lashes, then lined the lower lashline, as well. We'll come back to the eyes a little bit later.
For the skin, I used a small, dense powder brush to apply the green side of the L'Oreal HiP duo "Perky" all over my face. This will take you a thousand forevers, but it's a sheerer effect than greasepaint, and easier to find in a close-to-accurate shade. If you have trouble keeping the brush out of the dark navy shadow that makes up the other half of the duo, try carefully covering that half with a little masking tape until you finish with the green. Once you have your face (and neck and ears) covered, take an even smaller brush (like a lipliner) and the same green (the smaller brush will help concentrate the color) to map out the places you want contoured, like the cheekbones and around the nose. Use the bigger brush to blend out the lines. Then, uncover the navy blue side and lightly go over those contoured areas with the bigger brush and the blue. You'll also want to go into your hairline and around your jaw. Next, take a blush brush and a hot pink blush, like E.L.F.'s Pink Passion from the Studio line, and shade the apples of your cheeks. Use the same brush to pop a bit of the purple eyeshadow over the pink, to tie the colors together. Dust a sparkly white shadow, like L.A. Colors mineral shadow, onto the cheekbones to highlight.
Back to the eyes! You're going to have to do a little clean-up, now that the green is in place. I found it easiest to do this with the NYX jumbo pencil in Milk, because it's super creamy, opaque, and you can just draw it wherever you want it. I didn't want to lose the eyeshadow shape, so I used the white pencil as a highlight for the brow, inner corner, and brought it down below the lower lashline. I also used it on the waterline. Then, I applied two coats of black mascara to upper and lower lashes. You could use false lashes, but I know a lot of kids won't sit still long enough for that, so I just went with the mascara.
To finish things up, I used a black pencil to darken my brows and to draw on her stitches. Lastly, I applied Revlon's Just Bitten Kissable Balm Stain in Romantic to my lips for her signature glossy red pout.
I hope you enjoyed this. Again, if you want to see a more grown-up version, let me know in the comments.
Tuesday, October 16, 2012
Glitter and Be...Batgirl, Actually: NYX Glitter Cream Palette Review
***Points to anyone who guesses the song reference in the title! Also, not a Batgirl tutorial. She doesn't wear glitter, sad to say.***
I'm going to be controversial today!! Well, as controversial as I get, anyway. (I'm generally pretty easy-going...)
NYX has a collection of glitter palettes on the market, and it seems like you either love them entirely, or you hate them with the fiery passion usually reserved for only people who hit the elderly or kick puppies. Let me preface this by saying, I had no idea.
A couple of weeks back, Ulta ran a 40% off sale on NYX and a few other brands. I'd been eyeing the pretty shinies for a while, but have not been able to bring myself to spend upwards of five bucks a pop on them. I mean, it's not like I have the opportunity to wear full-on glitter every day. But...it was close to Halloween...and they were on sale...and it would almost be buy one, get one...so I bit the bullet and picked up the two that I thought I would use the most (you know, when I actually use glitter). I got Royal Violets, a variety of purples and a bright gold, and Paradise, which is sort of the "neutral" palette. It's a black, white, silver, and gold, with a hot pink thrown in for funsies. Here's a quick pic of the two.
I wore a Batgirl caped shirt to the Disney Halloween Party, and thought it might be fun to add a little glitter into my makeup for the occasion, so Paradise went with me to Orlando. I got to play with it a bit, and wanted to share my thoughts on the palette.
Frankly, I liked it. I can, however, see why this is so polarizing, and I'll explain.
WHY PEOPLE DON'T LIKE THESE PALETTES (taken from numerous bad reviews)
1) It's not pigmented.
2) It doesn't blend well, and it gunks up your brushes.
3) It doesn't look like it does in the pan when I put it on my eyes.
Alrighty. I get that. Every word of that is true. However, I don't think these palettes were ever meant to be pigmented, applied with brushes, packed on that heavily (though you can, and I've seen it done!), or even necessarily used around the eyes. In fact, on the back of the Paradise palette (not the Royal Violets), it flat-out states that it's not intended for use in the eye area. In other words: THIS IS NOT GLITTER EYESHADOW! It is loose glitter in a lightly tinted gel base. It's a less messy, more travel-friendly, infinitely more convenient alternative to just applying loose glitter, and if you look at it in that regard, it's a great product for the glitter-obsessed.
Now, I'll be honest. I used this in the eye area, because I am a rebel and I do what I want. Plus, I didn't see the warning on the back. Oops. Of course, I would never recommend that you ignore a warning and use this in the eye area. That would be irresponsible of me, and that's just not how I roll. Please forgive me for not having a picture, but I think the swatches above should tell you all you need to know about how this looks on. There's no difference. It's just glitter, and I used my fingers to mix the glitter with the gel, then place it over a finished eyeshadow look and onto my cheeks. Obviously, the eye area is the most common place for glitter to be used, and it strikes me as silly that this isn't eye-safe. That said, I think there are some ways you can use this to accentuate an eye look without placing it directly in the area. The white and silver make beautiful brow highlights, and you could probably take it down to the crease area without too much trouble. I would be extremely careful about going onto the lid, though. The extreme inner corner is pretty much out, but you could keep it mostly around the bridge of the nose and under the eye. Do not use this as a liner! I didn't have any trouble with fallout or sliding around, and the glitter came off fairly easily with a makeup remover wipe. The only irritation I had came the next day when a couple of errant pieces I missed with the wipe ended up on my right eye's waterline, and I had to try to gently remove them. I also used the pink as a cheek highlight, and it looked really nice.
The Good:
Beautiful colors, easy to apply, travel-friendly, convenient, inexpensive, no fall-out, long-lasting
The Bad:
Not a lot of product in the pan
The Ugly:
Not all are eye-safe
I really like this product for what it is. It's when you try to make it into something that it's not that you run into disappointment, but isn't that true of most things?
Final Verdict: 8.2 out of 10. Bear in mind it's not an eyeshadow palette and shine on!
I'm going to be controversial today!! Well, as controversial as I get, anyway. (I'm generally pretty easy-going...)
NYX has a collection of glitter palettes on the market, and it seems like you either love them entirely, or you hate them with the fiery passion usually reserved for only people who hit the elderly or kick puppies. Let me preface this by saying, I had no idea.
A couple of weeks back, Ulta ran a 40% off sale on NYX and a few other brands. I'd been eyeing the pretty shinies for a while, but have not been able to bring myself to spend upwards of five bucks a pop on them. I mean, it's not like I have the opportunity to wear full-on glitter every day. But...it was close to Halloween...and they were on sale...and it would almost be buy one, get one...so I bit the bullet and picked up the two that I thought I would use the most (you know, when I actually use glitter). I got Royal Violets, a variety of purples and a bright gold, and Paradise, which is sort of the "neutral" palette. It's a black, white, silver, and gold, with a hot pink thrown in for funsies. Here's a quick pic of the two.
 |
| Paradise is on top, Royal Violets on the bottom. I have not used Royal Violets, yet, so it's still sealed. That's how it comes from the store. |
Frankly, I liked it. I can, however, see why this is so polarizing, and I'll explain.
WHY PEOPLE DON'T LIKE THESE PALETTES (taken from numerous bad reviews)
1) It's not pigmented.
2) It doesn't blend well, and it gunks up your brushes.
3) It doesn't look like it does in the pan when I put it on my eyes.
Alrighty. I get that. Every word of that is true. However, I don't think these palettes were ever meant to be pigmented, applied with brushes, packed on that heavily (though you can, and I've seen it done!), or even necessarily used around the eyes. In fact, on the back of the Paradise palette (not the Royal Violets), it flat-out states that it's not intended for use in the eye area. In other words: THIS IS NOT GLITTER EYESHADOW! It is loose glitter in a lightly tinted gel base. It's a less messy, more travel-friendly, infinitely more convenient alternative to just applying loose glitter, and if you look at it in that regard, it's a great product for the glitter-obsessed.
 |
| Close-Up of the Paradise Palette |
 |
| Swatches. Left to Right: Pink Holographic, Black Multi, White Holographic, Gold Holographic, Silver Multi. |
The Good:
Beautiful colors, easy to apply, travel-friendly, convenient, inexpensive, no fall-out, long-lasting
The Bad:
Not a lot of product in the pan
The Ugly:
Not all are eye-safe
I really like this product for what it is. It's when you try to make it into something that it's not that you run into disappointment, but isn't that true of most things?
Final Verdict: 8.2 out of 10. Bear in mind it's not an eyeshadow palette and shine on!
Thursday, October 4, 2012
Smoky, Spooky, Vamp Eyes: Featuring E.L.F. Maleficent Palette
I know a lot of you were interested in the E.L.F. Disney Villains palettes, so I decided to put together a Halloween eye look incorporating the Maleficent palette products with some others I had lying around. Okay, truth be told, I did this accidentally. Today was actually "Favorite Sports Team" day at work, so I needed something with University of Alabama crimson. As I started putting on my makeup, I realized that this would work really well with a Devil or Vampire costume. You could go more dramatic than I did, but honestly, I like it just the way it is. I paired it with a nude lip for a 60s mod vibe, but a blood red lip would look amazing. (I didn't take pictures of the whole look, since it wasn't really Halloweeny.)
If you would like to see the full , more dramaticVampire/Devil look, please let me know in the comments. I'm working on a few costume looks, and appreciate suggestions. Now, does anyone know how to make time stop so I can take a break and do them?
Here 'tis:
*MAC shows it as darn near purple, and classifies it as a plum, but mine (bought from the store, so definitely not a fake) doesn't even come close to fitting that description. (Pixiwoo did a stunning tutorial with Cranberry, and theirs didn't look purple, either, if that makes any sense. In other words: IGNORE THE DESCRIPTION ON THE MAC SITE!)
If you would like to see the full , more dramaticVampire/Devil look, please let me know in the comments. I'm working on a few costume looks, and appreciate suggestions. Now, does anyone know how to make time stop so I can take a break and do them?
Here 'tis:
 |
| I hate cameras. In person, that crimson is CRIMSON. Oh well, it's still pretty. |
Alrighty! I started by priming all over the lid, up to the brow. Then I used a fluffy shader brush to wash the "Misfortune" shade (silver) from the Maleficent palette all over the lid and in the crease. Then, for the crimson, I dipped a denser, shorter shader brush into "Cranberry" by MAC*. It's a permanent color, and just a gorgeous almost metallic rusty berry. It just screams Fall. I placed the color from the outer corner just to the edge of my eyeball. Then, I dipped the same brush into "Forest of Thorns" (dark charcoal with multicolored micro-glitter) from the Maleficent palette, and, holding a tissue from the corner of my eye to the end of my brows, created a sharp angle at the outer corner and blended it in. Then, I used a blending brush to blur all my edges for a smoky look.
 |
| We're just doing eyes, so you can ignore the lip and cheek color. We'll be using the first two shades from the left, as well as the liquid eyeliner. It's sparkly! |
Next, I grabbed the liquid liner from the NYX Dark Shadows palette (Crimson Amulet...whatever you want to call it) and created a medium-thick, slightly winged line on my upper lashline. I used a tiny, flat liner brush to run "Forest of Thorns" over the liquid line, then from outer corner of the lower lashline to about halfway in, then used the same brush to place "Misfortune" in the inner corner and run it under the lashes to about halfway in, meeting "Forest of Thorns" in the middle, and overlapping slightly. I finished the look by running the glitter liquid liner from the Maleficent palette over the upper lashline, then adding black mascara to top and bottom lashes, and dusting a little of the highlighter from the NYX palette onto the brow bone.
Basically, the key to this is precise edges, but no harsh lines. False eyelashes would look amazing with this, as would either a nude or blood red lip.
I hope you've enjoyed this! Again, if you would like to see this amped up a bit (vamped up a bit?) as a full-on costume look, please let me know in the comments. Thanks!
*MAC shows it as darn near purple, and classifies it as a plum, but mine (bought from the store, so definitely not a fake) doesn't even come close to fitting that description. (Pixiwoo did a stunning tutorial with Cranberry, and theirs didn't look purple, either, if that makes any sense. In other words: IGNORE THE DESCRIPTION ON THE MAC SITE!)
Monday, September 10, 2012
Bold Berry Lips and a Little Catharsis
Hollywood Life posted this picture of Emma Watson looking absolutely gorgeous at the Toronto International Film Festival. The accompanying article was about her bold lips/nearly naked eye combination, which I love, but the suggested lipstick for re-creating the look just bugged the heck out of me.
It's a beautiful color--don't get me wrong--but seems much more tomato red than the berry Ms. Watson sported. Sure, you could do this look with tomato red, but I feel like the berry keeps the overall effect modern and sophisticated, where a brighter red could come off more retro.
Instead of sitting at the computer pounding my fist and silently seething (it seriously bothered me, folks), I decided to rectify the problem as best I could. Here are my berry picks for a Watson-esque Fall look:
Buxom Big & Healthy Lip Stick in Fresno
I love these lipsticks. Flat out. They're shaped more like a lip pencil (but nowhere near as large as a Chubby Stick), so you can use them to line. They feel a little thick going on, but melt into your lips within a few minutes, and leave a lovely tingle. They last a good long while, too, and are almost matte. Fresno is described as a "blackberry wine".
MAC in Hang-Up
My favorite berry from MAC was discontinued (Berry Boost), and I've found nothing to compare. However, I know how fantastic MAC lipsticks are, and wanted to include one in the list. Hang-Up is insanely dark, but with a brush and a light hand, this "deep berry" creamsheen can be a beautiful shade for Fall.
NYX Soft Matte Lip Cream in Monte Carlo
I picked this up thinking it was a true red, but was pleasantly surprised to discover it was really a lovely raspberry color, not unlike my Berry Boost (see review and not completely un-Watson-like look here. I think I may be ahead of a trend for once!). This is a cheap, quick, and easy way to pull off a bold lip, and I highly recommend it.
E.L.F. Mineral Lipstick in Cheerful Cherry
Just so you know, it's not cherry. I have a review here, with swatches, and the name is deceiving. Don't let that put you off of this product, though. It's a darn good lipstick at a darn good price point ($5!), which makes this an inexpensive way to experiment with a bold lip look.
 |
| Photo Credit: Hollywood Life |
It's a beautiful color--don't get me wrong--but seems much more tomato red than the berry Ms. Watson sported. Sure, you could do this look with tomato red, but I feel like the berry keeps the overall effect modern and sophisticated, where a brighter red could come off more retro.
Instead of sitting at the computer pounding my fist and silently seething (it seriously bothered me, folks), I decided to rectify the problem as best I could. Here are my berry picks for a Watson-esque Fall look:
Buxom Big & Healthy Lip Stick in Fresno
I love these lipsticks. Flat out. They're shaped more like a lip pencil (but nowhere near as large as a Chubby Stick), so you can use them to line. They feel a little thick going on, but melt into your lips within a few minutes, and leave a lovely tingle. They last a good long while, too, and are almost matte. Fresno is described as a "blackberry wine".
MAC in Hang-Up
My favorite berry from MAC was discontinued (Berry Boost), and I've found nothing to compare. However, I know how fantastic MAC lipsticks are, and wanted to include one in the list. Hang-Up is insanely dark, but with a brush and a light hand, this "deep berry" creamsheen can be a beautiful shade for Fall.
NYX Soft Matte Lip Cream in Monte Carlo
I picked this up thinking it was a true red, but was pleasantly surprised to discover it was really a lovely raspberry color, not unlike my Berry Boost (see review and not completely un-Watson-like look here. I think I may be ahead of a trend for once!). This is a cheap, quick, and easy way to pull off a bold lip, and I highly recommend it.
E.L.F. Mineral Lipstick in Cheerful Cherry
Just so you know, it's not cherry. I have a review here, with swatches, and the name is deceiving. Don't let that put you off of this product, though. It's a darn good lipstick at a darn good price point ($5!), which makes this an inexpensive way to experiment with a bold lip look.
Wednesday, September 5, 2012
Bargainistas Unite!: August Favorites
It's September! Holy mackerel! That means it's time for August Faves!!!
I swear, you're going to think I'm made of money when you see what I've picked out, but that couldn't be farther from the truth. It's just that I was raised by the Queen and Princess of Bargain Hunting (my grandmother and mother. I'm surprised salespeople didn't cry when they saw them walk into the mall). There is, literally, not one item on here that was purchased at full price, and one item was free.
Anyhoo, I've been really focused on skin care these days, so almost all of these items relate to that fact in some way or another. Let's get started!
Eyes
Super by Dr. Nicholas Perricone Bright Eyes
Recently, the skin around my eyes has looked a little dull. I don't know if it's age, lack of sleep, allergies, or what, but I needed to brighten things up a bit, and pronto. A while back, Sephora had a clearance sale on Super by Perricone, and I picked up this eye cream at half price. It has melon extract in it, and actually does a nice job of brightening. I've been using it morning and night for about a week, and can already tell a difference. Plus, it smells like bananas, which is just kind of neat. I don't think I'd pay $50, but $25 was a great price point, especially considering the huge amount of product you get. This should last a good, long while.
Benefit Erase Paste
This is a brightening concealer, and the second best* I've used. It's not really the greatest for covering blemishes, since it does have a peachy undertone, but it's fantastic for dark circles. The pot I have is a deluxe mini that came in a sampler set, so I paid maybe four bucks for it. It's medium, and I probably should purchase light for the Winter, but this works just fine with the little bit of Summer color I'm sporting right now.
Lips
Ellis Faas in L209
This came in my Glossybox, so it cost me all of about four dollars, too. I adore this color for fair redheads. It's a warm, peachy nude that doesn't wash me out like most. It's demi-matte, long-wearing, moisturizing, and is going to be gorgeous for Fall. I'm in love. Could I pay $35 for it? Um...are you high? Never. If I can ever find it on sale, though, I'm stocking up. Plus, the packaging is bada--I mean, really, really cool.
Fresh Sugar Treatment
This little darling was the Sephora Beauty Insider Birthday Gift this year (along with the Sugar Rose), and I'm completely hooked. I keep it by the sink with my eye cream and face wash, because I hate going a night without this on my lips. It makes them nice and soft, ready for whatever lip color I choose.
Face
NYX Crimson Amulet Palette
You know what, I'm not even going to go into this one. The link takes you my glowing review. What I will say is that I have reached more for this lately than any other palette I own. It's my go-to, and if you can get your hands on one, I highly recommend it.
Ole Henrikson Truth Serum
Again, this arrived in my Glossybox, so it ran about four bucks. I've been using it morning and night for about a week, and aside from a few itty-bitty pimples (I think just from transitioning and clearing out the gunk), I've been extraordinarily impressed. This morning, I actually noticed that my skin looked younger and brighter. That's saying something. I also love that it smells like oranges.
Nails
Illamasqua in Purity
I would never pay fourteen bucks for nail polish, but this came in my Glossybox (so, yeah, four dollars). I also don't care for the formulation, and it chips fairly easily. Basically, I can't recommend it, but it's here because I am absolutely in love with the color! It's lady-like and neutral, but the vibrancy gives it punch and makes it so much fun to wear. I can't stop putting it on, so here it is. Now, if only I could find a cheap dupe for it. Any ideas?
China Glaze in Fast Track
This is a favorite that I, sadly, had to give to Mom. I can't wear it. It looks horrific with my skintone. That said, it's a gorgeous khaki, infused with gold glitter flecks. Khaki is supposed to be big this Fall, so snap one of these up if you can. I found mine (Mom's) on clearance at Ulta, and this link takes you to Sally, where it's even less expensive.
Body
Pacifica Body Butter in Indian Coconut Nectar
Lightweight, non-greasy, and smells heavenly. What I love most is that the coconut is warmed up with spicy vanilla, which makes this the perfect transitional scent from Summer to Fall. I got mine on sale at Sephora for about five bucks, and now it's marked down to three.
*The best, you ask? A concealer palette from ebay. I kid you not. I use it for film makeup, so it's not mine, per se. The one I love is the first one on the second row.
Thursday, August 16, 2012
Theme Park* Makeup, Part Un
Ed. Note: This is the first in a multi-part series.
I still have almost two months to slog through until I get to visit Hogwarts and trick-or-treat with Mickey and Minnie, and it's just about to kill me. To pass the time, I've started stalking forums, mentally packing and unpacking, and seriously over-planning.
For giggles, I decided to use the crazy temperatures and humidity we've been experiencing to my advantage. Over the past few days, I have played around with several different travel-friendly makeup combinations, to see which was the quickest to apply, easiest to tote-around, most natural, and longest-wearing under our tropical conditions. See, when I go to the parks, I don't like to wear a ton of makeup. Sure, it might look cute when you first arrive, but after six or seven hours of hiking in the heat, you come to realize that, just maybe, the smoky eye or strong lip you started out with wasn't such a great idea. Still, I am going to be taking pictures, and I'd like to look presentable in public, so a little something to keep me from scaring small children is kind of necessary. Anyhoo, here's what I came up with:

There's no good way of going left to right, or clockwise, or whatevs, so I'm just going to list this out.
Now, remember how I said price was a factor? I threw the Naked 2 in for three shades, and only three shades: Foxy (all over), Bootycall (highlight), and Tease (crease and lower lashline).

You can find very similar shades in the much smaller, much cheaper NYX eyshadow trio with Aloha, Mink Brown, and Deep Bronze. They're a little more shimmery than the mattes and satin in the Naked 2, but will still work really well. Of course, if you have the Naked 2 already, it does come with an awesome travel brush. Speaking of brushes, if you take the Naked 2 and the E.L.F. Brow Kit (with actually decent brush), you can get away with only bringing two more brushes along...

...blush and powder. These are from Real Techniques, and please pardon how dirty they are. I'd just used them. I picked the buffing brush for powder because of its small size, but a kubuki would work just as well.

Here's the full look on my seriously broken out, puffy from allergies, in need of an eyebrow shaping face. You're welcome, world. *sigh*
I used my fingers to apply the moisturizer, concealer, and primer potion, and the brushes we talked about for the rest. I purposefully left out anything heavy (like foundation or face primer) because, personally, I feel gross sweating to death in full makeup. I also omitted anything sparkly or shimmery, because after a day in the parks, I'm shiny enough. I don't need to add to it. Lastly, I kept the budge-proof eyeliner thin, and just on the top lashline, because I only wanted a little definition, and not to advertise I was wearing makeup. A little brown eyeshadow (Tease) runs along the lower lashline, and is more than enough, in my opinion. Heck, I wouldn't have even bothered with my brows if they came anywhere close to matching my hair color (they don't), and weren't in such horrible shape.
You will need the eye primer. Even Urban Decay, for all it's pigmentation and staying power, has been sliding right off my lids in this humidity. If you're going to be in Florida, like I will be, it's going to be even worse.
As for the lips, I like the Revlon because it stains. The color sticks around for freaking ever, and if I don't feel like toting the balmstick around, I can just toss a teeny lip balm with SPF in my pocket for easy sun-protection top-offs.
It's not photo-shoot gorgeous, but it's not meant to be. It's functional, and I think it looks pretty. This is just meant to give you enough color and coverage to look polished in the umpteen vacation photos you'll be a party to, and, if you're me, not frighten the other tourists.
OH! Before I forget--toss the face wipes in the fridge. You'll be glad you did. :)
P.S. In case you were wondering what the heck all that stuff is lying on, it's a nifty little makeup bag from Lay-N-Go. I bought mine from OpenSky, and am not being compensated for telling you about it. I just thought it was cool. See, you lay your stuff on it...

...then pull the drawstring closed! That's it! No wondering how such-and-such is going to fit in it, or how on Earth you managed to get whatchamadingle in there the first go-round. Just toss in the stuff and pull. Plus, there are little zippered and velcro pockets for extra-valuables, like jewelry or contacts.

It's not huge, either, so it won't take up much space in the suitcase. For reference, the little red doohickies sticking out from underneath are the corners of a Netflix envelope.
I don't recommend it for toiletries, since they can leak, but for makeup, it's a dream. 9 out of 10.
*or music festival, or art festival, or film festival, or frisbee golf, or picnic, or camping, or flea market, or antiquing, or hiking, or...well, you get the drift.
I still have almost two months to slog through until I get to visit Hogwarts and trick-or-treat with Mickey and Minnie, and it's just about to kill me. To pass the time, I've started stalking forums, mentally packing and unpacking, and seriously over-planning.
For giggles, I decided to use the crazy temperatures and humidity we've been experiencing to my advantage. Over the past few days, I have played around with several different travel-friendly makeup combinations, to see which was the quickest to apply, easiest to tote-around, most natural, and longest-wearing under our tropical conditions. See, when I go to the parks, I don't like to wear a ton of makeup. Sure, it might look cute when you first arrive, but after six or seven hours of hiking in the heat, you come to realize that, just maybe, the smoky eye or strong lip you started out with wasn't such a great idea. Still, I am going to be taking pictures, and I'd like to look presentable in public, so a little something to keep me from scaring small children is kind of necessary. Anyhoo, here's what I came up with:

There's no good way of going left to right, or clockwise, or whatevs, so I'm just going to list this out.
- Urban Decay Naked 2
- E.L.F. Tinted Moisturizer
- Benefit Boi-ing concealer
- Rimmel Stay Matte powder
- Urban Decay Primer Potion (travel-size)--Eden is pictured and Original is linked to. Either works.
- E.L.F. Brow Kit
- Benefit Coralista blush (travel-size)
- Revlon Just-Bitten Kissable Balm Stain in Honey
- Urban Decay All-Nighter setting spray (travel-size)
- Urban Decay 24-7 Glide On Eye Pencil in Zero (travel-size)--Full-size is linked to, but travel sizes come in several kits. I have more than one of these guys.
- Buxom Lash Mascara (travel-size)--DISREGARD! Get something waterproof! This is all I had in the house!
- Real Techniques Blush Brush
- Real Techniques Buffing Brush
- Yes to Cucumbers Facial Towelettes
Now, remember how I said price was a factor? I threw the Naked 2 in for three shades, and only three shades: Foxy (all over), Bootycall (highlight), and Tease (crease and lower lashline).

You can find very similar shades in the much smaller, much cheaper NYX eyshadow trio with Aloha, Mink Brown, and Deep Bronze. They're a little more shimmery than the mattes and satin in the Naked 2, but will still work really well. Of course, if you have the Naked 2 already, it does come with an awesome travel brush. Speaking of brushes, if you take the Naked 2 and the E.L.F. Brow Kit (with actually decent brush), you can get away with only bringing two more brushes along...

...blush and powder. These are from Real Techniques, and please pardon how dirty they are. I'd just used them. I picked the buffing brush for powder because of its small size, but a kubuki would work just as well.

Here's the full look on my seriously broken out, puffy from allergies, in need of an eyebrow shaping face. You're welcome, world. *sigh*
I used my fingers to apply the moisturizer, concealer, and primer potion, and the brushes we talked about for the rest. I purposefully left out anything heavy (like foundation or face primer) because, personally, I feel gross sweating to death in full makeup. I also omitted anything sparkly or shimmery, because after a day in the parks, I'm shiny enough. I don't need to add to it. Lastly, I kept the budge-proof eyeliner thin, and just on the top lashline, because I only wanted a little definition, and not to advertise I was wearing makeup. A little brown eyeshadow (Tease) runs along the lower lashline, and is more than enough, in my opinion. Heck, I wouldn't have even bothered with my brows if they came anywhere close to matching my hair color (they don't), and weren't in such horrible shape.
You will need the eye primer. Even Urban Decay, for all it's pigmentation and staying power, has been sliding right off my lids in this humidity. If you're going to be in Florida, like I will be, it's going to be even worse.
As for the lips, I like the Revlon because it stains. The color sticks around for freaking ever, and if I don't feel like toting the balmstick around, I can just toss a teeny lip balm with SPF in my pocket for easy sun-protection top-offs.
It's not photo-shoot gorgeous, but it's not meant to be. It's functional, and I think it looks pretty. This is just meant to give you enough color and coverage to look polished in the umpteen vacation photos you'll be a party to, and, if you're me, not frighten the other tourists.
OH! Before I forget--toss the face wipes in the fridge. You'll be glad you did. :)
P.S. In case you were wondering what the heck all that stuff is lying on, it's a nifty little makeup bag from Lay-N-Go. I bought mine from OpenSky, and am not being compensated for telling you about it. I just thought it was cool. See, you lay your stuff on it...

...then pull the drawstring closed! That's it! No wondering how such-and-such is going to fit in it, or how on Earth you managed to get whatchamadingle in there the first go-round. Just toss in the stuff and pull. Plus, there are little zippered and velcro pockets for extra-valuables, like jewelry or contacts.

It's not huge, either, so it won't take up much space in the suitcase. For reference, the little red doohickies sticking out from underneath are the corners of a Netflix envelope.
I don't recommend it for toiletries, since they can leak, but for makeup, it's a dream. 9 out of 10.
*or music festival, or art festival, or film festival, or frisbee golf, or picnic, or camping, or flea market, or antiquing, or hiking, or...well, you get the drift.
Friday, July 6, 2012
Frugal Friday: Discount Rockstar (Featuring NYX Crimson Amulet Palette)
Today, just for fun, I thought I would try a look using almost exclusively drugstore (or the drugstore side of Ulta, anyway) products. It's hot and sticky and gross outside, so I went with a sleek ponytail hairstyle with a smoky brown eye. I hope you guys like it. (And please be kind about my photography and how messy my car is. Thank you, The Management)


 |
| Shirt: Old Navy. Necklace: Soixante Neuf for Open Sky. Earrings: JewelMint. Car: Hurricane Erin. |
The ponytail is the easiest thing in the world. Blow-dry your hair as straight as you can get it (I like to use a good leave-in conditioner/heat protectant first), then run a little Fekkai Glossing Cream throughout. Gather up your bangs/front section, and tease the underside for a little height and pin in place or use a barrette. Then create a ponytail, as usual, and slick down any flyaways with a little Pantene Classic Hairspray. If you want to fancy it up a bit, wrap a lock of hair around the ponytail and secure in place with a bobby pin.
The makeup isn't much more difficult. Start with E.L.F. Tinted Moisturizer, then grab your NYX Crimson Amulet palette (if you don't have one, see if you can still snap one up. It's one of my absolute essentials, now) and pop a little HD Eye Primer on each lid and blend up to the to the brow. I like to add a little under each eye, as well.

Next, you're going to need the bottom half of the eyeshadow palette. Going left to right, the second shade on the bottom row is your all-over color. The third shade on the top row goes in your crease. The second shade on the top row goes in your outer corner, adds further definition to the crease, and runs under the lower lashes. Finally, the dark brown shade that's second on the middle row completely lines your eyes--upper lashes, lower lashes, and inner corners. Wing it out a bit on the outer corners. For the waterline and a little added definition, I used Urban Decay's 24/7 Glide-On Pencil in Whiskey. It's not bargain, but it's all I had. Your brown and inner corner highlight is the first shade on the bottom row.
I pulled out the only other high-end product in this look, next. I used Benefit's Boi-ing Concealer to clean up around the eyes and cover blemishes and redness. Again, it's pretty much all I had, outside of my film kit. E.L.F.'s Eyebrow Kit in Medium filled in and defined my brows, and a coat of Maybelline Falsies waterproof mascara coated top and bottom lashes.

Alrighty! On to the rest! Apply the matte pink shade at the very top of your NYX Crimson Amulet palette to your cheeks, starting about an inch away from your nose. You don't want too much on the apples. Then dust the highlighter on the cheekbones. Finish the look with a swipe of Revlon's Just Bitten Kissable Balm Stain in Honey on the lips.
I hope you have a fantastic weekend!
Friday, May 25, 2012
Frugal Friday: Window Shopping Challenge!
Happy Friday-Before-A-Three-Day-Weekend!! Major sales happening over the next few days. I won't bore you with those, since they'll all but slap you in the face if you're out and about. Instead, here's the scoop on some extra special savings that you might not know about. Let's get to it!
TooFaced: Free Shipping all weekend with code THANKYOU12. Exp. 5/28.
Sally Beauty Supply: Take an extra 50% off all red tag clearance with code 555100. Exp. 5/28.
Bath and Body Works: $1 Shipping on orders over $25 with code MEMORIAL25. Exp. 5/28.
Question: has anyone here ever paid full price for anything at Aeropostale? That store seems to be in a state of perpetual clearance, and that's just fine and dandy, dandy and fine with me. Today, I looked and about half the store was 70% off. Just for giggles, I hopped on Polyvore and gave myself a challenge: put together a Memorial Day BBQ outfit for under $50, using only Aeropostale items. Here's what I came up with:

Not bad, if I do say so, myself. Dress, shoes, bag, and two accessories (that ring is precious, and I like the way the curve in the sunglasses mimics the curve in the bodice), and the total came to $44.10. For coming in so far under the imaginary budget, I imaginarily treated myself to an imaginary lip gloss, bringing the final bill to $49.60. Heck, I'm so proud of myself, I may go try this on at the real Aeropostale this weekend. You can't beat twelve bucks for a dress.
I hope you all have a truly wonderful holiday, and please take a moment to remember the reason for the day. See y'all next week! If you're interested in any of the products mentioned, there are links below. Bye!


TooFaced: Free Shipping all weekend with code THANKYOU12. Exp. 5/28.
Sally Beauty Supply: Take an extra 50% off all red tag clearance with code 555100. Exp. 5/28.
Bath and Body Works: $1 Shipping on orders over $25 with code MEMORIAL25. Exp. 5/28.
Question: has anyone here ever paid full price for anything at Aeropostale? That store seems to be in a state of perpetual clearance, and that's just fine and dandy, dandy and fine with me. Today, I looked and about half the store was 70% off. Just for giggles, I hopped on Polyvore and gave myself a challenge: put together a Memorial Day BBQ outfit for under $50, using only Aeropostale items. Here's what I came up with:
I hope you all have a truly wonderful holiday, and please take a moment to remember the reason for the day. See y'all next week! If you're interested in any of the products mentioned, there are links below. Bye!
Thursday, May 17, 2012
Sitting Pretty In Express Check-In
Summer Vacation! Sign me up! Right now, all I want to do is put on a swimsuit (and a cover up! Dear God!), slather on some sunscreen, grab a margarita and listen to crashing waves. Honestly, I can't think of anything in the world I'd rather do than just that. Lucky for me, I live 45 minutes from a gorgeous beach, so all I have to do is toss a cooler and towel in the trunk of my car and drive off into the sunshine. However, I know that's not the case for everyone. Some of you might even have to *gasp* brave air travel to get your beach on. Since Memorial Day is around the corner, and no one wants to have to check a bag if they can avoid it, here are my top purse-sized makeup palette choices to get you through the long weekend with no muss, no fuss, and hopefully, no strip searches*.
Okay, I picked five palettes that will not only take care of all of your color needs, but will also fit neatly inside your purse or beach bag for touch-ups. The only other things you might want to toss in your quart-sized Ziploc are a Garnier BB Cream (super-cheap and works great!), a waterproof mascara (, and maybe a liner (I like Urban Decay 24/7 Shadow Pencil in Rehab for a natural, beachy look. Milani also has a drugstore dupe that's almost spot on). I don't even think I'd bother with powder, considering the humidity. Seriously, what would even be the point? But, of course, that's up to you. To keep your money handy for souveniers and mai tais, these are all under $30.
The next one is also $12.99, but that's its regular price. NYX Natural Look Kit in Nude On Nude contains nine neutral shadows and two pink-toned glosses, which could also double for cheek color (that's me talking, not NYX). I have not had the opportunity to test the kit out, but from my experience and research, this is a great deal on some quality products. There are several variations of this kit out there, but this bronzey-brown kit is my pick to look like a golden goddess over Memorial weekend.
Stila puts out some fantastic travel kits, and they're all very reasonably priced. Not So Nude may be the best-looking one they've had, to date. I say best-looking because I (again) haven't gotten to personally play with it, but if it's anything like their other kits, it's a winner. For only $20, you get six shadows (and I adore Stila shadows. They're like shimmery butter), an all-over highlight in cult-fave Kitten, and a convertible color for cheeks and lips in Lily. Again, it's perfect for a natural, carefree look.
Happy Trails, and bring me back a daiquiri!
*Please check all TSA Rules before packing any liquids or gels in your carry-on. Rules can change, and I don't want anyone to get in trouble. Thanks!
Okay, I picked five palettes that will not only take care of all of your color needs, but will also fit neatly inside your purse or beach bag for touch-ups. The only other things you might want to toss in your quart-sized Ziploc are a Garnier BB Cream (super-cheap and works great!), a waterproof mascara (, and maybe a liner (I like Urban Decay 24/7 Shadow Pencil in Rehab for a natural, beachy look. Milani also has a drugstore dupe that's almost spot on). I don't even think I'd bother with powder, considering the humidity. Seriously, what would even be the point? But, of course, that's up to you. To keep your money handy for souveniers and mai tais, these are all under $30.
 |
| Photo Credit: Twilight Beauty |
The teeniest of the bunch is the itty-bitty Luna Twilight (yes, that Twilight) Color Palette in Rosalie. It's, literally, the size of a credit card. Ultra-thin and lightweight, you'd never guess that it has two shadows (peachy champagne and a soft almost-tangerine), a peach lipstick, apricot gloss, and a good-sized blusher that rivals Benefit Coralista. I haven't reviewed this palette, for some odd reason, but I've played with it for a little while now, and think it makes one of the most beautiful, natural-looking makeups I've ever worn. The colors melt into your skin, making it seem as if you just naturally look this gorgeous. I'll be 32 in about three weeks, and, I swear, this makes me look more like I'll be 22. Can't say enough good about it. My only complaint: I wish you could buy the colors in larger sizes, as well. $28, and other characters are available. If that's a little steep for you, click this link to go to a discount site. It's only $12.99 there, and not a knock-off or anything shady like that.
 |
| Photo Credit: Kaboodle |
 |
| Photo Credit: Musings of a Muse |
 |
| Photo Credit: Sephora |
This Sephora Collection Mini-Bag Makeup Palette is too adorable for words! I have seen this little $15 wonder up-close, and it's just darling. You get nine high-quality shadows in a range similar to the original UD Naked palette, four pretty glosses that range from nude to deep berry, and a lovely blush that reminds me of Avon Classic Aura (one of my favorites). When closed, the kit resembles a Sephora shopping bag, complete with logo and a little red handle.
 |
| Photo Credit: TooFaced |
Lastly, and my favorite of the group, the TooFaced Glamour To Go Palette. This $22 pack of awesomeness comes with eight creamy shadows, a good-sized bronzer and blush duo, and a lovely transluscent pink gloss. The kit is also just as cute as can be, and closes down to about the size of a smartphone, give or take. Out of the five, this would be my pick, if only because of the included bronzer. You can do a lot with a good bronzer, and TooFaced makes some of the best, in my opinion.
Happy Trails, and bring me back a daiquiri!
*Please check all TSA Rules before packing any liquids or gels in your carry-on. Rules can change, and I don't want anyone to get in trouble. Thanks!
Subscribe to:
Posts (Atom)
